
As an Amazon Associate I earn from qualifying purchases. All claims are strictly my personal opinion.
My top pick

DEWALT DWE6423K 5-Inch Random Orbital Sander
Variable speed from 8,000 to 12,000 OPM lets you run gently on thin veneer, and the dust port connects to a vacuum for MDF.

Sanding plywood without going through the veneer means staying at 120 to 180 grit, using a random orbital sander held flat, and letting the weight of the tool do the work. MDF is the opposite problem: the factory face is already smooth and needs only a light pass with 220 grit, while the cut edges soak up paint and need sealing and sanding before any color goes on.
Below is how plywood and MDF differ, how thin the face veneer really is, a step-by-step method for plywood faces and edges, how to sand and seal MDF, why MDF dust needs real extraction, and the sander and abrasives I’d put on the bench for both.
⚡ Quick Answer
Plywood: start no coarser than 120 to 150 grit on a good face, finish at 120 to 150 for paint or 150 to 180 for stain, and keep the sander moving. A 5-inch random orbital sander with a dust bag is the right tool.
MDF: 220 grit on the face, 120 then 220 on the cut edges, then seal the edges before paint. Wear a respirator and use extraction.
Never: press down, let the pad sit still, or start a thin-veneer panel with a coarse grit.
Plywood vs MDF at a Glance
Both are sheet goods, but they behave differently under a sander. Plywood is layers of real wood veneer glued with the grain crossing from layer to layer, so the outer layer is a thin skin of actual wood. MDF (medium-density fiberboard) is wood fiber and resin pressed into a uniform board with a dense, smooth surface and a softer core.
| Question | Plywood | MDF |
|---|---|---|
| Main risk | Sanding through the face veneer to the glue line or the layer below | Cutting through the dense skin into the softer core, and fuzzy edges |
| Face grit range | About 120 to 180, finer on thin hardwood faces | 220, one light pass |
| Edges | Visible layers, voids and splinters; edge band or fill | Exposed fiber that drinks primer and paint; seal first |
| Stain it? | Yes, with care on blotchy veneers | No, it is a paint-grade material |
| Dust | Normal wood dust; collect it anyway | Very fine; mask or respirator plus extraction |
How Thin Is Plywood Veneer?
Thinner than most people expect. Woodworking Advisor’s plywood guide puts face veneers at roughly 0.3 mm on economy panels up to 1.5 mm on premium hardwood-faced sheets, and its grade table lists about 1.0 to 1.5 mm for A-grade faces, 0.8 to 1.0 mm for B-grade and 0.5 to 0.8 mm for C-grade. Those are one site’s figures, not a standard, and the actual thickness of your sheet depends on the maker and the species. The practical lesson doesn’t change: on a thin face, a few seconds of coarse paper in one spot can remove it.
What Sanding Through Looks Like
Burn-through shows up as a patch of different color or grain where the cross-grain layer underneath is exposed. On hardwood-faced sheets the lower layer is usually a different, plainer wood, so the patch stands out as soon as you stain or varnish. You can’t sand it back; a patch means veneer repair or a painted finish.
Where It Happens Most
- Edges and corners of the panel, where the pad overhangs and pressure concentrates.
- Spots where the sander sits still while the pad is spinning.
- Machine-sanded, already thin faces that don’t need much more than a scuff.
- Coarse starting grits used to chase a mark that a finer grit would have handled.
Sanding Plywood Step by Step
Sanding plywood is mostly about restraint. The factory has already sanded the face; your job is to take off pencil marks, glue squeeze-out and any raised grain, then leave a surface that accepts finish evenly.
- Check the face first. Run your hand over it and look at it in raking light. If it’s already smooth, you may only need one pass with 180 or 220.
- Remove glue and marks by hand. Scrape dried glue or sand a small spot with a block rather than using the machine on a big area.
- Start at 120 to 150 grit. Woodworking Advisor suggests starting around 150 on A-grade faces and not going coarser than the veneer allows on thinner grades. When in doubt, begin finer.
- Use a random orbital sander, flat on the panel. The random orbit avoids the straight scratch lines a belt or straight-line sander leaves. Keep the pad fully on the surface and keep it moving; don’t tilt it onto its edge.
- Let the weight of the tool do the work. Woodworking Advisor says that on thin-veneer plywood the tool’s weight alone is enough. Pressing harder removes veneer faster, not better.
- Stop at 180 for stain, 120 to 150 for paint. The same guide says to stop at 180 grit maximum for staining, and for paint to finish at 120 to 150 and fill the grain with a diluted coat of primer before the topcoat.
- Vacuum and wipe. Remove all dust before finishing. Dust left in the grain turns into dark flecks under stain.
If you need a refresher on how grit numbers map to jobs, my guide to what grit sandpaper to use on wood covers the sequence, and how to sand wood walks through the technique from rough lumber to finish.
Which Sandpaper for Plywood?
Aluminum oxide or ceramic discs in 120, 150 and 180 cover almost every plywood job. Keep a few fresh 220 discs for the last pass on a veneer you plan to clear-coat. Dull paper tempts you to press harder, which is the exact move that burns through, so change discs sooner than feels necessary.
Which Sander for Plywood?
A 5-inch random orbital sander with variable speed is the best match: it’s gentle at low speed, it leaves no straight scratches and it takes standard hook-and-loop discs. A quarter-sheet sander is fine for small panels and tight corners. A belt sander is the wrong tool for a veneer face. If you’re shopping, my best random orbital sanders roundup compares the field.
⚠️ Important
Turn the speed down on thin faces. A lower speed setting removes material more slowly, which gives you time to notice a problem before the veneer is gone.
Plywood Edges
The face is only half of the job. The edge of a sheet shows every layer, and it’s where voids, splinters and torn veneer collect. How you treat it depends on the finish.
Edge Banding
Iron-on or glue-on edge banding hides the layers and gives you a clean strip to finish with the face. Woodworking Advisor notes that iron-on banding needs no drying time and works best on long, straight edges where the strip lies flat. After applying it, trim the overhang flush and ease the sharp corner with a light pass of 180 to 220 grit on a block.
Sanding Bare Edges
- Use a rigid block, not a soft pad. Woodworking Advisor says to sand parallel to the edge, not across it, with a firm block.
- Sand inward at the corners, toward the middle of the panel, so you don’t lift the face veneer.
- Start at 100 to 120 grit, fill voids with a water-based filler, then finish at 150 to 180.
Filling Voids
Fill gaps in the plies with a filler that suits the finish, let it dry fully and sand it flush with the same block. If you’re picking a product, my best wood filler guide compares the options for paint-grade and stain-grade work.
Sanding MDF
MDF is easier on the face and harder on the edges. The factory surface is dense and flat, so there’s little to remove, and heavy sanding does damage: Woodworking Advisor warns that it can cut through the dense skin into the softer core.
The Face
- Start with 220 grit and keep the pass light, just enough to knock off the sheen and any marks.
- Skip coarse grits entirely. They cut the skin and leave a surface that primer will swell.
- After the primer dries, go over it again with 220 to 320 grit to level any raised fiber.
The Cut Edges
The exposed core takes up primer and paint faster than the face, and a water-based first coat can swell it into a fuzzy line. Sand the edges with 120 to remove saw marks, then 220, using a flat block so you don’t round the corners unevenly. Ease the sharp corner very lightly; MDF edges chip easily.
Routed Profiles
Profiled edges (ogee, roundover, bevel) can’t be sanded flat. Use a flexible foam sanding block or folded paper in 220, and use seal-and-sand cycles instead of sanding hard: a thin coat of sealer, a light sanding with fine paper, then another coat.
Sealing MDF Edges Before Paint
This is the step that decides whether MDF looks professional or fuzzy. Raw edges drink paint, and a sealing layer stops them from swelling.
Diluted PVA Glue
Woodworking Advisor’s guide suggests mixing one part PVA wood glue to three parts water and brushing on a thin coat. It’s the cheapest option, but each coat needs 2 to 4 hours to dry and most edges need two or three coats. Sand lightly between coats with 320 grit; anything coarser can cut through a thin sealant coat.
Shellac or Sanding Sealer
A shellac-based primer or sanding sealer is the faster route. The same guide says shellac primer dries hard in 30 to 45 minutes and locks down loose fibers in a single coat, and recoating doesn’t lift the first layer. For a closer look at how sealers work and when they help, see my guide to sanding sealer.
Primer Order
- Prime the edges first with one wet coat, then the faces.
- Let the primer dry, then sand lightly with 220 to 320 grit to flatten raised fiber.
- Apply the final coats of paint and let the last coat cure; Woodworking Advisor suggests a full 24 hours before installing or handling to avoid trapped moisture and blistering.
Dust: MDF Needs Extraction
MDF dust is much finer than ordinary wood dust. Woodworking Advisor advises a dust mask or respirator while sanding, then vacuuming and wiping with a tack cloth or a barely damp microfiber before priming. I’d go further and treat MDF as a job for the dust collection port, not a loose dust bag in the open air.
- Connect the sander to a vacuum. My roundup of the best dustless sanders covers sanders that are built for it.
- Wear a respirator that’s rated for fine particles. See my guide to the best respirator for woodworking for how to choose one.
- Work outdoors or with ventilation where you can, and keep the dust away from living space.
The Tools I’d Use
The product facts below come from the makers’ pages or Amazon listings where I could open them; where I couldn’t, I say “not stated” rather than guess. I don’t show customer ratings or prices, which change daily.
DEWALT DWE6423K 5-Inch Random Orbital Sander
Best for Plywood Faces
DeWalt lists the DWE6423K as a 5-inch corded random orbital sander with a 3.0 amp motor and variable speed from 8,000 to 12,000 orbits per minute. It uses a hook-and-loop pad, comes with a locking dust bag, and the dust port fits DeWalt’s DWV010 and DWV012 dust collectors, with the DWV9000 connector adapting it to other vacuums with 1-1/4 inch hoses. The variable speed is what matters for veneer: you can run it low and let it cut gently.
- ✅ Variable speed for thin veneer
- ✅ Hook-and-loop pad takes standard discs
- ✅ Dust port connects to a vacuum
- ❌ The bag alone isn’t enough for MDF dust
Best For: Plywood faces and MDF panels when connected to a vacuum.
Bosch ROS20VSC 5-Inch Random Orbit Sander

Best Alternative Random Orbital Sander
The ROS20VSC is the other random orbital sander I’d put next to the DeWalt. Bosch lists a 2.5 amp motor, variable speed from 7,500 to 12,000 OPM, a 5-inch hook-and-loop pad, a pad dampening brake meant to help prevent swirl marks, and on-board dust filtering. The low end of that range is where I’d run it on a thin face.
- ✅ Random orbit action suits veneer
- ✅ Variable speed down to 7,500 OPM
- ❌ On-board filtering is no substitute for a vacuum on MDF
Best For: Shoppers who want a second 5-inch option to compare.
Mirka Gold Multifit Sanding Discs

Best Discs for Fine Finishing Passes
Mirka Gold is a line of sanding discs, and the Multifit name refers to a hole pattern designed to fit different pads. The box linked here is 5-inch, 120 grit, 50 discs, the grit to start a good plywood face; for the MDF face, the same line comes in 220 grit.
- ✅ Multi-hole pattern for dust extraction
- ✅ Replaceable discs for every stage
- ❌ 5-inch only; 6-inch sanders need another size
Best For: The last passes on veneer and MDF where a clean scratch pattern matters.
3M Aluminum Oxide Sandpaper Assortment
Best for Hand-Sanding Edges
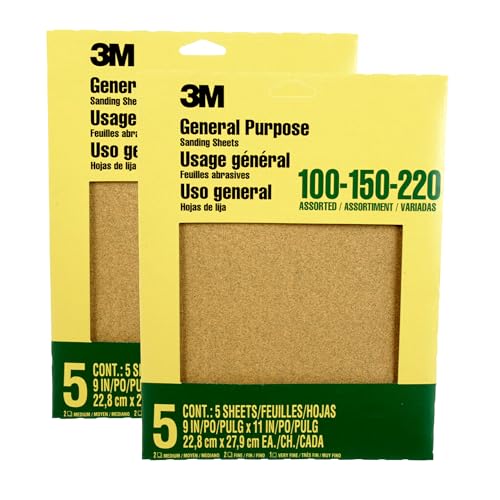
For plywood and MDF edges, hand sanding on a rigid block is safer than a machine. This listing is a 2-pack of the 3M 9005NA assortment, each pack holding five 9 by 11 inch aluminum oxide sheets in 100, 150 and 220 grit, which covers the edge sequence: 100 for saw marks on plywood, 150 to finish them, 220 for MDF edges. Wrap a sheet around a flat block and sand parallel to the edge.
- ✅ Works wrapped on a rigid block
- ✅ Handy for edges and corners
- ❌ Only ten sheets across three grits; buy more of the grit you use most
Best For: Easing edges and blending filler by hand.
3M 7502 Half Facepiece Respirator

Best for MDF Dust
MDF is the job where a paper dust mask is least convincing, so I’d reach for a reusable half-facepiece respirator. The 3M 7502 is the model I’d start from. The listing linked here is the NIOSH-approved facepiece in size medium; the filter type is not stated here, so confirm on the listing which particulate filters you need and whether they are included, and check the fit before relying on it.
- ✅ Reusable, so a better habit than disposable masks
- ✅ Suits long MDF sanding sessions
- ❌ Medium size only in this listing; filters to check
Best For: Anyone sanding MDF regularly.
How I Put This Guide Together
The grit, veneer and edge advice comes from Woodworking Advisor’s guides to sanding plywood, sealing MDF and sealing MDF edges, which I read for this article and attribute above because the figures are one site’s, not a standard. The sander facts come from the DeWalt and Bosch product pages, and the abrasive and respirator details from the Amazon listings. Where a source didn’t say, I wrote “not stated”. I don’t show customer ratings or prices. More on how I choose the products I recommend.
🏆 The Verdict
For plywood, a variable-speed random orbital sander like the DeWalt DWE6423K, 120 to 180 grit, a flat pad and no pressure will keep the veneer intact. For MDF, go light on the face with 220, seal the edges before paint, and protect your lungs with extraction and a respirator.
❓ Frequently Asked Questions
What sandpaper is best for plywood?+
Does plywood need to be sanded?+
What sander is best for plywood?+
What sandpaper do you need for MDF?+
How do I sand MDF before painting it?+
Conclusion
Plywood and MDF both reward a light touch. On plywood, protect the thin face: fine grit, flat pad, low pressure. On MDF, protect the edges and your lungs: seal before paint and extract the dust. For the wider picture on abrasives and technique, see how to sand wood and the wood grit guide.

