
As an Amazon Associate I earn from qualifying purchases. All claims are strictly my personal opinion.
Yes, you can sand pressure-treated wood, as long as it is dry and you control the dust. Sand only once the boards pass a water sprinkle test (or read below 15% on a moisture meter), use 60 to 80 grit for decks and fences and stop at 120 before paint, and wear a dust mask and goggles, outdoors. The treated-wood industry’s own handling sheet says exactly that: wear a dust mask and goggles when cutting or sanding, wash your hands after, and never burn the sawdust or offcuts.
Below is what changed when arsenic-based treatment left the residential market, when wet lumber is ready, which grit to use for each job, a step-by-step method, and the few tools that make sanding pressure-treated wood quick and clean.
⚡ Quick Answer
When: only when water soaks in instead of beading, or a moisture meter like the General Tools MMD4E reads below 15%. Kiln-dried after treatment (KDAT) lumber is ready right away.
Grit: 80 for fuzz, mill glaze and the grade stamp; 60 for rough, splintered boards; 100 to 120 before paint. Not finer than 80 to 120 before a penetrating stain.
Safety: dust mask (a P100 half mask is better) and goggles, sand outdoors, sweep up and bin the dust, wash your hands and wash work clothes separately. Never burn treated wood or its sawdust.
Can You Sand Pressure-Treated Wood Safely?
Pressure-treated lumber is wood that has had a liquid preservative forced deep into its cells in a pressure cylinder, so it resists rot and insects outdoors. Sanding it is normal practice: decks, fences, railings and raised beds made of treated pine are sanded to take off splinters, fuzz and old finish all the time. What makes it different from sanding untreated pine is the dust, which carries some of the preservative, and the moisture, because freshly treated boards are often still wet when you buy them.
Today’s Treated Lumber Is Not the Old Green Arsenic Wood
For decades, most outdoor residential lumber in the US was treated with chromated copper arsenate (CCA). The EPA says that effective December 31, 2003, the CCA manufacturers voluntarily cancelled virtually all residential uses, including decks and children’s playsets. The preservatives that replaced it are copper-based, such as ACQ (alkaline copper quaternary) and copper azole, and the EPA notes that ACQ is now the most widely used residential wood preservative and that these water-based treatments leave a dry, paintable surface.
That matters for sanding. Health Canada points out that decks, fences and playground structures built before 2004 are likely to be CCA-treated, and that coatings on them can chip or flake, so scraping or sanding them increases exposure to the arsenic in the wood. If your deck is older than that, keep sanding to a minimum, never sand it indoors, and dispose of the dust the way your local rules require. For new lumber from a home center, the same basic precautions apply, just with far less at stake.
What the Treated-Wood Industry and Regulators Say
The Western Wood Preservers Institute’s safe handling guidance, the National Pesticide Information Center at Oregon State University and Health Canada agree on the same short list:
- Wear a dust mask and goggles when cutting or sanding (Health Canada adds gloves and long sleeves).
- Work outdoors where you can, so the fine dust doesn’t settle inside.
- Wash your hands with soap and water after handling treated wood, and before eating, drinking or smoking.
- Wash work clothes separately from the household laundry.
- Clean up sawdust and offcuts and dispose of them with household trash under local rules; don’t compost them or use them as mulch.
- Never burn treated wood, sawdust included, in a fire pit, stove or fireplace.
A paper dust mask meets the letter of that advice. A half-mask respirator with P100 filters, like the GVS Elipse P100 below, seals much better around the face and is the better choice for a whole deck. My guide to the best respirators for woodworking explains the filter classes.
Does Sanding Ruin Pressure-Treated Wood?
No. A sanding pass takes off a thin surface layer, the same layer that weathering greys and erodes anyway, and the preservative is in the wood, not painted on top of it. The Western Wood Preservers Institute even recommends a light sanding to remove the grade stamp from visible boards. What does need attention is fresh, untreated-looking wood exposed by cutting: the same guidance says to treat all field-cut ends and drilled holes with a brush-on preservative such as copper naphthenate, which is sold at home centers. If you plane a board heavily or sand deep into a cut end, give it the same brush-on treatment.
⚠️ Important
Never burn pressure-treated wood or the sawdust from sanding it, not even a small amount in a fire pit. The EPA, Health Canada and the treated-wood industry all say the same thing: burning it releases the preservative chemicals in the smoke and ash. Bag the dust and put it in the trash.
When to Sand New Pressure-Treated Wood
The most common mistake isn’t sanding treated wood, it’s sanding it too soon. Lumber that’s still wet from treatment clogs sandpaper in seconds, tears instead of cutting and raises more fuzz than it removes. And whatever you plan to put on afterwards, stain or paint, won’t soak in or stick until the wood dries.
The Sprinkle Test
YellaWood, a treated-lumber brand, and Benjamin Moore both recommend the same quick check: sprinkle a few drops of water on the boards. If the water beads up, the wood is still too wet (or has a mill glaze) and isn’t ready; wait several days and test again. If it soaks in, the wood is dry enough to sand and finish. Test in sun and in shade, on more than one board, because they dry at different rates.
Use a Moisture Meter for a Real Number
A pin moisture meter takes the guesswork out. YellaWood says the wood’s moisture content should ideally be below 15% before staining, and Defy, a deck stain maker, asks for 12% to 15% or less. That’s also a good point to start sanding: the fibers cut cleanly instead of matting. Push the pins in along the grain and take several readings across the deck, then average them.
How Long to Wait Before Sanding Pressure-Treated Wood
There’s no fixed number of weeks, because it depends on your climate, the season and how wet the lumber was. YellaWood notes that the old rule of thumb was to wait six months or even a year, and that with today’s treatments you’ll ideally stain within six weeks after construction, as long as the wood is sufficiently dry. Let the sprinkle test or the meter decide, not the calendar, and if you can’t wait, buy KDAT lumber.
KDAT Lumber Is Ready Right Away
Kiln-dried after treatment (KDAT) boards go into a kiln after the preservative is applied, which brings them back to their original moisture content. YellaWood says KDAT products need to be stained, painted or sealed immediately after installation, so there’s no wait at all. It’s a step up from standard treated lumber and not every yard stocks it, but if you’re building furniture or a project you want to finish the same weekend, they’re the only treated lumber that lets you sand and finish straight away.
What Grit to Sand Pressure-Treated Wood
Treated pine is a softwood, and on a deck or fence the goal is a surface that’s smooth enough not to splinter but open enough for stain to soak in. That’s why the grits stay coarse. These ranges follow the deck prep guidance from Benjamin Moore (80 grit after cleaning) and TWP’s stain help desk (not finer than 60 to 80 grit before their stain).
| Job | Grit | Notes |
|---|---|---|
| Rough, splintered or weathered boards | 60 | Follow with 80 if the sander leaves visible swirls |
| Raised grain, fuzz, mill glaze | 80 | One pass after the boards are dry |
| Grade stamp and pencil marks | 80 | A light pass usually takes it off |
| Before a penetrating deck or fence stain | 60 to 80 | Finer grits close the surface and the stain sits on top |
| Before exterior paint or solid stain | 80, then 100 to 120 | Smooth enough for an even film, still has tooth |
| Handrails, benches, outdoor furniture | 80, then 120 | Anything hands and legs touch; round over the edges |
For deck boards specifically, my guide on how to sand a deck has the full grit table, and the sandpaper grit chart covers every other material in your project.
Why Not Sand Finer?
On bare wood that will get a penetrating stain, a finer grit isn’t a better finish, it’s a worse one. Sanding to 150 or 220 burnishes the surface, so a stain made to soak in stays on top and wears off unevenly. TWP’s help desk tells customers who sanded finer than 60 to 80 grit to let the wood weather for a month or two before staining. Paint and solid stains form a film, so they tolerate 120, but there’s still no reason to go finer outdoors.
How to Sand Pressure-Treated Wood, Step by Step
- Check that it’s dry. Sprinkle test or moisture meter, on several boards in sun and shade.
- Clean first if it’s an old deck. Wash off dirt, mildew and loose finish, then let it dry for at least 48 hours, the wait Benjamin Moore gives after cleaning. Sanding a dirty deck only grinds grit into the wood and kills the paper.
- Set nails and screws. Punch any proud nail heads below the surface and drive screws flush, or they’ll tear discs and belts.
- Put on your mask, goggles and gloves, and keep children and pets away from the work area.
- Connect dust collection. A shop vac or extractor on the sander catches most of the dust before it spreads; otherwise, the sander’s own canister or bag.
- Sand with the grain at 60 or 80 grit. Keep the sander flat and moving, with light pressure. On a deck, work one board at a time, end to end, so you don’t leave lap marks.
- Do the edges and spaces by hand. A folded sheet or a sanding sponge reaches between balusters and along board edges where a sander can’t.
- Step up only if you’ll paint. For paint or solid stain, go over the boards once more at 100 or 120.
- Clean up the dust. Vacuum or sweep the boards, the ground below and your clothes. Bag the dust and put it in the trash, never in compost or a fire.
- Treat any cut ends you exposed while building with a brush-on preservative, then finish within the window your stain or paint maker gives.
💡 Pro Tip
If an 80 grit disc turns into a gummy, shiny pad within a minute, stop. The wood is still too wet, and you’ll go through a box of discs and still get fuzz. Wait a few dry days and test again.
Sand or Power Wash a Deck?
They do different jobs, and most decks need both. Washing (with a deck cleaner and a garden hose or a pressure washer on a gentle setting) removes dirt, mildew and grey weathered fibers. Sanding takes off what washing leaves behind: the raised grain and fuzz that washing itself causes, splinters, mill glaze and the last of an old finish. So on an old deck the order is clean, dry, then sand. On a new deck of dry treated lumber, a light sanding to break the mill glaze and remove the grade stamps is usually all it takes before the first coat.
For a large deck, a sander built for decks saves hours over a 5″ palm sander. And once the boards are sanded, the deck stain calculator tells you how much stain to buy.
Should You Sand Pressure-Treated Wood Before Painting or Staining?
Before Staining
On new, dry lumber, sand lightly at 80 grit if the sprinkle test shows beading from mill glaze, if there’s fuzz, or to remove grade stamps; otherwise you can skip it. On older decks, sanding after cleaning gives the stain an even, open surface to soak into. Always follow the stain maker’s directions: they decide the grit, the wait after cleaning and the moisture limit.
Before Painting
Paint needs a clean, dry and slightly rough surface to grip. Sand at 80 and then 100 to 120, remove all the dust, prime with an exterior primer and paint. Painted treated wood is a film finish: it will peel if the wood was still wet underneath, so the moisture check matters even more than for stain.
What You Need
You don’t need special tools for treated wood, just the usual sanding kit plus the two things that keep this job safe and on schedule: a moisture meter and a proper mask. The specs below are the makers’ own, from each product’s listing.
Bosch ROS20VSC 5″ Random Orbital Sander

Best All-Round Sander for Treated Wood
A 5″ random orbital sander handles railings, steps, planters and furniture, and a small deck if you’re patient. Bosch’s ROS20VSC has a 2.5 amp motor with variable speed from 7,500 to 12,000 OPM, hook-and-loop discs, and a microfilter canister that Bosch says traps particles down to half a micron, plus a vacuum adapter for a shop vac, which is what you want with treated-wood dust. My full Bosch ROS20VSC review goes through it in detail, and the best random orbital sanders list has bigger and cordless options.
- ✅ Variable speed for softwood
- ✅ Microfilter canister and vacuum adapter
- ✅ Light enough for railings and steps
- ❌ Slow on a whole deck: see the deck sanders
Best For: Railings, stairs, benches, planters and small decks.
Diablo 5″ 80 Grit Hook and Lock Sanding Discs, 50-Pack
Best Discs for Pressure-Treated Wood
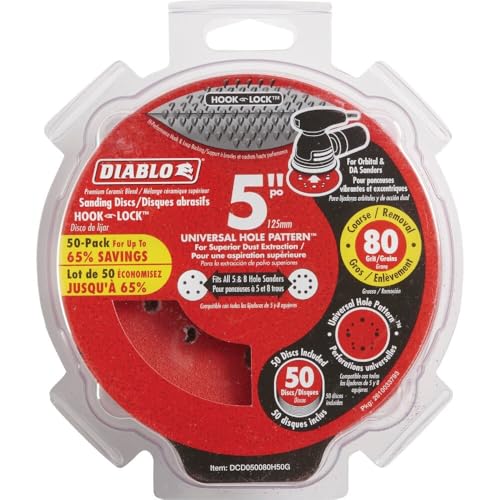
80 grit is the grit you’ll use most on treated lumber, so buy it in a box. Diablo’s 5″, 80 grit discs come 50 to a pack, use a ceramic abrasive made for leveling and heavy stock removal, and have a universal hole pattern that fits 5- and 8-hole sanders. A coarse, aggressive disc is what you want on soft, resinous pine, which loads finer paper quickly. For the rest of the range, see the best sanding discs for random orbital sanders.
- ✅ 50 discs in the grit you need most
- ✅ Fits 5- and 8-hole pads
- ✅ Ceramic grain made for heavy removal
- ❌ One grit only: buy 120 separately for paint prep
Best For: Fuzz, mill glaze, grade stamps and stain prep on decks and fences.
GVS Elipse P100 Half Mask Respirator

Best Mask for Sanding Treated Wood
The guidance asks for a dust mask; a sealed half mask does the job properly. The GVS Elipse P100 is a NIOSH-approved P100 respirator (approval TC-84A-6949) with replaceable filters, a soft latex- and silicone-free facepiece and a low profile that leaves room for goggles. It’s the editor’s choice in my best respirator for woodworking guide for the same reasons.
- ✅ P100, NIOSH approved
- ✅ Compact, fits under goggles
- ✅ Filters are replaceable
- ❌ Particles only: not for solvent stain fumes
Best For: A full day of sanding a deck, fence or old CCA lumber you have to touch.
General Tools MMD4E Pin Moisture Meter

Best Way to Know When the Wood Is Ready
The sprinkle test tells you yes or no; a meter tells you how close you are. The MMD4E is a pin meter with a 5% to 50% range for wood, a backlit display, a hold button, low, medium and high moisture tones, and spare stainless steel pins. Its cap doubles as a calibration check. Take readings on several boards and wait until they’re under 15%.
- ✅ Reads 5% to 50% in wood
- ✅ Spare pins and calibration cap
- ✅ Useful for firewood, drywall and leaks too
- ❌ Pins leave small holes: test on the underside
Best For: Deciding when new treated lumber is dry enough to sand, stain or paint.
How I Put This Guide Together
The safety advice comes from the EPA’s pages on wood preservatives and CCA, the Western Wood Preservers Institute’s handling and installation guidance, the National Pesticide Information Center and Health Canada. The drying, moisture and grit advice comes from treated-lumber and finish makers: YellaWood, Benjamin Moore, Defy and TWP. The products are on sale on Amazon today and their specs come from the makers’ listings; I don’t show customer ratings or prices, which change daily. More on how I choose the sanders I recommend.
🏆 The Verdict
You can sand pressure-treated wood whenever it needs it, as long as it’s dry (water soaks in, or under 15% on a meter), you use 60 to 80 grit for stain and up to 120 for paint, and you handle the dust properly: mask, goggles, outdoors, bag the dust, never burn it. A Bosch ROS20VSC with a box of 80 grit discs covers most projects, and a P100 half mask makes the job comfortable as well as safe.
❓ Frequently Asked Questions
Does sanding ruin pressure-treated wood?+
How do you make pressure-treated wood look good?+
Is it better to sand or power wash a deck?+
Is it okay to leave pressure-treated wood unpainted?+
How long should you wait before sanding pressure-treated wood?+
Can you sand pressure-treated wood with an orbital sander?+
Conclusion
Sanding pressure-treated wood is routine deck and fence work, not a hazard to avoid. Wait for dry wood, stay coarse, catch the dust and never burn it, and the boards will take stain or paint far better than they do straight off the lumber pile. If you’re refinishing a whole deck, start with how to sand a deck, and if you have questions about your own boards, ask in the comments.

