
As an Amazon Associate I earn from qualifying purchases. All claims are strictly my personal opinion.
Band saw this guide follows

A 14" steel-frame saw with a tension gauge, a guide post height scale and 13" of resaw height.

To use a band saw, fit a blade sized for the cut with the teeth pointing down toward the table, tension it, track it so it runs in the center of the wheels, and set the side guides and thrust bearings just clear of the blade. Lower the upper guide to about 1/8″ to 1/4″ above the wood, let the saw reach full speed, and feed the board slowly with steady pressure, hands to the side of the blade and a push stick near the end of the cut.
Below: the safety rules, the setup in the order the manufacturers give it, choosing a blade, your first rips, crosscuts, curves and resaws, and fixing drift. Setup numbers come from JET’s manual for its JWBS-14SFX and RIKON’s for its 10-305; blade limits from LENOX’s Guide to Band Sawing.
⚡ Quick Answer
Setup order: blade (teeth down, toward you), tension, tracking, side guides, thrust bearings, table square, guide height. Unplug the saw first.
Guide height: about 1/8″ to 1/4″ above the workpiece (RIKON), about 3/16″ on the JET.
Blade: narrow for curves, wide for rips and resawing; keep 6 to 12 teeth in the wood.
Cutting: full speed first, feed slowly, relief cuts before long curves, never back out of a cut with the blade running.
What You’ll Use
A band saw, the right blades, and two inexpensive accessories that keep your hands where the manuals want them. Specs come from the makers’ manuals, product pages and listings.
JET JWBS-14SFX 14″ Band Saw
The Band Saw This Guide’s Setup Follows
The setup steps below follow JET’s manual for this saw, because it gives every adjustment a real number. It’s a 14″ steel-frame saw with 13″ of resaw height, a 1.75 HP motor and a 116″ blade from 1/8″ to 3/4″ wide, plus a quick-release tension lever, a tension gauge, a tracking window, ball-bearing guides, a guide post with a height scale and a resaw fence. The blade is sold separately. Any band saw sets up the same way; if you’re still choosing one, my best band saw guide compares six.
- ✅ Tension gauge and quick-release lever
- ✅ Guide post with a height scale
- ✅ Resaw fence included
- ❌ Takes 116″ blades, not the common 93-1/2″
- ❌ Heavy: plan where it lives
Best For: Woodworkers who want a 14″ saw that handles curves and 13″ resaws.
POWERTEC 93-1/2″ Band Saw Blade Assortment

Three Blades for Curves, General Cuts and Resawing
This set gives you the three widths that cover nearly every job: a 1/8″ 14 TPI blade for tight curves, a 1/4″ 6 TPI blade for general curves and a 1/2″ 6 TPI blade for rips and resawing, all carbon steel. The catch is length: they fit saws that take 93-1/2″ blades, the usual size for 14″ cast-iron saws such as the JET JWBS-14CS, not the 116″ JET above. Check your manual before you order; POWERTEC also sells a 59-1/2″ set for 9″ benchtop saws.
- ✅ 1/8″, 1/4″ and 1/2″ widths in one box
- ✅ Covers curves, rips and resawing
- ❌ Fits 93-1/2″ saws only
- ❌ Carbon steel, not bi-metal
Best For: Owners of 14″ saws that take 93-1/2″ blades who want the right blade for each cut.
POWERTEC Push Block and Push Stick Set

Keeps Your Hands Away From the Blade
JET’s and RIKON’s manuals both call for a push stick when you work close to the blade: on a band saw, the end of every narrow rip and the last inches of a resaw. This set has one long push block, two short push blocks, a V push stick and a straight push stick. The narrow sticks fit between fence and blade on thin rips, and the set works on the table saw, router table and jointer too.
- ✅ Five pieces for rips, resaws and small parts
- ✅ Narrow sticks fit between fence and blade
- ❌ Plastic, so keep them out of the blade
Best For: Every band saw owner, from the first cut.
POWERTEC Universal Tandem Featherboards
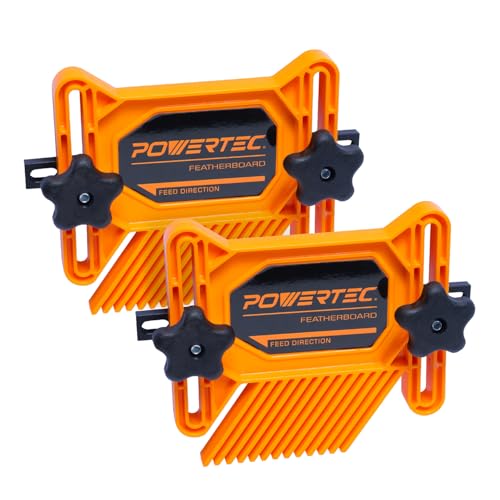
Holds the Board Against the Fence When You Resaw
A featherboard presses the board against the fence so your hands stay well back from the blade. This kit has two featherboards with knobs, T-bolts and miter slot brackets, and POWERTEC lists it for band saws. It’s most useful when resawing or ripping thin strips: lock it in the miter slot just before the blade, never beside or behind it, where it would pinch the cut closed. The two stack for tall boards.
- ✅ Fits standard miter slots
- ✅ Two boards stack for tall resaws
- ❌ Needs a miter slot on your table
Best For: Resawing and ripping thin strips with steady pressure against the fence.
You’ll also need safety glasses, a combination square to set the table, and a hex key set for the guide adjustments. If you’re setting up a first shop, my guide to woodworking tools for beginners puts the band saw in order with everything else.
Parts of a Band Saw You’ll Adjust
A band saw is a loop of blade running over two wheels, one above the table and one below. The blade cuts on a continuous downstroke, so it doesn’t throw a board back at you the way a table saw can. Five controls decide whether it cuts straight and safely:
- Tension knob on top, often with a quick-release lever and a gauge marked by blade width.
- Tracking knob, which tilts the upper wheel so the blade rides in the center of the tire.
- Side guides above and below the table, which stop the blade twisting.
- Thrust bearings behind the blade, which stop it being pushed back off the wheels.
- Guide post, which raises and lowers the upper guides and the blade guard.
Band Saw Safety Rules From the Manuals
A band saw is one of the friendlier machines in the shop, but the blade is always moving toward the table and it doesn’t stop instantly. These rules come straight from JET’s and RIKON’s band saw manuals:
- Unplug the saw before changing blades or adjusting the guides.
- Set the upper guide just above the work: about 1/8″ in JET’s safety list, 1/8″ to 1/4″ in RIKON’s.
- Keep your hands to the side of the blade, never in line with it, as RIKON puts it, and use a push stick on narrow work.
- Start the saw with nothing touching the blade and let it reach full speed before you cut.
- Don’t back a board out of a cut with the blade running. Turn the saw off and wait for the blade to stop first. This is the move that pulls a blade off its wheels.
- Wait for the blade to stop before clearing scraps or jammed offcuts.
- Hold the work flat on the table. RIKON warns against cutting stock without a flat surface unless it’s supported; round stock spins into the blade.
- Wear safety glasses, no gloves, no loose sleeves or jewelry, and hearing protection for long sessions.
How to Set Up a Band Saw, Step by Step
Do these steps in this order every time you change a blade: tracking needs tension, and the guides need a blade that’s already tracking.
1. Install the Blade With the Teeth Pointing Down
Unplug the saw, open the wheel doors, release the tension and back the guides away from the blade. Uncoil a new blade slowly, with gloves and safety glasses as JET’s manual advises: a coiled blade springs open. Feed it through the table slot and over both wheels. The teeth must point down toward the table and toward the front of the saw, where you stand. If they point up, turn the loop inside out. Center the blade on both tires.
2. Tension the Blade
Turn the tension knob clockwise until the gauge reads the width of the blade you’ve fitted. JET calls this the initial setting, to fine-tune once you know the saw. Wider blades need more tension than narrow ones, and JET warns that too little or too much can break the blade or spoil the cut. Recheck it from time to time, because blades stretch with use.
3. Track the Blade
Turn the upper wheel by hand and watch the blade. It should run in the center of the tire. If it creeps toward an edge, loosen the tracking lock and turn the tracking knob a little while you keep the wheel turning. JET stresses that this adjustment is sensitive: small moves, and give the blade time to settle. Lock the knob, close the doors and run the saw briefly to confirm.
4. Set the Side Guides
Move the guide assembly so the front of the bearings sits just behind the gullets, the curved bottoms of the teeth: about 1/64″ in JET’s manual, about 1/16″ in RIKON’s. Guides on the teeth ruin the blade. Then bring each side bearing in until it almost touches the blade. JET’s trick is a business card, or a dollar bill folded twice, as a spacer. The bearings shouldn’t spin when the saw runs empty; they only touch the blade under cutting pressure. Repeat below the table.
5. Set the Thrust Bearings
The thrust bearing stops feed pressure pushing the blade back off the wheels. Slide it forward until it almost touches the back of the blade, using the same card gap; JET notes that on narrow blades it can sit in actual contact. If it spins constantly with no wood on the table, back it off: JET’s troubleshooting table links constant contact to a worn bearing and cracks on the back of the blade. Set the lower one the same way.
6. Square the Table to the Blade
Set a square on the table against the side of the blade, clear of the teeth. If it isn’t square, loosen the table lock, tilt the table until it is, and lock it. JET’s procedure then sets the 90° stop screw and zeroes the tilt pointer, so you can return to square after a bevel. Check that the fence is parallel to the miter slot too.
7. Set the Upper Guide Height
Lower the upper guide until it sits just above the workpiece: about 1/8″ to 1/4″ per RIKON, about 3/16″ on the JET’s guide post scale. Do it for every cut. A guide left high exposes inches of blade and lets it flex, and JET lists upper guides set too high among the causes of broken blades.
Choosing the Right Blade for the Cut
Two numbers matter: width and teeth per inch (TPI). Width decides how tight a curve you can cut: wider blades hold a straight line better, narrow ones turn tighter. LENOX’s Guide to Band Sawing gives the minimum radius for each width:
- 1/8″ blade: 1/8″ radius, for scroll-style detail.
- 3/16″ blade: 5/16″ radius, for tight curves.
- 1/4″ blade: 5/8″ radius, the general curve-cutting blade.
- 3/8″ blade: 1-7/16″ radius, for gentle curves and general work.
- 1/2″ blade: 2-1/2″ radius, for rips and light resawing.
- 3/4″ blade: 5-7/16″ radius, for resawing.
TPI decides speed and finish. Fewer, bigger teeth cut faster and rougher and clear sawdust from thick wood; more teeth cut slower and smoother. JET’s rule of thumb is to keep no fewer than 6 and no more than 12 teeth in the workpiece at any time, which is why a 3 TPI blade suits 6″ resaws and a 10 TPI blade suits 1/2″ stock. Check your saw’s maximum blade width and exact blade length in the manual before buying blades; my best band saw guide lists the blade length for each saw it covers.
Your First Cuts
Practice on softwood offcuts first. Mark your line with a pencil, set the guide height, start the saw, and let it reach full speed. Feed slowly and steadily: JET’s manual warns that overfeeding shortens blade life and can break the blade. The sound of the saw tells you a lot; if it labors, slow down.
Straight Rips With the Fence
Ripping means cutting along the grain. Lock the fence, put the straightest edge of the board against it and push with light forward pressure. For long boards, JET suggests roller stands or a helper. On a narrow rip, finish with a push stick so your fingers never pass the teeth. If the cut wanders off the fence, see the section on drift below.
Crosscuts With the Miter Gauge
Crosscutting is cutting across the grain with the miter gauge. Slide the gauge into the slot, hold the board against it with one hand and push the gauge past the blade with the other. Don’t use the fence and the miter gauge together: JET warns that trapping the offcut between them can bind the board and damage the blade. Move the fence out of the way first.
Curves and Relief Cuts
This is the job band saws do best. Fit a blade narrow enough for the tightest radius in the list above. Before a long or tight curve, make relief cuts, as both JET and RIKON advise: straight cuts from the edge to just short of your line, every inch or two. The waste then falls away in pieces, so the blade never twists through a radius it can’t handle. Steer by pushing and turning together; RIKON warns that turning without pushing can make the work stick or bend the blade. For tight inside curves and pierced cuts, a scroll saw is the better tool; my best scroll saw guide explains the difference.
Resawing a Board
Resawing means standing a board on edge and slicing it into thinner boards or veneer. JET’s manual says the ideal resaw blade is the widest your saw can take, because it holds a straighter line. Joint one face and one edge first so the board sits square; my guide on how to use a jointer covers that. Use a tall fence, set the guide just above the board and feed slowly, with a featherboard ahead of the blade and a push block for the last inches.
How to Fix Blade Drift
Drift, or lead, is when the blade wanders off the line even with the fence set. JET’s manual says it’s more common with small, narrow blades and almost always comes from poor blade quality or a missing adjustment. Go through its checklist:
- Fence not parallel to the miter slot and blade.
- Blade not tensioned correctly.
- Blade dull, or with more set on one side than the other.
- Feeding too fast.
If a sharp, well-tensioned blade still pulls to one side, many woodworkers find the drift angle with a freehand test cut along a pencil line on scrap and set the fence to match. It’s a workaround; a new blade is often the better fix.
💡 Pro Tip: Release the Tension at the End of the Day
Both JET and RIKON tell you to release blade tension when the saw won’t be used for a while: it extends the life of the blade and the tires. A quick-release lever makes this a two-second habit. Just remember the order when you come back: re-tension, check the tracking, then cut.
Band Saw Care and Maintenance
JET’s maintenance section keeps it simple: unplug first, keep the table, miter slot and guide bearings free of resin, vacuum dust out of the wheel housings, check the drive belt, and wax a cast-iron table with a non-silicone product to stop rust. Replace blades that are cracked or missing teeth. Band saws drop fine dust through the table, so connect a collector or shop vac; my picks for a dust collector for a small shop suit a 10″ or 14″ saw. Sawn curves still show blade marks, and an oscillating belt and spindle sander cleans them up in a few passes.
🏆 The Short Version
Set up in order: teeth down, tension by the gauge, tracking centered, side bearings a card’s width away and behind the gullets, thrust bearings just clear, table square, upper guide just above the work. Choose the blade by the tightest curve, feed slowly, make relief cuts and keep a push stick within reach. On a saw like the JET JWBS-14SFX, with blades sized for your saw, that routine gives clean, safe cuts from the first board.
❓ Frequently Asked Questions
Which way do the teeth go on a band saw?+
How do you cut straight on a bandsaw?+
How do you properly tension a bandsaw blade?+
How do you use a bandsaw safely?+
How tight a curve can a band saw cut?+
Should you release tension on a band saw blade?+
Conclusion
Most band saw frustration comes from setup, not the saw. Fit the right blade the right way round, tension and track it, set the guides close without touching, and lower the upper guide for every cut. Then feed slowly, make relief cuts on curves and keep a push stick handy. Do that and a band saw becomes the safest, most versatile saw in the shop. Questions about your saw or a project? Ask in the comments.

