As an Amazon Associate I earn from qualifying purchases. All claims are strictly my personal opinion.
Best Sanders for Stairs

Stairs are one of the most awkward sanding jobs in any home — and they’re awkward in all the ways that matter most. The tight junction between tread and riser, the confined space between each step, the balusters and stringers that box you in, and the sharp right-angle corners that most sanders simply can’t follow cleanly. Anyone who’s tried to sand a staircase with the wrong tool knows exactly how quickly it turns from a manageable job into a full-day ordeal with a disappointing result.
The key is using the right type of sander for each zone of the staircase — and knowing that no single tool covers everything. I’ll break it down by sander type, explain where each one excels on stairs specifically, and give you my top picks in each category. Get this combination right and staircases stop being a headache.
Best Sanders for Stairs — By Type
There are three types of sander that suit stair work, each with a distinct role:
- 📐 Sheet Sanders — The classic choice for stair treads. The rectangular pad matches the flat rectangular surface of a stair tread almost perfectly, reaching right to the edges and into the back corners with the riser. The go-to primary tool for most staircase jobs.
- 🔄 Random Orbital Sanders — Versatile and excellent on the open tread face, but the round pad can’t follow corners cleanly. A great choice if you already own one, but pair it with a detail sander for the corners or you’ll be finishing those by hand.
- 🎯 Detail Sanders — The indispensable finisher. The pointed triangular pad reaches into the tight junction between tread and riser, along the stringer, around balusters, and into any corner that stops everything else cold. Don’t attempt a full staircase refinish without one.
Worth noting: if you want to eliminate cord management on a staircase entirely — which is a genuine quality-of-life improvement when you’re moving up and down steps — check out my list of cordless sanders. They’re slightly less powerful but the freedom of movement on stairs is hard to argue with.
Sheet Sanders for Stairs
Sheet sanders are the most popular choice for stair treads and for good reason — the rectangular pad fits the geometry of a tread naturally, covering the full width in fewer passes than a round pad and following the straight edges right to the corner. For most standard staircases, a sheet sander is the primary workhorse and the detail sander handles the rest.
Makita BO4556 2 Amp Finishing Sander
Best Budget Sheet Sander for Stairs
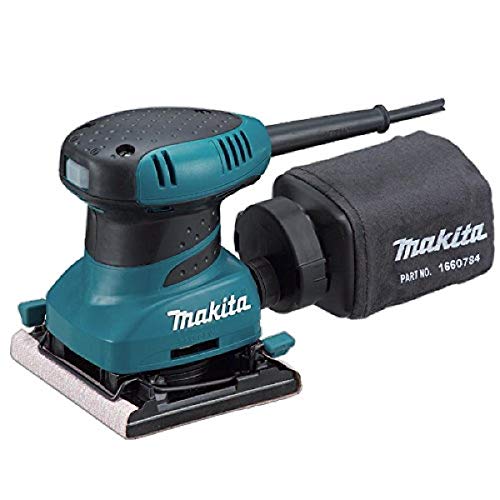
The Makita BO4556 is perfectly suited to stair work in a way that its spec sheet doesn’t fully reveal. Yes, the 2A motor is modest, but on a stair tread you’re never working a huge surface area — you’re making short, controlled passes on a confined space where precision and maneuverability matter more than raw power. The ultra-compact body is a genuine asset here: it fits between the balusters more easily than a larger tool, and the comfortable one-handed grip means you can brace yourself on the staircase with the other hand while working.
The built-in dust collection keeps the tread surface clear so you can see your progress, and at its price point it’s one of the best value tools in the entire sander category. For a homeowner refinishing their staircase on a budget, this is a smart, capable choice that won’t let you down.
✅ Ultra-compact body — fits into tight stair spaces easily
✅ Comfortable one-handed grip — essential for working on stairs
✅ Square pad reaches tread-to-riser corners cleanly
✅ Effective dust collection
✅ Outstanding value — excellent quality for the price
❌ Modest 2A motor — slower on very rough or heavily painted treads
❌ No variable speed
Bosch OS50VC 120-Volt 3.4-Amp Variable Speed 1/2 Orbital Sheet Sander
Best Premium Sheet Sander for Stairs

One of my favourite sanders of all time, and for stair work the Bosch OS50VC brings some meaningful upgrades over the Makita. The 3.4A motor is significantly more powerful — it handles rough, heavily worn treads with ease where the Makita would slow down and struggle. The larger 1/2-sheet pad covers each tread in fewer passes, which actually matters on a full flight of stairs where the cumulative time savings add up. The variable speed is genuinely useful for treads with softer wood sections or where you’re transitioning from stripping to fine finishing.
Bosch’s vibration management is excellent — on a staircase you’re often working in slightly awkward positions, and a tool that doesn’t beat up your hands and wrists over an extended session is a real advantage. Build quality is excellent and it will outlast most alternatives many times over. If you’re doing a quality staircase refinish and want the best sheet sander for the job, this is it.
✅ 3.4A motor — handles rough and heavily worn treads confidently
✅ Large 1/2-sheet pad covers treads faster
✅ Variable speed for controlled stripping through to fine finishing
✅ Outstanding vibration management — comfortable in awkward positions
✅ Exceptional build quality and longevity
❌ Larger body — slightly less nimble in very tight stair spaces
❌ Higher price than the Makita
Orbital Sanders for Stairs
Random orbital sanders are the versatile all-rounders — and they work well on stair treads, particularly for the final smoothing passes where the swirl-free finish they produce is a genuine advantage. The limitation is the round pad, which can’t follow corners cleanly. This isn’t a dealbreaker if you have a detail sander in your kit, but it does mean you’ll always have some corner work left over after the orbital pass.
DEWALT D26453K 3 Amp 5-Inch Variable Speed Random Orbit Sander
Best Budget Orbital Sander for Stairs

DEWALT’s D26453K is a compact, well-built random orbital that punches above its price point. The 3A variable speed motor ranging from 7,000 to 12,000 OPM gives it genuine versatility — dial it back for softer woods or fine finishing, push it up for the initial stripping passes on worn treads. The compact body handles well one-handed on a staircase, and the built-in dust collection keeps the tread clear while you work.
For a homeowner who already has this or a similar orbital sander and wants to use it for a staircase job, it’s more than capable on the open tread faces. Just be clear going in that you’ll need the B+D Mouse to finish the corners and edges — no orbital can replace that step on stairs.
✅ Variable speed 7,000–12,000 OPM — versatile for all stages
✅ Compact and lightweight — good one-handed handling
✅ DEWALT build quality at an affordable price
✅ Good dust collection
❌ Round pad leaves corners unsanded — detail sander required
❌ Not as fast on large flat treads as the Bosch OS50VC
Bosch 120-V 6-Inch Random Orbit Sander ROS65VC-6
Best Premium Orbital Sander for Stairs
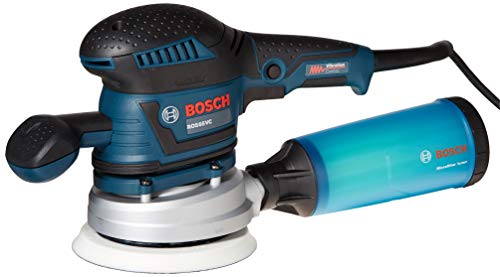
The Bosch ROS65VC-6 is the premium orbital option on this list — and it’s the natural orbital companion to the Bosch OS50VC sheet sander above if you want to run a full Bosch setup. The 6″ pad is larger than most 5″ orbitals on stairs, which speeds up coverage on wider open treads. Variable speed, Bosch’s excellent vibration management, ergonomic dual-grip design, and outstanding dust collection all come as standard — this is a truly refined machine that will last a lifetime of use.
The finish quality it produces is excellent — the larger 6″ pad with random orbital motion leaves a beautifully clean, swirl-free surface that’s ideal for a stair tread that will take heavy foot traffic and needs a durable, even finish. Available in 5″ and 6″ versions — for stairs, the 6″ is the faster choice on wide treads, while the 5″ is slightly more nimble in tighter spaces.
✅ 6″ pad — faster coverage on wider stair treads
✅ Excellent variable speed and vibration management
✅ Outstanding swirl-free finish quality
✅ Ergonomic dual-grip design
✅ Bosch build quality — lifetime tool
❌ Round pad still requires a detail sander for corners
❌ 6″ body is less nimble in very confined stair spaces
Detail Sanders for Stairs
A detail sander isn’t optional on a staircase — it’s the tool that determines whether the job is truly finished or just mostly finished. The tight corners where tread meets riser, the edges along the stringer, the sections around balusters, any profile on the nosing — these are exactly the spots a detail sander was designed for, and where every other tool on this list reaches its limit. There’s only one detail sander I recommend:
BLACK+DECKER BDEMS600 Mouse Detail Sander
The Essential Stair Sander — The One That Completes the Job

There are other detail sanders on the market — but none that come close to the B+D Mouse at this price point, and very few that match it at any price. It’s solidly built, surprisingly powerful at 14,000 OPM, and the pointed triangular pad is the exact shape you need for stair corner work. It reaches the tight junction between tread and riser, works neatly along the stringer edge, and with the detail finger attachment it gets into spots that would otherwise require tedious hand-folded sandpaper work.
I only recommend one detail sander on this list because it’s so far above the competition in both performance and value that there’s genuinely no reason to consider anything else. Whether you use it as a companion to a sheet or orbital sander — which I strongly recommend — or as a standalone on a smaller staircase, this machine is the one that turns a good stair refinish into a perfect one.
✅ Pointed triangular pad — perfect for tread-to-riser corners
✅ 14,000 OPM — genuinely powerful for a detail sander
✅ Detail finger attachment for tight spots around balusters
✅ Comfortable grip — easy to control in confined stair spaces
✅ Outstanding value — so affordable there’s no reason not to own one
❌ Small pad means slow coverage on open flat tread faces
❌ Not a standalone replacement for a sheet or orbital on large treads
How to Sand a Staircase: A Step-by-Step Guide
Step 1: Prepare the Staircase
Remove any carpet, carpet grippers, and staples before you start — this is non-negotiable. Carpet staples will destroy sandpaper and can damage your sander’s pad. Check every tread for raised nail heads, countersink any protruding fixings, and give the whole staircase a thorough vacuum. If the staircase has a handrail, tape off the wall beside it and any spindles or balusters you want to protect.
Step 2: Grit Progression for Stair Treads
Stairs take heavy foot traffic and often have thick buildup of old paint, varnish, or wax. Here’s the grit sequence I use:
- 🟤 60–80 grit — Strip the old finish, remove paint or varnish, and level any worn areas. This is the heavy lifting stage. Work with the grain along the length of each tread.
- 🟡 100–120 grit — Remove the coarse scratch pattern and continue leveling. By the end of this pass, bare wood should be visible everywhere.
- 🟢 150–180 grit — Smooth the surface and prepare for finishing. Run your hand along the grain — it should feel genuinely smooth.
- ⚪ 220 grit — Final pass and between coats once your finish is applied.
Step 3: Sand the Tread Faces
Use your sheet sander or orbital on the open flat face of each tread — this is where these tools excel. Work along the grain from back to front on each tread, overlapping passes by about an inch. Keep the sander moving and apply only light pressure. On very narrow stairs where the sander barely fits, the compact Makita BO4556 is the better choice over the wider Bosch OS50VC.
Step 4: Sand the Risers
The vertical riser faces between treads are often overlooked — but they’re clearly visible when you look down the staircase and they need the same treatment as the treads. Use the sheet sander on these, working up and down with the grain if the risers have a vertical grain, or across if they’re painted MDF. Take care not to catch the top edge of the riser and round it over.
Step 5: Detail Sand All Corners and Edges
This is where the B+D Mouse earns its place. Work through every corner where tread meets riser, the back edge of each tread where it meets the riser above, along both sides where the treads meet the stringers, and around any balusters or newel posts. Be thorough — these are exactly the areas that catch the eye when someone walks past a staircase, and unsanded corners under a coat of varnish look messy and unfinished.
Step 6: Final Hand Sand and Clean
Once all machine work is done, do a final light pass by hand with 180–220 grit on all surfaces, working with the grain. This removes any remaining machine marks. Vacuum the entire staircase thoroughly, then wipe down with a tack cloth before applying your finish.
Frequently Asked Questions
A staircase done properly is one of the most impactful refinishing jobs in any home — the transformation is dramatic and visible every single day. With the right combination of tools and a methodical approach, what seems like an intimidating job becomes very manageable. Any questions about your specific staircase — leave a comment below. Thanks for reading!

Hi, what would you recommend to remove stain and poly off stair treads so I can restain and poly again? And banisters and handrails? And the grit paper to use? I’m a beginner at this
We are trying to color match our Shaw LVP flooring.
Hello, please could you recommend a block sheet sander that isn’t too heavy to sand the stair risers. I’m thinking of hiring something as only a few stairs to complete. Also which is best to purchase. Cord or cordless. The mouse sander used hasn’t been able to get into the corners of the treads and the large edger is to heavy to hold up to do the risers!!!! Thank you.
Carole
Hey Carole,
For the risers, the Makita BO4556 would be a perfect fit – it’s small and lightweight while still being potent and highly effective. To get the corners the BLACK+DECKER BDEMS600 is the best choice as even if the regular shape can’t reach a tight corner, the tip expands into a precise sanding “finger” that can reach anywhere with ease. When it comes to cord vs cordless, it’s all about personal preference and type of work. I’d always go with corded tools for more demanding or long tasks but if it’s a more casual or quick ordeal then the cordless variety would be a great fit. Hope that helps Carole and good luck with the stair refinishing!
Hi just came across your site and it has a lot of great information…thank you for sharing. I do have a question though. I have a staircase which consist of two open stringers and treads with carpet wrapped around them. The treads butt up to the wall on one side and are open on the other side all four sides of the tread are rounded. Could you advise best sander to tackle this I know at this point the edge against the wall will require hand sanding. Also could you advise proper sandpaper grades to use the stairs current have a clear stain. When finished I hope to paint the strings and do a dark stain on the treads.
Mike
Hey Mike, taking into consideration the details of your staircase, I’d go with a random orbital sander – they’re the most versatile type of machine and they’ll guarantee that everything gets smoothly sanded even if rounded, at an angle or hard to reach. In the end, just as you mentioned, I’d definitely give a manual finish to all the pesky edges to ensure I get a perfect result. Since they currently have a clear stain I’ll imagine the stairs are in pretty good shape – if this is the case, you can skip the rougher grits and go right to around 80 or 120. It’ll not only make the whole process faster but it also ensures that you eliminate the old clear stain without damaging the wood’s grain or integrity. After that, you can either go right to staining or, if you want a highly polished look, you can move on up to a very fine grit like 200+ and perform another pass.
Hope that helps Mike and I wish you the best of luck with the renovation!
I enjoy watching flipping shows like Stone House Revival, Rehab Addict and Home Town. I love old wood and enjoy watching them repair and rebuild trim, doors, floors and built-ins bringing them back to their former glory. Now I would like to stain and refresh my wooden stair railings. I found your site when researching electric sanders and wood finishes.
I am thinking of using dutch oil for a finish and a palm sander. What would you recommend for my first project.
Hey Kathleen, you’re not the only one – it’s always satisfying to watch experts take an old piece of wood and breathe a new life into it. For your stair railing renovation, Dutch oil is a great choice as you can’t go wrong with it, it always looks beautiful. When it comes to the sanding machine, you’re also spot on – a palm sander is nimble, small enough to fit anywhere and produces great results without tiring your arms which is great when dealing with railings. I recommend that you go with a circular orbital palm sander due to their outstanding capability of producing an excellent, scratch-free finish, even if you’re an absolute beginner. The DEWALT D26453K shown above is great, and so is the Bosch ROS20VSC, you’ll be well armed with either one of them.
Hope that helped and good luck with your very first project Kathleen, have fun!