
As an Amazon Associate I earn from qualifying purchases. All claims are strictly my personal opinion.

How to stain wood in one line: sand bare wood with the grain to the right final grit for the species (usually 150 to 180, never much finer), remove every bit of dust, use a pre-stain conditioner on pine, maple, birch and cherry, wipe the stain on, wipe the excess off after a few minutes, and let it dry before a clear topcoat. The stain can only be as even as the surface under it, which is why most blotchy, streaky or too-light results start at the sanding stage, not with the can.
Below is the grit to finish at for each common wood, why sanding too fine makes stain lighter and patchier, how to use a conditioner, the application steps the stain makers give, and the short kit that makes the prep fast.
⚡ Quick Answer
Sand: start at 120, finish at 150 to 180 on oak, ash and maple and at 180 to 220 on pine, cherry, walnut and mahogany. A random orbital sander does the flat parts; a detail sander does corners.
Condition: on blotch-prone woods (pine, fir, alder, birch, maple), apply pre-stain conditioner, wipe it off after 5 to 15 minutes and stain within 2 hours.
Stain: brush or rag it on with the grain, wipe the excess after 2 to 15 minutes depending on the product, let it dry and seal it with polyurethane or another clear finish.
How to Stain Wood: The Short Version
Wood stain is a colorant in a carrier (oil, water or a gel) that soaks into the surface fibers and pores. Unlike paint, it doesn’t hide the wood; it shows the grain and every scratch, glue smear and rough patch. That’s the whole reason the preparation matters more than the brand. Here’s the full process at a glance:
- Remove any old finish, or start with bare, raw wood.
- Repair and fill dents and holes with a stainable filler, then let it dry.
- Sand in steps from 120 to the final grit for your wood, always with the grain.
- Remove the dust completely: vacuum, then wipe.
- Test the color on an offcut or the underside.
- Apply conditioner if the wood is prone to blotching.
- Apply the stain and wipe off the excess at the time the label gives.
- Let it dry, add a second coat only if you want it darker, and topcoat.
If the wood already has a finish on it, the stain can’t get in. Strip or sand the old coating off first: my guide on how to remove stain from wood covers both routes.
Step 1: Sanding Wood Before Staining
Sanding before staining does two jobs. It removes mill marks, planer ripples, pencil lines and glue, which stain would otherwise highlight. And it sets how much stain the surface will accept. General Finishes puts the rule plainly: the finer the sandpaper you finish with, the lighter the stain color will be; the coarser, the darker. Minwax says the same in its own FAQ: for a darker color, finish your last sanding at #150 to #180. The general method, from the first grit to the last pass by hand, is in my guide on how to sand wood.
What Grit to Sand Wood Before Staining
The makers don’t agree on one number, because it depends on the wood and the stain. Minwax and Varathane give a 220 finish in their stain directions (Varathane’s data sheet says start at #120 and work through 150 and 180 to 220). General Finishes is more specific, and more cautious: on hardwoods like maple and oak it says finish-sand no finer than 180 for water-based stains and 150 for oil-based stains, and on softwoods like pine and alder no finer than 220 for water-based and 180 for oil-based. Its own grit table per species, which I’ve reproduced below, is the most useful starting point I’ve found.
| Wood | First sanding | Second | Final | Blotch risk |
|---|---|---|---|---|
| Oak | 120 | 150 | 180 | Low: open grain takes stain readily |
| Maple | 120 | 120 | 180 | High: use conditioner or gel stain |
| Birch | 120 | 150 | 180 | High: use conditioner |
| Pine | 120 | 150 | 220 | High: use conditioner |
| Fir | 120 | 150 | 180 | High: use conditioner |
| Cherry | 120 | 150 | 220 | Medium: test first |
| Walnut | 150 | 180 | 220 | Low, and often left unstained |
| Mahogany | 150 | 180 | 220 | Low |
The grit columns are General Finishes’ sequences; the blotch column follows the woods Minwax lists as needing conditioner (pine, fir, alder, aspen, birch and maple). For every other material, the sandpaper grit chart has the full range, and what grit sandpaper for wood explains the CAMI and P scales.
Why Sanding Too Fine Ruins Stain
Fine paper doesn’t just smooth the surface, it closes it. Sanding oak to 320 burnishes the fibers so the stain has fewer scratches and open pores to settle into. General Finishes warns that over-sanding can seal the wood so much that it won’t take a finish, and for hard-to-stain woods it suggests finishing at 120. The practical rule: stop at the grit in the table, and if a test board comes out too light, sand the real piece one step coarser rather than adding coat after coat of stain.
Sand the Whole Surface to the Same Grit
Stain reads every difference in scratch pattern. General Finishes notes that if you miss a spot, the stain will be darker on the rougher area. Finish each surface with one grit all over, overlap your passes, and don’t spot-sand a single patch at a finer grit than the rest. End grain soaks up much more stain than face grain; the same maker suggests giving end grain an extra sanding to slow its absorption.
Use a Random Orbital Sander, Then Finish With the Grain
A random orbital sander is the fastest way to take a tabletop, door or shelf from 120 to 180 without cross-grain scratches, because the pad spins and orbits at the same time. Keep it flat, move it slowly, and let the weight of the sander do the work. Small swirl marks are the one thing it leaves behind that stain shows. To catch them, do a last light pass by hand with the grain at the final grit, using a block or a fine sanding sponge. Corners, inside edges and drawer fronts go faster with a detail sander that has a pointed pad.
💡 Pro Tip
Before staining, wipe the surface with a cloth dampened with mineral spirits (for oil-based stain) and look at it under a low, raking light. The wet surface shows exactly what the stain will: swirls, scratches, glue spots and filler. Fix them now with your final grit, while it’s still a two-minute job.
Raise the Grain Before Water-Based Stain
Water swells the surface fibers, so a water-based stain leaves bare wood feeling rough. General Finishes suggests pre-wetting oak and ash with a damp cloth before the final sanding, letting it dry for 30 minutes, and then sanding again with your final grit. The fibers that stand up get cut off, and the stain goes on a smoother surface. Minwax’s water-based conditioner does the same job: its directions call for a light sanding with fine paper 15 to 30 minutes after it goes on.
Remove Every Bit of Dust
Dust left in the pores mixes with the stain and turns into muddy specks. Vacuum the surface with a brush attachment, then wipe it with a clean cloth: dampened with mineral spirits under oil-based stain, or with water under water-based stain. General Finishes adds two warnings for water-based products: don’t use a tack cloth that contains linseed oil, and don’t use steel wool, because its particles can cause rust spots.
Step 2: Pre-Stain Wood Conditioner (Prevent Blotching)
Blotching is the dark and light patchwork you get on soft or porous woods because some areas drink stain and others don’t. Minwax’s FAQ lists pine, fir and spruce (soft) and maple, alder and aspen (porous) as the usual suspects. A pre-stain conditioner partially seals the thirsty areas so the stain soaks in more evenly.
How to Use Pre-Stain Conditioner
For Minwax’s oil-based Pre-Stain Wood Conditioner, the directions are: stir well, apply with a brush or cloth with the grain, let it penetrate for 5 to 15 minutes, wipe off the excess, and apply an oil-based stain within 2 hours. After that, Minwax says the resins begin to dry and can block the stain. The water-based version pairs with water-based stains: it needs only 1 to 5 minutes to penetrate and a light sanding once it has dried, 15 to 30 minutes later.
When to Skip It
On oak, ash, walnut and mahogany you usually don’t need conditioner. Expect the color to come out somewhat lighter when you do use one, because less stain gets in; that’s the point. On maple and birch, which can blotch even with conditioner, a gel stain is the other route: it sits more on the surface than in it. Minwax’s Gel Stain directions are to wipe off the excess after about 3 minutes and wait 24 hours before a clear topcoat.
Step 3: How to Apply Wood Stain
Test on an Offcut First
Minwax tells you to test any stain on an inconspicuous spot, because the final color is the stain plus the color of your wood. Prepare the test piece exactly like the project: same species, same final grit, same conditioner. A stain chip on a can is printed on a different wood than yours.
Brush or Rag?
Either works for a wiping stain. Minwax lists a bristle brush, a foam brush or a cloth; Varathane says a good quality brush or a clean, lint-free rag. A rag gives you more control on flat panels and is easiest for beginners. A brush gets stain into carvings, pores and inside corners. What changes the result is not the applicator but the wiping off.
Wipe On, Wait, Wipe Off
- Stir, don’t shake, and keep stirring as you go: the pigment settles.
- Apply a full, wet coat with the grain, one manageable section at a time (a table leg, a drawer front, half a top).
- Wait for the time on the label. Varathane Premium Fast Dry asks for 2 to 3 minutes. Minwax Wood Finish asks for 5 to 15 minutes, and Minwax says the longer you wait, the darker the color.
- Wipe off all the excess with a clean cloth, with the grain, blending into the previous section so you don’t get lap lines.
- Let it dry. Varathane’s data sheet gives 1 hour to touch and recoat and 24 hours for full cure; Minwax Wood Finish lists a 2 to 3 hour dry and recoat time.
- Add a second coat only to darken it. Minwax’s directions: to darken, recoat once the first coat is dry.
⚠️ Important
Rags soaked with oil-based stain can heat up and catch fire on their own as they dry. Lay them flat outside to dry, or put them in a sealed metal container filled with water, which is how General Finishes says to dispose of oil-finish rags.
Oil-Based vs Water-Based Stain
Oil-based stain (like Minwax Wood Finish or Varathane Premium Fast Dry) gives you more working time, penetrates deeply and doesn’t raise the grain. Water-based stain dries faster, cleans up with water and smells less, but raises the grain and dries quicker than you can wipe it on large surfaces. The topcoat matters too: General Finishes says that a water-based topcoat over a heavy oil-based stain can turn cloudy, and recommends letting an oil-based stain dry 72 hours before a water-based topcoat, or sealing it first with shellac.
Step 4: Topcoat the Stain
Stain colors wood; it doesn’t protect it. Minwax recommends finishing every stained project with a clear topcoat such as its Fast-Dry Polyurethane or Polycrylic. Brush or wipe on a thin first coat once the stain is dry, then sand lightly between coats. My guide to sanding between coats of polyurethane has the grits and timing, and the key warning: sand the topcoat, never the stain, or you’ll cut through the color and leave light spots.
Common Staining Mistakes (and the Fix)
Blotchy Color
The wood was blotch-prone and wasn’t conditioned, or the sanding was uneven. If it’s already stained, a gel stain over the top can even it out; otherwise strip or sand back to bare wood and start again with conditioner. Stain only wood that has dried and acclimated: a moisture meter for wood shows when indoor lumber is down around 6 to 10%.
Stain Too Light
Usually the wood was sanded too fine or a conditioner was used. Leave the stain on longer before wiping, apply a second coat, or re-sand one grit coarser on the next piece.
Sticky or Tacky Surface
Excess stain wasn’t wiped off. Varathane’s data sheet says removing all excess is essential for proper dry time and topcoat adhesion. Wipe the surface with a rag dampened with the stain itself or mineral spirits to lift the excess, then let it dry fully.
Swirl Marks Show Under the Stain
Those are sander marks from moving too fast, pressing too hard or skipping a grit. Re-sand the area with the last grit you used and finish by hand with the grain.
The Kit for Staining Wood
Most of the time a staining project is won or lost in the prep, so the tools that matter most are the ones that sand. The specs below are the makers’ own, from each product’s listing and data sheets.
Bosch ROS20VSC 5″ Random Orbital Sander

Best Sander for Stain Prep
For sanding tabletops, doors, shelves and cabinet sides to an even scratch pattern, a 5″ random orbital sander is the tool to own. Bosch’s ROS20VSC has a 2.5 amp motor with variable speed from 7,500 to 12,000 OPM, hook-and-loop discs and a microfilter canister plus a vacuum adapter, so less dust ends up in the pores you’re about to stain. Turn the speed down for the final grit to cut swirls. My Bosch ROS20VSC review goes through it in detail.
- ✅ Variable speed for a gentle final pass
- ✅ Microfilter canister and vacuum port
- ✅ Takes standard 5″ 8-hole discs
- ❌ Round pad can’t reach inside corners
Best For: Flat surfaces on furniture, doors, trim boards and cabinets.
BLACK+DECKER BDEMS600 Mouse Detail Sander

Best for Corners, Spindles and Frames
Stain shows unsanded corners as dark, rough patches. The BDEMS600 has a pointed pad that reaches into the inside corners of frames, drawers and cabinet doors, a 1.2 amp motor at 16,000 orbits per minute, a detail finger attachment for tight spots and a dust collection canister. It’s the low-cost way to give corners the same final grit as the flat surfaces. More options are in my best detail sanders guide.
- ✅ Pointed pad for inside corners
- ✅ Finger attachment for slats and spindles
- ✅ Light and easy to control
- ❌ Too small for whole tabletops
Best For: Corners, chair parts, raised panels and drawer fronts.
POWERTEC 5″ Sanding Disc Assortment, 80 to 220 Grit

Best Discs for the Grit Steps
Staining needs the middle grits, 120, 150 and 180 to 220, and an assortment saves buying five boxes. This pack has 10 discs each of 80, 100, 120, 150 and 220 grit (50 in total), aluminum oxide on a hook-and-loop backing with a stearate anti-clog coating and the 5″ 8-hole pattern that fits the Bosch and most other random orbital sanders. If you finish at 180 on oak or maple, add a box of 180. For premium options, see the best sanding discs for random orbital sanders.
- ✅ Five grits, ten discs each
- ✅ Anti-clog coating
- ✅ Standard 8-hole hook and loop
- ❌ No 180 in the pack
Best For: Working through the grit sequence on a staining project.
Minwax Pre-Stain Wood Conditioner

Best for Pine, Maple and Birch
This is the oil-based conditioner that goes under oil-based stains. Minwax says it evens out stain absorption and helps prevent streaks and blotches, and that it’s especially necessary on soft or porous woods like pine, fir, alder, aspen, birch and maple. The directions: let it penetrate 5 to 15 minutes, wipe off, and stain within 2 hours. A half pint covers a small piece of furniture.
- ✅ Prevents blotching on softwoods
- ✅ Quick: stain the same session
- ✅ Works under any oil-based stain
- ❌ Not for water-based stain (use the water-based version)
Best For: Pine furniture, maple cabinets and any wood that has blotched before.
Minwax Wood Finish Oil-Based Stain

Best Classic Wiping Stain
Minwax Wood Finish is the penetrating oil-based stain most people picture. Minwax says it penetrates within 5 minutes, you wipe it off after 5 to 15 minutes (longer for darker), it dries in about 2 to 3 hours, and a gallon covers 500 to 600 sq ft in one recommended coat. The long working time makes it forgiving on big surfaces. The link goes to Dark Walnut; the same listing family covers the other colors.
- ✅ Long, forgiving working time
- ✅ Wait time controls the depth of color
- ✅ Pairs with Minwax’s conditioner
- ❌ Mineral spirits cleanup and odor
Best For: First staining projects, furniture, doors and trim.
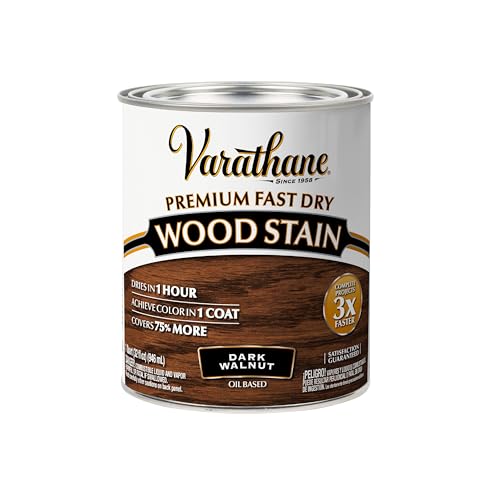
Varathane Premium Fast Dry Wood Stain
Best When You Want to Topcoat the Same Day
Rust-Oleum’s data sheet for Varathane Premium Fast Dry gives a 2 to 3 minute penetration time, 1 hour to touch and to recoat, 24 hours to full cure, and 225 to 275 sq ft per quart. It’s an oil-based, one-coat stain with nano pigments, and the same sheet says polyurethane can go on within an hour of staining. The short open time means smaller sections at a time.
- ✅ Recoat and topcoat in about an hour
- ✅ One-coat color
- ✅ Clear data sheet with prep grits
- ❌ Short working time on big panels
Best For: Small pieces, shelves and trim you want finished in a day.
How I Put This Guide Together
The sanding grits, the per-species table, the grain-raising and dust advice come from General Finishes’ own preparation guide and FAQ. The conditioner and stain directions come from Minwax’s product pages and FAQ, and the Varathane figures from Rust-Oleum’s technical data sheet for Premium Fast Dry. The products are on sale on Amazon today, and their specs come from the makers; I don’t show customer ratings or prices, which change daily. More on how I choose the sanders I recommend.
🏆 The Verdict
Even stain starts with even sanding. Work from 120 to 150 to 180 on oak and maple or 180 to 220 on pine and cherry, sand every surface to the same grit, remove the dust, and condition blotch-prone woods before a wipe-on, wipe-off stain. A Bosch ROS20VSC with a disc assortment handles the prep on almost any project, and Minwax Pre-Stain Conditioner saves pine and maple from blotching.
❓ Frequently Asked Questions
Can I just stain wood without sanding?+
Is it better to stain wood with a rag or a brush?+
How long do you leave wood stain on before wiping it off?+
What not to do when staining wood?+
What is the best thing to clean wood with before staining?+
How long does stain take to dry before polyurethane?+
Conclusion
Learning how to stain wood is mostly learning how to prepare it: the right final grit for the species, one even scratch pattern, no dust, and a conditioner where the wood needs it. Get that right and almost any good stain will look the way the sample did. If you’re starting from an old finish, read how to remove stain from wood first, and if you’re choosing a sander for the job, the best sanders for furniture list compares the palm, detail and orbital options.

