
As an Amazon Associate I earn from qualifying purchases. All claims are strictly my personal opinion.

To refinish hardwood floors, you sand the old finish off with a drum or orbital floor sander and an edger, working through three grits (typically 36 or 40, then 60, then 80 to 100), screen the whole floor with a buffer, vacuum and tack, then apply two to four coats of floor finish. Plan on two to four days for a typical room, most of it waiting for finish to dry, and up to a month before rugs go back down.
This guide walks through the whole job in the order you’ll do it: deciding whether the floor needs a full refinish at all, prepping the room, each sanding stage with the grit that goes with it, the edger and the buffer, dust, stain, the finish itself and the cure. The sanding sequence follows the National Wood Flooring Association’s (NWFA) Sanding and Finishing Guidelines, and the coat counts and dry times come from the finish makers’ own technical data sheets.
⚡ Quick Answer
Machines: a drum or orbital floor sander and a 7″ edger (usually rented), a buffer with screens, a scraper and a sanding block. For a small room, a 6″ turbo random orbital like the Bosch GET75-6N works.
Grits: 36 or 40 to cut the old finish, 60 to remove those scratches, 80 to 100 to finish; edge with the same grit you’ll use on the next drum pass; screen at 100 to 150.
Finish: 2 to 3 coats of oil-based poly or 3 coats of a waterborne floor finish. Light foot traffic after 12 to 24 hours, furniture after 48 hours, rugs after 7 to 30 days.
Refinish, Recoat or Replace: Decide Before You Rent Anything
A full refinish (sanding to bare wood and starting again) is the most work and removes wood every time you do it. Before you book a sander, check whether the floor actually needs it. The NWFA guidelines are blunt about this: it isn’t necessary to fully sand a floor unless it has visible dents, wear patterns or permanent cupping, or you want to change its color. If the finish is just dull and lightly scratched, a screen and recoat may be all it needs.
If you’re weighing DIY against a contractor, put your room sizes into my hardwood floor refinishing cost calculator first: it prices both options side by side and writes the sandpaper and finish shopping list for the DIY route.
When a Full Refinish Is the Right Call
- Worn-through traffic lanes: grey or dark wood showing where the finish has gone, usually in doorways and in front of the sink or sofa.
- Deep scratches, dents and pet damage that go into the wood, not just the finish.
- A color change. You can’t go lighter or darker without getting to bare wood.
- Peeling or cracking finish, or a floor that has been waxed. Minwax’s floor finish instructions say you need to sand to bare wood if the finish is cracking, peeling or worn away, or if shellac, lacquer, wax or products containing wax or stearates have been applied.
When a Screen and Recoat Is Enough
If the color is fine, the finish is intact with no worn-through spots, and nobody has waxed the floor, you can abrade the existing finish and add a fresh coat on top. It takes a day instead of four, removes no wood and costs a fraction of the abrasives. I’ve written a full guide on how to refinish hardwood floors without sanding that covers the screen and recoat method step by step, plus the chemical recoat kits.
Check the Wood Before You Sand It
Three quick checks save a ruined floor:
- How much wood is left. Pull a floor vent or look at a threshold to see a board’s edge. Solid strip flooring has plenty of wood above the tongue; engineered flooring has a thin top veneer that can only take a limited number of sandings, and some can’t be sanded at all. If you can’t tell, ask the flooring maker before you start.
- Moisture and cupping. The NWFA says cupped floors should not be sanded until the moisture content of the flooring and subfloor has stabilized. Sand a cupped floor flat while it’s still wet and the boards crown when they dry.
- Lead. Floor finishes applied before 1978 may contain lead, the NWFA notes. Test kits are sold at hardware stores; if it tests positive, follow the EPA’s lead rules or hire a certified contractor.
Tools and Materials You’ll Need
Most of the heavy machinery is rented; the abrasives, finish and safety gear you buy. Here’s the full list for a typical room, grouped the way you’ll use it.
Sanding Machines
- Drum (or belt) floor sander for the main field of the floor. It cuts fastest and flattens uneven boards, but it will gouge if you stop moving. The 8″ Clarke EZ-8 is the standard rental machine.
- Square-pad orbital floor sander (often called a square buff) as the beginner-friendly alternative. It’s slower and won’t flatten cupped boards, but it is much harder to gouge with.
- 7″ edger for the strip along the walls the big machine can’t reach.
- Buffer (a 175 rpm rotary floor machine) with sanding screens, to blend the drum and edger scratches before finish.
- Hand scraper and sanding block for corners, under radiators and around door casings.
If you’re deciding between renting and buying any of these, my guide to floor sander rental has published rental rates and a break-even sum, and the best floor sanders roundup covers the machines worth owning.
Abrasives
Buy more than you think you need, in each grit you’ll use, for the drum, edger and buffer. Rental shops sell the matching belts, discs and screens, usually by the piece. The grit for each stage is covered below and in the floors section of my sandpaper grit chart.
Finish, Applicators and Cleanup
- Floor finish (oil-based polyurethane, waterborne floor finish or hardwax oil), and stain if you’re changing the color.
- Applicator: a T-bar with a pad for waterborne finish, a lambswool applicator or roller for oil-based poly, plus a brush for the edges.
- Shop vacuum with a brush head, tack cloths or a microfiber pad, painter’s tape and plastic sheeting.
- Wood filler matched to your finish, a putty knife and a nail set.
Safety Gear
The NWFA guidelines open the sanding chapter with one line in capitals: always wear NIOSH-approved respiratory protection. A half-mask with P100 filters, eye protection and hearing protection are the minimum; the drum and edger are loud for hours at a time. My guide to the best respirators for woodworking explains the filter classes.
Step 1: Prepare the Room
Preparation decides how much dust ends up in the rest of the house and how many belts you tear.
- Empty the room completely, including curtains and anything on the walls you care about.
- Remove floor vents and the shoe molding (the small quarter-round along the baseboard) if there is one. Number the pieces on the back so they go back in the same place.
- Set every nail. Run your hand over the floor and punch any proud nail head below the surface with a nail set. One raised nail tears a drum belt in seconds and can throw a spark into the dust bag.
- Seal the room. Plastic sheeting over doorways, tape over vents and returns, and switch the HVAC off so it doesn’t pull dust through the house. The NWFA recommends sealing with plastic or a dust blocker and covering doorways, heat registers and returns.
- Clean the floor so grit doesn’t load the first belt.
Step 2: Sand the Floor, Stage by Stage
This is the part people worry about, and it’s where most of the mistakes happen. The principle is simple: each grit only has to remove the scratches left by the one before. Start coarse enough to cut through the old finish and flatten the boards, then work up, never skipping more than one grit. The NWFA puts it this way: use the finest grit that will flatten the floor, and don’t skip more than one grade between cuts, because a finer grit that skips too far only knocks the peaks off the deep scratches and leaves them in the floor.
| Stage | Drum or orbital | Edger | What it does |
|---|---|---|---|
| 1. First cut | 36 or 40 (24 on very rough or painted floors) | Same as drum | Removes the old finish and flattens the boards |
| 2. Second cut | 50 or 60 | The grit of your final drum cut | Removes the first-cut scratches |
| 3. Final cut | 80 to 100 | Done at stage 2 | Leaves a scratch fine enough for finish |
| 4. Screen | Buffer: 100 to 120 before stain, 120 to 150 for clear finish | Blends drum and edger marks into one pattern | |
| Old floor in good shape | Start at 50 or 60 | Start at 50 or 60 | The NWFA abrasive guide lists 50 as the first sanding on new floors and the second on old ones |
These are starting points, not rules. Factory-finished floors with an aluminum oxide finish are much harder to cut, and the NWFA notes they may respond better to a fine grit (80 or finer) used to remove the surface finish. Test a small area: if 36 grit hasn’t cut through the old finish after two passes, it isn’t the grit, it’s the finish, and you need a different approach.
The First Cut (36 to 40 Grit)
On strip and plank floors the NWFA recommends making the first cut at a 7 to 15 degree angle to the length of the boards, which flattens boards of different heights faster than going straight along them. Lower the drum only while the machine is moving forward, keep it moving at an even pace, and lift it before you stop. When two-thirds of the room is done, turn around and sand the remaining third, overlapping the first passes by two to three feet so the two halves blend.
With an orbital floor sander you can go with the grain from the start, and it won’t flatten the floor the way a drum does, so on a badly cupped or uneven floor the first cut takes much longer. The step-by-step technique for each machine is in my guide on how to sand hardwood floors, which has a section each for the drum sander and the orbital floor sander.
Edge the Perimeter
The drum can’t get closer than a few inches to the walls. After the first cut, run the edger around the room with the same coarse grit, keeping it moving in smooth arcs and never tilting it onto the disc’s edge. The edger leaves curved scratches the drum doesn’t, which is why the buffer step later matters so much.
The Second Cut (50 to 60 Grit)
Now sand parallel to the grain, along the length of the boards, with the next grit up. This pass removes the angled scratches from the first cut. After it, the NWFA says to edge again, using the same grit you’ll use for the final drum cut, so the edge and the field finish at the same scratch depth.
Fill Gaps and Holes
Fill nail holes, gouges and small gaps before the final cut, so the last pass sands the filler flush. Use a commercial filler that’s compatible with your stain and finish, or do what floor pros do and mix the fine dust from your final edging with a compatible filler binder into a paste.
The Final Cut (80 to 100 Grit)
The last drum pass goes with the grain again, one grit finer. Finish with 100 if you’re leaving the wood natural under a clear coat, or stop at 80 if you’re staining dark and want more color to soak in (more on that below). Then hand-scrape the corners, under radiators and around door casings, and sand those spots by hand with the same grit, as the NWFA recommends.
Screen the Whole Floor With a Buffer
Finally, look at the floor in raking light from a low angle. You’ll see edger swirls along the walls and possibly chatter marks from the drum. The NWFA says to run a buffer, multi-disc sander or oscillating sander over the entire floor to remove these sanding imperfections. Bona’s technical data sheet for Traffic HD gives the grits: for an unstained floor, make the final cut at 80 to 120 grit and multidisc at 120 to 150; for a stained floor, final cut at 80 to 100 and multidisc at 80 to 120.
💡 Pro Tip
Before the final cut, scribble across the whole floor with a soft pencil. Sand until every mark is gone. Any pencil line still visible is a spot the machine skipped, and it will show the moment finish goes on.
Step 3: Control the Dust (and the Fire Risk)
Rental drum sanders and edgers have dust bags, but a lot of fine dust still escapes. Three habits keep it manageable and safe:
- Empty the bags often. The NWFA warns that sanding dust is highly flammable and that you should never run the sanding machine with the bag more than half full.
- Never leave dust overnight. Spontaneous combustion of floor dust is a real fire cause. Empty bags into a metal container outdoors and take dust off site at the end of each day. Never leave the machine with dust in the bag.
- Vacuum between grits, not just at the end. Loose coarse grit trapped under a finer belt leaves deep scratches.
If you’re using your own handheld sanders on a small room, connect them to a shop vac or a dust extractor; a tool’s own dust bag doesn’t come close on a whole floor.
Step 4: Clean, Then Stain (Optional)
Vacuum the whole room, top down: walls, window sills, door frames, then the floor, including the gaps between boards. Then tack the floor with a microfiber pad or a cloth dampened with the solvent your finish maker specifies (water for waterborne finishes, mineral spirits for oil-based).
Do You Seal a Wood Floor After Sanding or Just Stain?
Stain is color only; it doesn’t protect anything. If you stain, the stain still needs a clear finish on top. If you like the natural color of the wood, skip the stain and go straight to finish (or a sealer, if your finish system calls for one). Minwax’s floor instructions, for example, say to finish sanding at 100 grit before staining and to wait 24 hours for the stain to dry before the first coat of their waterborne floor finish.
Water Popping for Darker, Even Stain
Water popping (also called grain raising) means wiping the sanded floor with water to open the grain so it takes stain darker and more evenly. The NWFA says to test it on a sample board first, record the moisture content before you start, and let the wood return to its original moisture content before you stain. A pinless moisture meter makes that check quick and leaves no holes in the floor. Too much water, or staining too soon, causes blotching.
Test the Color First
Sand a spare board or a closet corner through the same grits and test your stain there. Oak, maple and pine take the same stain very differently, and the color on the can lid means nothing until you’ve seen it on your floor under your finish.
Step 5: Apply the Finish
The finish is what you’ll live with for the next ten years. The main choice is between oil-based polyurethane and waterborne finish, with hardwax oil as a third option. For seven floor finishes compared on their makers’ data sheets, see my roundup of the best wood floor finish.
| Maker’s data sheet | Minwax Super Fast-Drying Poly for Floors (oil) | Minwax Ultimate Floor Finish (water) | Bona Traffic HD (2-part water) |
|---|---|---|---|
| Coverage per gallon | 600 to 700 sq ft | About 500 sq ft | 350 to 400 sq ft |
| Time between coats | 3 to 4 hours | At least 2 hours, under 24 | 2 to 3 hours |
| Sanding between coats | Not needed within 12 hours | Not needed within 24 hours | Not needed within 48 hours |
| Coats on bare wood | 3 (2 over stain or sealer) | 3 (2 over stain) | Per Bona system, sealer plus finish coats |
| Traffic and cure | Light foot traffic 12 to 18 hours after the final coat | Light foot traffic in 24 hours, no rugs for 7 days | 80% cured after 1 day, fully cured in about 3 days |
Oil-Based Polyurethane
Oil-based poly is forgiving to apply, builds a thick film in fewer coats and covers more area per gallon. The trade-offs are a strong solvent smell, longer dry times and a warm amber tone that deepens over the years, which looks good on red oak and less so on maple or whitewashed floors. Ventilate hard: Minwax’s data sheet tells you to open windows and doors or use respiratory protection rated for organic vapors.
Waterborne Floor Finish
Waterborne finishes dry in a couple of hours, smell far less, stay clear rather than ambering, and let you put several coats on in one day. Minwax notes that its Ultimate Floor Finish needs a sanding sealer first on bare white oak, to prevent a tannin reaction that discolors the wood. Two-part commercial finishes like Bona Traffic HD add a hardener for more scratch resistance and are what many flooring pros use.
Hardwax Oil
Hardwax oils soak in rather than forming a film, give a matte, natural look and can be spot-repaired without sanding the whole room. They usually need more frequent maintenance coats than a polyurethane. Follow the maker’s coverage and buffing instructions exactly; excess oil left on the surface stays sticky.
How to Apply It Without Lap Marks
- Cut in along the walls with a brush first.
- Pour a line of finish and pull it with the grain using a T-bar or applicator pad, keeping a wet edge so each pass overlaps finish that hasn’t started to dry.
- Work toward the exit door so you don’t finish yourself into a corner.
- Don’t spread it thinner than the coverage rate on the label; Bona’s data sheet repeats this in capitals.
- Between coats, vacuum and tack at a minimum. If you go past the recoat window, scuff the floor with a buffer and a fine screen or pad (Minwax specifies 220 grit after 24 hours for its waterborne finish; Bona specifies 180 to 240 grit abrasives after 48 hours), then vacuum and tack again.
My guide on sanding between coats of polyurethane goes into the abrasives for that intercoat step.
Step 6: Let It Cure Before You Move Back In
Dry to the touch is not cured. The NWFA’s general guidance is that most surface-finished floors can be walked on after 24 to 48 hours; furniture should be lifted (never slid) into place after 48 hours, and area rugs wait until the finish is fully cured, generally 7 to 30 days, or as the finish maker says. Put felt pads under every furniture leg before it goes back.
How Long Does It Take to Refinish Hardwood Floors?
For one room done yourself, budget it like this:
- Day 1: prep, three sanding cuts, edging, screening and cleanup.
- Day 2: stain (if used) or the first one or two coats of waterborne finish.
- Day 3: the remaining coats. Oil-based poly at three to four hours between coats can take a day longer.
- Then: 24 to 48 hours before careful walking and furniture, up to a month before rugs.
A whole house is closer to a week, and most of that time is spent waiting for finish, not sanding.
Common Mistakes That Ruin a DIY Refinish
- Stopping the drum in one place. It digs a dip in seconds. Lift the drum before you stop, every time.
- Skipping grits to save time, which leaves deep scratches that show under the finish.
- Not matching the edger to the field. Edge with the grit of the next drum pass and screen the whole floor, or you’ll see a frame of swirls around the room.
- Finishing over dust. Every speck becomes a bump in the film. Vacuum twice and tack.
- Rushing the cure. Dragging a sofa across a two-day-old finish is the fastest way to undo the whole job.
What You Need
The big machines are usually rented, but a few products are worth owning for the job, and buying the abrasives and finish online is often simpler. The specs below come from the makers; I don’t show prices or ratings, which change daily.
Bosch GET75-6N 6″ Dual-Mode Random Orbital Sander
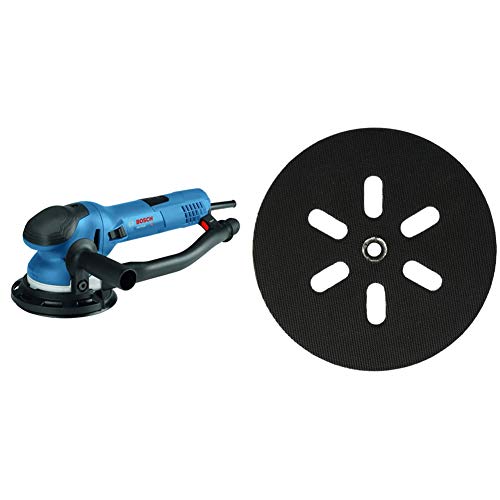
Best Handheld Sander for Small Floors and Edges
For a closet, hallway or small bedroom, renting a drum sander can be more machine than you need. Bosch’s GET75-6N has a 7.5 amp motor, a 6″ pad and a Turbo mode that switches from random orbit to a direct-drive rotation for much faster stock removal, then back to random orbit for a swirl-free finish. It is slow on a whole living room, but it’s a genuinely useful edger substitute and stair tool. It’s the top pick in my best floor sanders roundup.
- ✅ Turbo mode for removing old finish
- ✅ Random orbit mode for the final pass
- ✅ 6″ pad covers ground faster than a 5″
- ❌ Too slow for a large room on its own
Best For: Small rooms, edges, stair treads and touch-ups.
17″ Floor Sanding Screens, 120 Grit
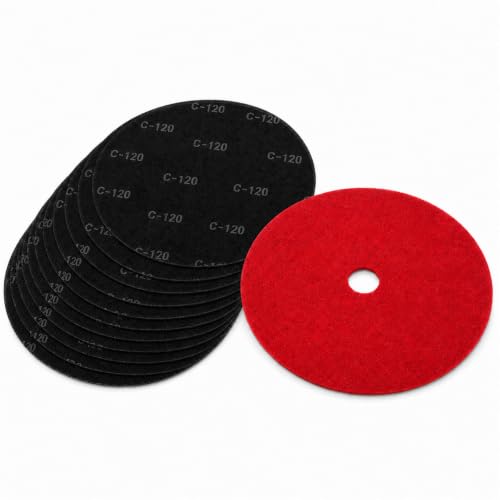
For the Screening Step
The common rental buffer is a 17″ machine, and its screens sit under a driver pad. This 10-pack of 120 grit silicon carbide mesh screens covers the clear-finish screening step, and 80 grit packs are sold the same way (HUAALIUCHE 17″ 80 grit) for stained floors or blending heavier edger marks. Screens are open mesh, so they don’t load up with dust as fast as paper; flip them when one side stops cutting.
- ✅ Fits standard 17″ rental buffers
- ✅ Mesh resists clogging
- ❌ Check your buffer’s pad size before you order
Best For: Screening before finish, and screen-and-recoat jobs.
Minwax Super Fast-Drying Polyurethane for Floors

Best Oil-Based Floor Finish
An oil-based polyurethane formulated for hardwood floors. Minwax’s technical data sheet gives 600 to 700 sq ft per gallon, a 3 to 4 hour recoat time, no sanding between coats if you recoat within 12 hours, and light foot traffic 12 to 18 hours after the final coat. Three coats on bare wood, two over stain or sealer. This listing is a two-gallon pack in satin, which is enough for two coats on most single rooms.
- ✅ High coverage per gallon
- ✅ No sanding between coats inside 12 hours
- ❌ Strong solvent odor; ventilate well
- ❌ Ambers over time
Best For: Red oak and warm-toned floors, and anyone who wants fewer coats.
Minwax Ultimate Floor Finish

Best Waterborne Finish for DIY
A waterborne floor topcoat that Minwax says can be recoated in two hours without sanding between coats (if you recoat within 24 hours), doesn’t amber quickly and cleans up with soap and water. Coverage is about 500 sq ft per gallon; three coats on bare wood, two over stain or for a screen and recoat. Light foot traffic in 24 hours, but no rugs and no cleaning for seven days. Use a sanding sealer first on bare white oak.
- ✅ Three coats in one day
- ✅ Low odor, stays clear
- ❌ Needs a sealer on white oak
Best For: Maple, white oak and light floors, and homes that can’t be empty for long.
Duratool 18″ T-Bar Applicator

For Waterborne Finish
An 18″ T-bar is the tool floor finishers use to pull waterborne finish across a room in long, even strokes. This bundle includes the frame and an 18″ refill pad, which threads onto a standard broom-style handle. For oil-based poly, a lambswool applicator or a short-nap roller is the better choice.
- ✅ Even film, fewer lap marks
- ✅ Refill pad included
- ❌ Takes a little practice on the first coat
Best For: Applying waterborne finish to whole rooms.
GVS Elipse P100 Half Mask Respirator

For Sanding Dust
A compact reusable half mask with P100 filters, the highest particulate filter class for half masks, which seals better around the face than a disposable dust mask over a full day of drum sanding. P100 filters stop particles, not vapors: for oil-based finish fumes, you need a cartridge rated for organic vapors.
- ✅ P100 particulate filters included
- ✅ Low profile, fits under safety glasses
- ❌ Not for solvent vapors
Best For: Drum sanding, edging and screening.
How I Put This Guide Together
The sanding sequence, edging, screening, dust safety and cure times come from the National Wood Flooring Association’s Sanding and Finishing Guidelines and Methods. Finish coverage, recoat windows and coat counts come from the technical data sheets for Minwax Super Fast-Drying Polyurethane for Floors, Minwax Ultimate Floor Finish and Bona Traffic HD. The products are on sale on Amazon today and their specs come from the makers; I don’t show customer ratings or prices. More on how I choose the sanders I recommend.
🏆 The Verdict
Refinishing hardwood floors is a weekend of sanding and a few days of finishing. Decide first whether the floor needs it, then sand in three cuts (36 or 40, 60, 80 to 100) without skipping grits, edge with the next grit up, screen the whole floor, clean twice, and lay down two to three coats of a floor-rated finish. Rent the drum and edger, and keep a Bosch GET75-6N for the corners, stairs and small rooms.
❓ Frequently Asked Questions
Is it worth refinishing hardwood floors?+
Can you recoat hardwood floors without sanding?+
Do you seal a wood floor after sanding or just stain?+
What is the difference between resurfacing and refinishing hardwood floors?+
How long does it take to refinish hardwood floors?+
Can a beginner refinish hardwood floors themselves?+
Conclusion
Most of a good refinish happens before the finish can is opened: an honest decision about whether the floor needs sanding, careful prep, and patient sanding through every grit. Get those right and the finish is the easy part. If you’re still choosing machines, start with my floor sander rental guide; if your floor only looks tired, try the screen and recoat method first. Questions about your own floor? Ask in the comments.

