
As an Amazon Associate I earn from qualifying purchases. All claims are strictly my personal opinion.
Router table for this guide

Kreg PRS2100 Precision Benchtop Router Table
Full-size insert plate with three reducing rings, a fence with sliding faces and T-slots for featherboards, plus a starting pin and bit guard.

To use a router table, unplug the router, install the bit with most of the shank in the collet, fit the smallest insert ring that clears the bit, set the bit height and the fence, and lower the guard as close to the work as it will go. Then switch on, hold the work flat on the table and tight to the fence, and feed it from right to left, against the bit’s rotation, finishing the cut with a push block.
This guide covers the whole job on a table: what each part does, setting up the plate, bit, height, fence and speed, why the feed always goes right to left, step-by-step methods for edge profiles, grooves, rabbets, stopped cuts and curved edges, and how to set featherboards and push blocks. The safety rules come from the manuals Kreg, Bosch and Rockler publish for their router tables. If you’ve never used a router at all, start with my guide on how to use a router, which covers bits, depth and speed for hand-held work.
⚡ Quick Answer
Setup: router unplugged, bit deep in the collet, smallest insert ring, fence faces close to the bit, guard down.
Direction: standing in front of the table, feed right to left. The bit spins counterclockwise seen from above.
Never: trap the work between the bit and the fence, start the router with the work touching the bit, or take a deep cut in one pass.
Hands: featherboards hold the work in, push blocks move it past the bit. Rout small parts from a larger board.
What You’ll Use
A router table, the router that hangs under it, a few good bits, featherboards and push blocks. Facts below come from the makers’ manuals and product pages.
Kreg PRS2100 Precision Benchtop Router Table
The Router Table
Every step in this guide works on any decent table, but the Kreg PRS2100 is the one I’d point a beginner to, and it’s the Editor’s Choice in my best router table roundup. It has a 16″ x 24″ top and a full-size insert plate with three reducing rings, so you can close the opening around small bits; one ring takes standard Porter-Cable-style guide bushings for pattern work. The aluminum fence has sliding faces you can close up to the bit, T-slots on the top and front for featherboards and stops, and a center-reading tape rule for positioning stopped cuts. The outfeed face can be offset 1/16″ or 1/32″ so the table works as a vertical jointer. Kreg includes a bit guard and a starting pin for curved work. It sits on a bench and stores on a shelf.
- ✅ Full-size plate with three reducing rings
- ✅ Fence with sliding faces and T-slots
- ✅ Starting pin and bit guard included
- ❌ Router and lift not included
- ❌ Smaller top than a floor-standing table
Best For: Home shops that want a precise, portable table to learn on and keep.
Kreg True-FLEX Featherboard (PRS3020, Pack of 2)

Featherboards
Featherboards keep the work tight against the fence and flat on the table, so your hands can stay back and push. Kreg’s twin pack mounts in miter slots and T-slots with Wedge-Lock hardware, which fits the PRS2100 fence and most tables. Two boards cover the usual router-table setup: one on the table pushing the work into the fence, one on the fence pushing it down. Kreg’s manual says to set the finger tips 1/16″ less than the width or thickness of the workpiece, point the direction-of-feed arrow the way the work travels, and never apply pressure right over the bit. It’s also clear that a featherboard is not an anti-kickback device and doesn’t replace the guard.
- ✅ Fits miter slots and T-slots
- ✅ Two boards for side and top pressure
- ✅ Also works on the table saw and band saw
- ❌ Needs re-setting for each stock size
- ❌ Not a substitute for push blocks
Best For: Grooves, rabbets and edge profiles on long boards.
POWERTEC Push Block and Push Stick Set

Push Blocks and Sticks
On a router table your hands feed the work toward a bit spinning at well over 10,000 RPM, so the last few inches of every cut should be pushed with a block, not your fingers. This POWERTEC set has one long and two short hold-down push blocks, a V push stick and a straight push stick. POWERTEC lists them for router tables, table saws, band saws, jointers and shapers. The blocks press a board flat while it moves; the narrow sticks push thin strips along the fence where a block won’t fit.
- ✅ Five pieces for wide and narrow stock
- ✅ Hold-down blocks keep work flat
- ✅ Useful on the table saw and jointer too
- ❌ Plastic, not shop-made to your fence
Best For: Anyone starting on a router table.
Whiteside 401 Basic 7-Piece Router Bit Set (1/2″ Shank)
Router Bits
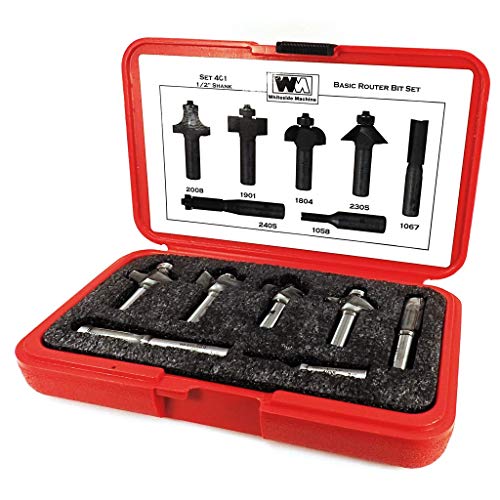
Seven bits cover almost every first router-table project, and 1/2″ shanks run smoother and flex less than 1/4″ shanks. The Whiteside 401 set has a 1/4″ and a 1/2″ straight bit for grooves and dadoes, a 3/8″ x 1/2″ rabbet, a 3/8″ roundover, a 3/8″ cove, a 45° chamfer and a 1/2″ flush trim bit, in a hard case. The rabbet, roundover, cove, chamfer and flush trim bits carry a guide bearing, so they also work against the starting pin on curved edges. My guide to types of router bits explains what each profile does.
- ✅ Seven most-used profiles
- ✅ 1/2″ shanks for a table-mounted router
- ✅ Bearing bits for curved work
- ❌ Needs a 1/2″ collet
Best For: A first set of quality bits for table and hand-held work.
You’ll also need a router with enough power for a table, ideally 2 HP or more with variable speed and a 1/2″ collet; my picks for the best router for woodworking cover the ones that work well upside down. Add a shop vacuum on the fence port, eye and hearing protection, scrap boards for test cuts and a couple of clamps for stop blocks.
How a Router Table Works
A router table turns the router upside down. The router bolts to an insert plate that sits flush in the tabletop, the bit sticks up through a hole in the plate, and instead of moving the router over the wood, you move the wood over the bit. That makes narrow and small parts, long moldings and repeat cuts much easier to control than with a hand-held router. Around the bit you’ll find reducing rings that close the opening in the plate, a fence that sets how far the cut reaches into the edge, a clear bit guard, a starting pin for curved work, and a miter slot or T-slots for featherboards and stop blocks.
Set Up the Router Table
1. Mount the Router and Level the Plate
Fit the router to the insert plate following the table’s instructions, then check the plate against the top with a straightedge: it must sit flush. Bosch’s manual for its RA1171 table warns that a plate that isn’t flush gives poor results, and suggests sliding a square board from right to left across the plate to check it moves smoothly. Adjust the plate’s leveling screws until it does. A plate that sits low lets the work dip at the bit; one that sits high catches the leading edge.
2. Install the Bit
Unplug the router before any adjustment. Kreg and Bosch both say it: never change the bit, fence, plate or rings with the router running or plugged in. Insert the bit so at least 75% of the shank is in the collet (Kreg) or at least 3/4″ (Bosch), then pull it back 1/16″ to 1/8″ so the shank doesn’t bottom out, and tighten the collet firmly. Use only router bits: Kreg’s manual rules out carving burrs, wire wheels and drill bits, even if the shank fits. Dull, dirty or damaged bits go back for sharpening or in the bin.
3. Fit the Smallest Insert Ring
Drop in the reducing ring with the smallest opening that lets the bit pass. Kreg explains why: a large gap around the bit lets the work tip into it and kick back. Turn the bit by hand to make sure nothing touches it.
4. Set the Bit Height
Raise the bit to the height of the cut, measuring from the table to the top of the cutter with a ruler or setup gauge. For a profile like a roundover, set the bit so the edge of the profile blends into the face of the board without a step. For a groove, the height is the depth of the groove. If the cut is deep, set the bit lower and raise it in stages: Kreg and Bosch both say to make several progressively deeper cuts rather than remove a lot of wood in one pass.
5. Set the Fence
Move the fence to set how far the bit reaches into the edge, then close the fence faces as close as possible to the bit and turn the bit by hand to check for contact. Lock the fence and the faces firmly. With a bearing bit used against the fence, line the fence faces up with the front of the bearing so the fence and the bearing guide the work together. Unlike a table saw fence, a router fence doesn’t need to be parallel to the miter slot, because the bit is round and cuts the same at any angle.
6. Lower the Guard and Set the Speed
Bring the bit guard down over the bit and as close to the surface of the work as it will go, as Kreg’s manual specifies. Then set the router’s speed for the bit’s diameter. Kreg’s recommended maximums, the same pattern most router makers publish:
- Bits up to 1″ diameter: 24,000 RPM.
- 1-1/4″ to 2″: 18,000 RPM.
- 2-1/4″ to 2-1/2″: 16,000 RPM.
- 3″ to 3-1/2″: 12,000 RPM.
Big panel-raising bits need the slow end of the dial, and the bit maker’s own speed rating comes first. Plug in, stand clear, and switch on with nothing touching the bit.
Feed Direction: Always Right to Left
This is the rule that matters most on a router table. Seen from above, a table-mounted router bit spins counterclockwise. Standing in front of the table, facing the fence, you feed the work from right to left, so the cutting edges meet the wood head-on and push it gently against the fence and back toward you. Kreg, Bosch and Rockler all put it the same way: feed the workpiece against the rotation of the bit, never with it.

Feeding the other way is a climb cut. Bosch’s manual describes what happens: the work climbs up on the bit, which pulls it, and possibly your hands, into the cutter. Rockler’s fence instructions say even a small bit will overpower your grip during a climb cut. Some woodworkers take light climb cuts with a hand-held router to stop tear-out; on a router table, don’t.
The second half of the rule is the fence trap. Never feed a board so that it runs between the bit and the fence. In that position, an ordinary right-to-left feed becomes a climb cut, and the bit sits exposed on your side of the work. Rockler’s diagram shows the one exception: a groove or dado, where the bit is fully under the board and doesn’t cut through it, isn’t a trap. For edge profiles, the bit always sits inside the fence opening and the edge being cut rides against the fence.
How to Use a Router Table, Step by Step
1. Rout an Edge Profile Along the Fence
Install a profile bit such as a roundover or chamfer, set the height and fence as above, and add a featherboard on the table pushing the board into the fence. Make a test pass on scrap of the same thickness. Then hold the board flat and tight to the fence with your left hand ahead of the bit and your right hand pushing from behind, both well away from the cutter, and feed at a steady pace. As the end of the board reaches the bit, switch your right hand to a push block. Rout the end grain first and the long grain last, so the long-grain pass cleans up any chip-out at the corners.
2. Cut a Groove or Dado
Use a straight bit the width of the groove. The fence sets the distance from the edge of the board to the groove, and the bit height sets the depth. Take the depth in two or three passes, raising the bit between them. For a dado across a narrow board, back the board with a miter gauge or a square block of scrap so it stays at 90° to the fence. A featherboard on the fence, pressing down just before the bit, keeps the board from lifting.
3. Cut a Rabbet
A rabbet is a step along the edge, cut with a straight bit partly buried in the fence or with a bearing rabbet bit. With a straight bit, set the height to the depth of the rabbet and move the fence so only the width you need is exposed. Work in shallow passes, moving the fence back between them; Bosch’s manual describes this same method for deep edge cuts.
4. Make a Stopped Cut
A stopped groove or flute starts and ends inside the board. Mark both edges of the bit on the fence, or use the fence’s center-reading scale, which Kreg includes for exactly this. Clamp a stop block to the fence on the infeed side (right) and one on the outfeed side (left) to set where the cut starts and ends. With the router running, hold the board’s trailing end against the infeed block and lower it carefully onto the bit, feed left to the outfeed block, then switch off and wait for the bit to stop before lifting the board. The infeed block takes the push of the bit when it first bites, so the board can’t be thrown back toward you.
5. Rout Curved Edges With the Starting Pin
For curved work, remove the fence, screw the starting pin into the plate and fit the guard that goes with it. Use only bits with a guide bearing. Rest the work against the pin, clear of the bit, and pivot it slowly into the bit until the edge touches the bearing. Then ease it off the pin and keep it against the bearing as you feed, always right to left across the front of the bit, as Bosch’s manual puts it. Kreg’s warning applies: the pin is for curved edges only; straight edges always go against the fence.
6. Rout Narrow and Small Parts Safely
Kreg’s advice is to avoid routing small parts at all: rout the profile on the edge of a wide board, then cut the narrow piece off it on the saw. If you must rout a small part, hold it in a jig or a wooden handscrew clamp, never with your fingertips. Narrow strips go past the bit with a push stick along the fence, with a featherboard holding them in.
💡 Pro Tip: Keep a Setup Block for Every Bit You Use Often
Once a test piece comes out right, keep it and write the bit and the date on it. Next time you use that bit, set the height and fence by sliding the test piece up to the stopped bit, and you skip half the trial cuts. Always do one test pass on scrap anyway: Bosch’s manual recommends a trial cut on scrap after every adjustment.
How to Set Featherboards and Push Blocks
Featherboards hold the work; push blocks move it. On a router table, the usual arrangement is one featherboard on the table, in the miter slot, pressing the board into the fence just before the bit, and one on the fence pressing it down onto the table. Kreg’s featherboard manual gives the details:
- Set the finger tips 1/16″ less than the width or thickness of the board, so they press firmly but the board still moves without a fight.
- Point the direction-of-feed arrow the way the work travels, and tighten the knobs so the board can’t creep.
- If you add a featherboard on the outfeed side, raise or offset it so it doesn’t press on the part of the board that’s already been cut away, or the board can tip.
- Never put side pressure directly opposite the bit or top pressure directly over it.
Bosch adds the most important limit: featherboards are an aid, and they’re not meant to hold the work on their own while the bit is turning. Keep pushing until the board is completely past the bit, then let go. Use a push block or push stick for the last part of every pass, and switch off before reaching for offcuts near the bit.
Router Table Safety Rules
These come from the safety sections of the Kreg PRS2100 and Bosch RA1171 manuals and Rockler’s fence instructions:
- Unplug before adjusting the bit, fence, plate or rings.
- Feed right to left, against the bit’s rotation. Never climb cut.
- Never trap the work between the bit and the fence.
- Use the guard, as low as the work allows.
- Light passes: several shallow cuts instead of one deep one.
- Start clear: never switch on with the work touching the bit, and wait for the bit to stop before moving the work back.
- Flat, straight stock only: warped, twisted or bowed boards and loose knots can lift and kick back.
- Support long work with infeed and outfeed stands; don’t rout very large panels on a small benchtop table.
- Hands away from the bit and your body out of the path of the work, with push blocks, push sticks and featherboards.
- Ear, eye and dust protection: a router is loud and throws fine dust, so connect a vacuum to the fence port. My guide to dust collection for woodworking tools covers hookups.
Common Router Table Mistakes
- Burn marks: feeding too slowly, a dull or dirty bit, or too much speed for a big bit. Keep the feed moving and clean resin off the bit.
- Chatter and a wavy edge: too deep a cut in one pass, or the board drifting off the fence. Take lighter passes and add a featherboard.
- Snipe at the end of the board: the board drops into the fence opening as it leaves the infeed face. Close the fence faces around the bit, or align the outfeed face with the cut edge when the whole edge is removed.
- Chip-out at the corners: routing long grain before end grain. Rout the ends first, or back the end with a scrap block.
- A step in the profile: the bit set slightly too high or low. Adjust on scrap until the profile blends into the face.
🏆 The Short Version
Unplug, set the bit deep in the collet, use the smallest ring, set the height and fence on scrap, and lower the guard. Feed right to left with the board flat and tight to the fence, take deep cuts in several passes, and let featherboards and push blocks do the work near the bit. A table like the Kreg PRS2100, a pair of Kreg True-FLEX featherboards and a set of push blocks cover everything in this guide.
❓ Frequently Asked Questions
Which way do you run wood on a router table?+
How is a router table used?+
What can I make with a router table?+
How does a router attach to a router table?+
Can you use a router table without a fence?+
How do you cut grooves on a router table?+
Conclusion
A router table rewards a careful setup: a bit seated deep in the collet, the smallest ring, a fence closed around the bit and a guard set low. After that it comes down to one direction, right to left, and light passes with featherboards and push blocks between your hands and the cutter. Start with simple edge profiles on scrap, move on to grooves and rabbets, and leave stopped cuts and curved work for when the basic feed feels automatic. If you’re still choosing a table, my best router table guide compares benchtop and floor models. Questions about your setup? Ask in the comments.

