
As an Amazon Associate I earn from qualifying purchases. All claims are strictly my personal opinion.

To use a router, unplug it, fit the bit deep in the collet and tighten it, set a shallow depth of cut, clamp the workpiece, then start the router clear of the wood and feed it against the bit’s rotation: left to right along the edge nearest you, which means counterclockwise around the outside of a board. Take several shallow passes rather than one deep one, and let the router stop before you lift it.
This guide covers how to use a router from the first cut: what a router does, the safety rules that matter, installing a bit, setting depth and speed, feed direction, and step-by-step methods for edge profiles, grooves and dadoes, plunge cuts, template routing and the router table. If you don’t own one yet, my best router for woodworking picks compare full-size kits, trim routers and cordless models.
⚡ Quick Answer
Direction: against the bit’s rotation. Hand-held: counterclockwise around outside edges, clockwise inside openings. Router table: right to left.
Depth: several shallow passes; about 1/8″ to 1/4″ per pass in hardwood with a straight bit, less with big profiles.
Speed: full speed for small bits, slower for large-diameter bits, and never above the bit’s rated RPM.
Always: unplug to change bits, clamp the work, wear eye and hearing protection, and keep both hands on the router.
What a Router Does
A router is a motor that spins a cutting bit at 8,000 to 35,000 RPM, mounted in a base that rides on the wood. The bit decides the cut, and the base and a guide decide where it goes. With different bits and guides, one router rounds and shapes edges, cuts grooves, dadoes and rabbets for joints, trims one piece flush with another, copies a template, cuts circles and mortises, and, mounted upside down in a table, makes molding and door frames.
Fixed Base and Plunge Base
A fixed base holds the bit at one depth: you set it, switch on and enter the wood from an edge. A plunge base lets you start with the bit above the wood and push it down into the middle of a board, which you need for mortises, stopped grooves and inlays. Many routers come as kits with both. My plunge vs fixed base router comparison explains which to use when.
Full-Size, Compact and Palm Routers
Mid-size routers take 1/2″ and 1/4″ shank bits and do everything in this guide. Compact (trim) and palm routers take 1/4″ bits, weigh 4 to 5 lb and are easier to control one-handed on edges. The techniques are the same.
Router Safety Before You Start
- Unplug the router (or remove the battery) before you change a bit, adjust depth or change bases.
- Wear eye and hearing protection and a dust mask. Routers are loud and throw chips at face height.
- Clamp the workpiece or use a non-slip mat. You need both hands on the router.
- Check the bit’s maximum RPM, printed on the bit or its packaging, and stay below it.
- Start the router with the bit clear of the wood and let it reach full speed before cutting.
- Feed against the rotation (see the diagram below). The wrong direction is a climb cut, and the router will try to run along the edge on its own.
- Wait for the bit to stop before you lift the router or set it down, and set it down on its side or base with the bit clear of the bench.
- Don’t wear gloves or loose sleeves, and check the wood for nails and screws.
Your router’s manual has the full list for that model. Read it once; the depth and collet instructions differ between makers.
Set Up the Router
Install the Bit
- Unplug the router and remove the motor from the base if your model makes the collet easier to reach that way.
- Match the collet to the shank: a 1/2″ shank bit in the 1/2″ collet, a 1/4″ in the 1/4″. Never use a bit in the wrong collet.
- Clean the shank and collet of resin and dust so they grip evenly.
- Slide the bit in until it almost bottoms, then pull it back about 1/16″ to 1/8″. A bit that bottoms out can loosen as the collet tightens, and a bit inserted too shallowly can work loose. Most of the shank should be inside the collet.
- Tighten the collet nut with the spindle lock or the two wrenches, firmly but without standing on the wrench.
Set the Depth of Cut
Set the router on the edge of the board, lower the bit to the depth you want and lock it. For a profile bit with a bearing, depth decides how much of the profile you cut: start shallow and creep up to the full profile. For grooves and dadoes, set the final depth with the depth ring or turret, then reach it in passes. As a starting point, take about 1/8″ to 1/4″ per pass with a 1/2″ straight bit in hardwood, more in softwood and less with small bits or large profiles. A plunge router’s turret stop makes the steps easy: set the stops to each pass depth.
Set the Speed
Small bits (roundovers, chamfers, straight bits up to about 1″) cut cleanly at or near full speed. Large-diameter bits, such as panel-raising bits and big coves, must run slower, because the edge of a big bit travels much faster than the edge of a small one at the same RPM. Turn the speed down for big bits, never exceed the bit’s rated RPM, and drop the speed a little if you see burning in cherry or maple. If you’re not sure, start slower and speed up until the cut is clean.
Which Direction to Move a Router
This is the rule most beginners get wrong. Seen from above, a hand-held router’s bit spins clockwise. Feed against that rotation so each cutting edge meets the wood head-on and the router pulls gently toward the work, under your control. On the edge nearest you, that means moving left to right. Around the outside of a board, go counterclockwise; inside an opening, go clockwise. On a router table, where the router hangs upside down, feed right to left along the fence.

⚠️ Avoid the Climb Cut
Feeding the same way the bit spins is a climb cut: the bit grabs the wood and pulls the router along faster than you’re pushing. Experienced woodworkers sometimes take a very light climb cut to stop tear-out on difficult grain, but don’t try it until normal feeding is second nature, and never on a router table.
How to Use a Router, Step by Step
1. Rout an Edge Profile With a Bearing Bit
This is the best first cut: a roundover or chamfer bit with a bearing on the tip that rides along the edge and steers the cut.
- Clamp a scrap board of the same wood and practice on it first.
- Set a shallow depth so the bit takes only part of the profile.
- Rest the base flat on the board with the bit clear of the edge, and switch on.
- Move into the edge until the bearing touches, then feed left to right along the edge nearest you, keeping the base flat and the bearing in light contact.
- Rout end grain first when you go around a board: any tear-out at the corners is then removed when you rout the long edges.
- Lower the bit and repeat until you reach the full profile, then a final light pass for a clean surface.
2. Cut a Groove or Dado
A groove runs along the grain and a dado across it. The bit has no bearing, so a guide sets the line.
- Mark the groove on the board and on its end.
- Set up a guide: an edge guide for grooves near the edge, or a straightedge clamped to the board for dadoes across a wide panel. Measure from the bit to the edge of the router’s base to place the straightedge.
- Keep the base pressed against the guide and feed so the bit’s rotation pulls the router toward the guide, not away from it.
- Cut in passes to full depth. For a groove wider than your bit, make two cuts, moving the guide between them.
For shelves and cabinet sides, a jig makes dadoes faster and exactly the width of the shelf: my DIY router dado jig plans show how to build one.
3. Make a Plunge Cut
- Set the depth stop or turret for the first pass.
- Place the router on the work with the bit above the surface and the base flat, and switch on.
- Release the plunge lock, push down smoothly to the stop and lock it.
- Feed along the guide to the end of the cut, then release the lock and let the springs lift the bit out before you switch off.
- Repeat at the next turret stop until you reach full depth.
4. Rout to a Template
To make identical curved parts, cut a template from 1/2″ MDF or plywood, fasten it to the rough-cut workpiece with double-sided tape or screws in waste areas, and rout around it with a flush trim bit (bearing at the tip, template underneath) or a pattern bit (bearing at the shank, template on top). Rough-cut the part with a jigsaw first, leaving about 1/16″ to 1/8″ for the router to remove. A guide bushing in the router’s base does the same job with a straight bit, offset from the template by the bushing’s size.
5. Use a Router Table
On a table, the router hangs upside down under an insert plate and you move the wood. Set the bit height from below or above the table, set the fence, and feed from right to left with the work pressed against the fence and down on the table. Use featherboards to hold the work in, push blocks to keep your hands away from the bit, and the starter pin for curved work without a fence. Narrow and small parts are much safer on a table than hand-held. My best router table picks compare benchtop and floor tables.
💡 Pro Tip: Make a Final Skim Pass
Leave about 1/32″ for a last pass at a steady, slightly faster feed. A very light final cut leaves a smoother surface with less burning and fuzz, and much less sanding afterwards.
Common Router Mistakes and Fixes
- Burn marks: the bit is dull, the speed is too high for the bit, or you fed too slowly or paused. Keep moving, clean or replace the bit, and lower the speed for big bits.
- Tear-out at the end of a cut: rout end grain first, back up the exit edge with scrap, or take a lighter pass.
- Wavy edge or groove: the base rocked or drifted off the guide. Keep the base flat, add a wider sub-base for edges, and keep steady pressure against the guide.
- Router pulling away: you’re feeding in the wrong direction. Check the diagram above.
- Chatter and a rough cut: the cut is too deep or the bit too long for a 1/4″ shank. Use a 1/2″ shank bit and take shallower passes.
- Bit slipping: a dirty collet or a bit that bottomed out. Clean the collet and reinsert the bit, pulled back slightly.
What You Need to Get Started
A router with both collets, a few good bits, clamps, and eye and hearing protection. An edge guide and a straightedge cover grooves and dadoes; push blocks matter once you move to a router table. Router dust is fine and goes everywhere, so hook up a shop vacuum where the base has a port: see my guide to dust collection for woodworking tools.
DEWALT DW618PK Fixed and Plunge Base Router Kit

A Good First Router
Every technique in this guide works with the DW618PK, which is why it’s the top pick in my best router for woodworking list. DeWalt lists a 12 A, 2-1/4 HP motor with variable speed from 8,000 to 24,000 RPM and a soft start, a fixed base and a plunge base with a five-position turret stop, 1/4″ and 1/2″ collets, a depth ring that moves in 1/64″ steps and a clear sub-base that takes standard template guides. The warranty is 3 years.
- ✅ Fixed and plunge bases with one motor
- ✅ Both collet sizes
- ✅ Fine 1/64″ depth ring
- ❌ Edge guide sold separately
- ❌ Heavier than a trim router for edge work
Best For: Learning every basic router technique with one tool.
Bosch RA1054 Deluxe Router Edge Guide

Edge Guide for Grooves and Circles
An edge guide rides along the edge of the board and keeps a groove or dado parallel to it. Bosch’s RA1054 has a fine adjustment control, guides cuts along the edge or up to 8″ in from it, and converts into a circle guide for arcs and circles up to 32″ across. It comes with a pivot plate, a dust extraction hood and a vacuum hose adapter. Bosch lists it for its 1617, 1618 and 1619 series routers, the MR23 series including the MRC23EVSK, and the PR011 palm router plunge base, so check your router before you buy; DeWalt and Makita sell guides for their own routers.
- ✅ Fine adjustment
- ✅ Doubles as a circle guide to 32″
- ✅ Dust hood and vacuum adapter
- ❌ Fits Bosch routers only
Best For: Bosch router owners cutting grooves, dadoes and circles.
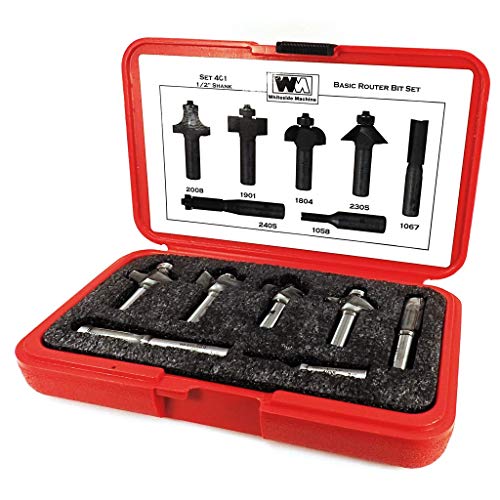
Whiteside 401 Basic 7-Piece Router Bit Set (1/2″ Shank)
Starter Bits Worth Owning
You learn faster with a few sharp bits than with a box of fifty dull ones. Whiteside’s 401 set holds the seven bits most projects need, all carbide-tipped with 1/2″ shanks: a 1/4″ and a 1/2″ straight bit for grooves and dadoes, a 3/8″ roundover, a 3/8″ cove, a 45° chamfer, a 3/8″ x 1/2″ rabbet and a 1/2″ flush trim bit, in a hard plastic case. Whiteside says they’re for hand-held routers and router tables. My guide to types of router bits explains what each one does.
- ✅ The seven most-used profiles
- ✅ Carbide-tipped, 1/2″ shanks
- ✅ Hard case
- ❌ 1/2″ shanks don’t fit trim routers
Best For: A first set for a mid-size router.
POWERTEC Push Block and Push Stick Set

Push Blocks for the Router Table
On a router table your hands push the work toward the bit, so they need something between them and the cutter on small parts. This POWERTEC set has one long and two short hold-down push blocks, a V push stick and a straight push stick. POWERTEC lists them for router tables, table saws, band saws, jointers and shapers. The blocks press the board flat on the table; the narrow sticks push thin strips past the bit along the fence.
- ✅ Five pieces for different parts
- ✅ Works on the table saw and jointer too
- ❌ Not needed for hand-held routing
Best For: Anyone starting on a router table.
Router Projects for Beginners
Good first projects use one or two techniques: a cutting board with a roundover or chamfer on the edges, picture frames with a rabbet for the glass, a small bookcase with dadoes for the shelves, and a sign with V-groove lettering cut to a template. Each one builds a skill you’ll use on bigger furniture. Sand the routed edges lightly afterwards, starting around 150 grit for profiles; my what grit sandpaper for wood guide has the full sequence.
❓ Frequently Asked Questions
How do you use a router for beginners?+
Can I just buy a router and use it?+
What can you do with a router as a beginner?+
Which way do you move a router?+
How deep should a router cut in one pass?+
How do you cut a groove with a router?+
Conclusion
Using a router comes down to a few habits: unplug before you touch the bit, clamp the work, set shallow passes, run big bits slower, and always feed against the rotation. Start with a bearing-guided edge profile on scrap, then move to grooves, plunge cuts and templates. When you’re ready for more profiles, my guide to types of router bits explains what each bit cuts. Questions about a cut? Ask in the comments.

