
As an Amazon Associate I earn from qualifying purchases. All claims are strictly my personal opinion.
The bit this jig is built around

Whiteside 3001 Template Bit With Top Bearing
1/2 in diameter and 1/2 in cutting length, so the bearing rides on 3/4 in rails.

A router dado jig is two straight rails clamped across your workpiece, set apart by the exact thickness of the shelf that will go into the dado. A top-bearing pattern bit rides along one rail, then the other, and cuts a dado precisely as wide as the gap, so the shelf fits snugly even when “3/4 in” plywood is really 23/32 in. You can build one from scrap plywood in an afternoon with the dimensions, cut list and diagrams below.
Every drawing on this page is our own. The plan is a two-rail adjustable jig, the most common DIY design because it needs no measuring at all: you set the width with the shelf itself and the depth with the router. I’ll also cover what a dado is, which router bit to use, how to cut the dado step by step, other DIY dado jig plans worth a look, and how to clean up and sand the dado before glue-up. If you want the same plan on paper, there is a printable PDF further down. New to the tool? Start with my guide on how to use a router.
⚡ Key Takeaways
- The jig: two 3/4 x 3 x 30 in rails, a 12 in back bridge and a 12 in front fence. One rail is fixed, the other slides in two slots and locks with knobs.
- The bit: a top-bearing pattern bit, 1/2 in diameter with a 1/2 in cutting length for 3/4 in rails. Bearing and cutter are the same size, so the cut follows the rail exactly.
- Width: put the shelf between the rails, slide the loose rail against it, tighten. The dado comes out exactly as wide as the shelf.
- Depth: the usual rule is one third to one half of the panel thickness, so about 1/4 in in a 3/4 in cabinet side.
- Two passes: one with the bearing on each rail, moving clockwise around the opening so the bit pulls into the rail.
What Is a Dado?
A dado is a flat-bottomed channel cut across the grain of a board, sized so another board can sit in it. It is the classic way to hold fixed shelves in a bookcase, dividers in a cabinet and stair treads in a stringer. The shelf is supported along its whole length by the bottom of the dado, so the joint carries weight without relying only on screws or glue.
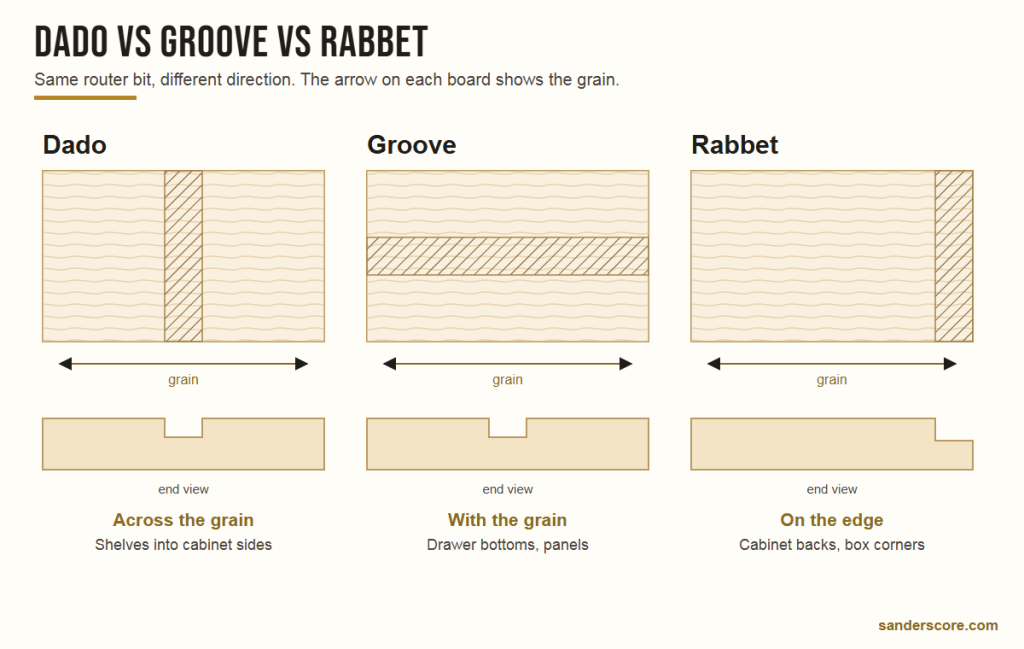
Dado vs Groove vs Rabbet
The three cuts are made with the same tools; what changes is the direction and position:
- Dado: across the grain, somewhere in the middle of the board. Shelves into cabinet sides.
- Groove: the same channel, but running with the grain. Drawer bottoms and panels sit in grooves.
- Rabbet: an L-shaped step cut along an edge or end, open on one side. Cabinet backs and simple box corners.
On plywood, where the face grain is the only grain you can see, woodworkers still call a cut across the long direction of the panel a dado. A stopped dado ends before the front edge, so the joint is hidden from the front of the cabinet.
Is It Better to Cut a Dado With a Router or a Table Saw?
Both work. A table saw with a stacked dado set is faster when you have many identical dadoes in parts small enough to push across the saw. A router with a jig is better when the panel is big and awkward (a 6 ft bookcase side is far easier to clamp a jig to than to slide over a saw), when you need a stopped dado, or when you don’t own a dado set or a saw whose arbor can take one. The router also leaves a flat bottom with square corners from a straight bit, where some dado sets leave small ridges (“bat ears”) at the edges.
How a Router Dado Jig Works
The jig does one thing: it gives the router bit two perfectly straight, parallel edges to follow. Everything else follows from the bit.
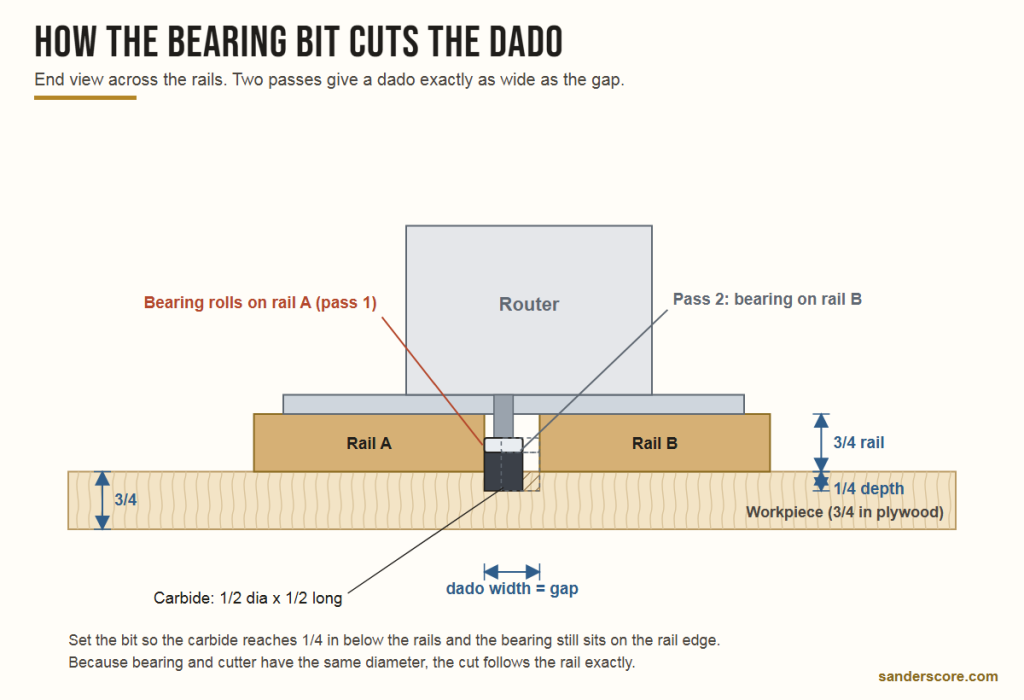
The Bearing Does the Measuring
A top-bearing pattern bit (also sold as a template bit or a top-bearing flush trim bit) has a ball bearing on the shank, right above the carbide, and the bearing has the same diameter as the cutter. When the bearing rolls along a rail, the cutting edge is exactly in line with the rail’s edge. Run the bit along rail A and you cut one wall of the dado; run it back along rail B and you cut the other wall. Whatever is in between is cleared by the two passes, so the dado is exactly as wide as the gap, whether the gap is 1/2 in or 1-1/4 in.
That is why this jig never needs a tape measure. Plywood sold as 3/4 in often measures closer to 23/32 in, and a fixed 3/4 in bit leaves a sloppy joint. Setting the gap with the actual shelf removes the problem.
What Router Bit Is Best for Dado Cuts?
It depends on how the router is guided:
- With a two-rail jig (this plan): a top-bearing pattern bit. For 3/4 in rails the cutting length should be about 1/2 in, like the Whiteside 3001 (1/2 in diameter, 1/2 in cutting length, 1/4 in shank). A longer bit, such as one with a 1 in cutting length, puts the bearing above the rail, so you’d need 1-1/2 in rails (two layers of plywood glued together).
- With a straightedge or a T-square jig: a plain straight bit or an upcut spiral bit the same width as the dado. The router base slides against the fence, so you have to offset the fence by the distance from the bit to the edge of the base.
- With a guide bushing: a straight bit inside a template guide, as in the Wood Magazine plan listed further down. You have to account for the offset between bushing and bit.
For clean edges in plywood, carbide-tipped two-flute bits or solid carbide spirals are the usual choice. Whatever bit you use, take the depth in one or two passes rather than forcing a deep cut. My guide to types of router bits shows the profile every common bit cuts.
Router Dado Jig Plans: Dimensions and Cut List
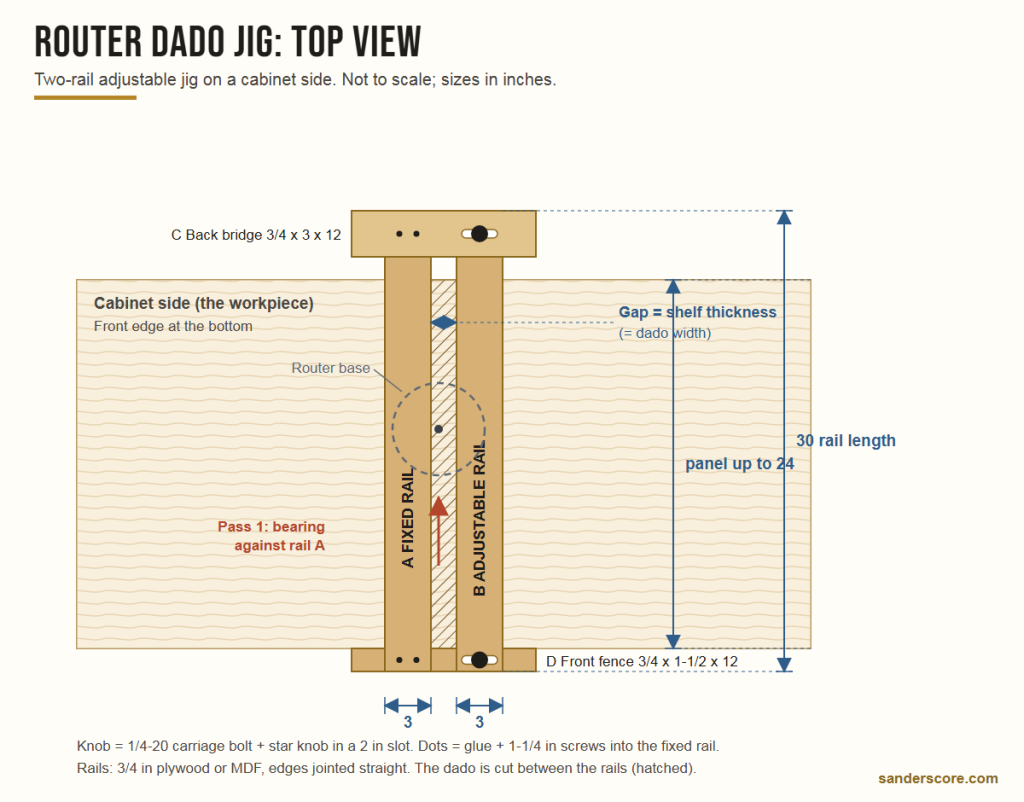
This is a two-rail adjustable router dado jig for cabinet and bookcase sides up to 24 in deep. Dimensions are in inches. Make the rails from the flattest, straightest material you have: Baltic birch plywood or MDF both work, and the edges the bearing rides on must be jointed or table-saw cut perfectly straight.
Cut List
| Part | Qty | Size (T x W x L, in) | Notes |
|---|---|---|---|
| A Fixed rail | 1 | 3/4 x 3 x 30 | Glued and screwed to C and D, square to D |
| B Adjustable rail | 1 | 3/4 x 3 x 30 | One 1/4 in hole at each end for the bolts |
| C Back bridge | 1 | 3/4 x 3 x 12 | Sits on top of both rails; 5/16 x 2 in slot over rail B |
| D Front fence | 1 | 3/4 x 1-1/2 x 12 | Under the rail ends; hooks the front edge of the panel; same slot |
Hardware and Supplies
- 2 carriage bolts, 1/4-20 x 2 in, with 2 flat washers
- 2 star knobs, 1/4-20 female thread
- 4 wood screws, #8 x 1-1/4 in, and wood glue
- A top-bearing pattern bit, 1/2 in diameter, 1/2 in cutting length
- Two clamps, 12 in or longer, to hold the jig on the work (see the best clamps for woodworking for options)
What the Dimensions Allow
- Panel depth: up to 24 in. For deeper panels, make the rails longer by the same amount.
- Dado width: from 1/2 in (the bit diameter) to about 1-1/2 in. Wider than that and a 6 in router base no longer spans both rails comfortably.
- Dado depth: up to about 3/8 in with the 1/2 in cutting length bit, which covers the usual 1/4 in dado in 3/4 in stock.
How to Build the Dado Jig
Step 1: Cut and Check the Parts
Rip the two rails at the same fence setting so they are exactly the same width, then cut all four parts to length. Sight down the inside edge of each rail: any bow there will be copied into every dado you cut.
Step 2: Cut the Slots
Lay out a 5/16 x 2 in slot in the back bridge (C) and the front fence (D), centered on where rail B will sit. Drill a 5/16 in hole at each end and rout or saw out the waste between them.
Step 3: Attach the Fixed Rail
Glue and screw rail A to the underside of the back bridge and to the top of the front fence, two screws at each end. Check with a framing square that rail A is exactly 90 degrees to the front fence before the glue sets, because this is what makes the dado square to the front edge of your cabinet side.
Step 4: Fit the Adjustable Rail
Drill a 1/4 in hole near each end of rail B, lined up with the slots. At the back end, counterbore the hole from below so the head of the carriage bolt sits below the bottom face; the rails must lie flat on the work. Push the bolts through, add a washer and a star knob on each, and check that rail B slides along the slots and locks firmly.
Step 5: Test Cut and Mark
Set the gap with a scrap of your shelf material, rout a test dado in scrap and check the fit. Then mark the centerline of the gap on the front fence: lining that mark up with a pencil line on the panel is how you position each dado.
How to Cut a Dado With a Router
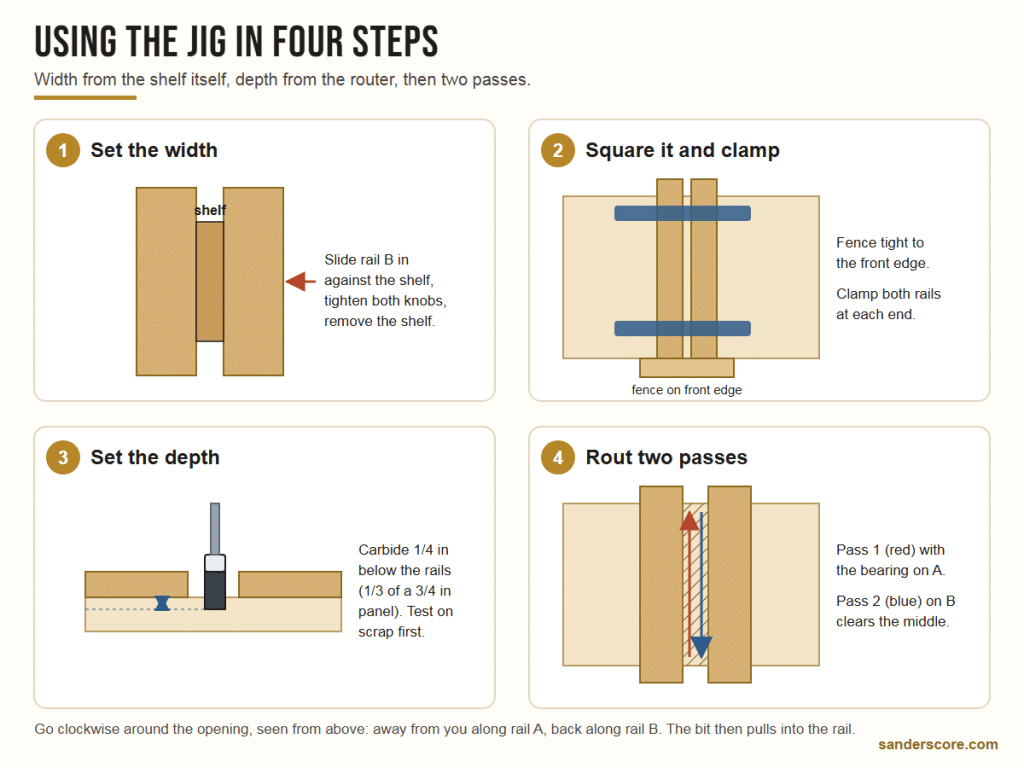
Set the Width With the Shelf
Loosen both knobs, put the actual shelf (or an offcut from the same sheet) between the rails, slide rail B against it and tighten. Take the shelf out. That’s the width set, with no numbers involved.
Position and Clamp
Mark the dado location on the panel, hook the front fence against the front edge, line up the centerline mark and clamp both rails down at each end. The clamps must sit outside the router’s path. If the panel is narrow, clamp it to the bench as well so nothing shifts.
Set the Depth
Put the router on the rails and lower the bit until the carbide reaches about 1/4 in below the bottom of the rails, which is the common depth for 3/4 in stock (one third of the thickness). Check that the bearing is still touching the rail edge, not hanging below it. Make a test cut in scrap and measure before you cut the real panel.
Rout Two Passes
Start the router clear of the work, with the bearing against rail A, and move away from you to the back of the panel. Then come back toward you with the bearing against rail B. Going clockwise around the opening (seen from above) means the spinning bit pulls itself into the rail you are following instead of pushing away from it. For hardwood or deeper dadoes, set the depth to half, make both passes, then lower the bit and repeat.
Stopped Dadoes
To stop a dado short of the front edge, clamp a stop block across the rails where the router base should stop, or simply mark the stopping point on rail A and plunge out there. The end of a routed stopped dado is round; square it with a chisel or round the front corner of the shelf to match. Stopped dadoes are where a plunge base earns its keep: see plunge vs fixed base router.
Can I Cut Dados Without a Dado Blade?
Yes. This jig is one way. Others are several overlapping passes with a regular table saw blade, a circular saw guided by a straightedge with the waste cleaned out by chisel, or by hand with a backsaw and chisel (a router plane flattens the bottom). The router jig gives the most repeatable result of the hand-held methods.
Other DIY Dado Jig Plans Worth a Look
If you want to compare designs before you build, these published plans are still online. They are third-party plans: we link to them and do not reproduce their drawings here.
| Plan | Guided by | What is different |
|---|---|---|
| Exact-Width Dado Jig (Wood Magazine) | Straight bit and guide bushing | Adjustable width without a bearing bit |
| Perfect Dados With a Router Dado Jig (Jays Custom Creations) | Pattern bit between two rails | Same principle as ours, with a build video |
| Cheap and Simple Dado Jig (Popular Woodworking) | Router base against a fence | Built from scrap for repeat dadoes without re-measuring |
| A Dado Jig for the Router (Carter Tools) | Router base against a fence | Clamps built into the jig |
Four plans that used to be on this list now lead to dead pages or to a site’s home page, so they are gone. If you prefer to buy rather than build, commercial adjustable dado jigs work on the same two-rail principle.
Clean Up and Sand the Dado Before Glue-Up
A routed dado needs very little work, but three things make the joint close tight:
- Fuzz at the edges: plywood veneer can lift where the bit exits. Knock it down with 180 or 220 grit on a hard block, sanding lightly along the edge rather than into the dado. A firm sanding block keeps the corner crisp; a soft sponge rounds it over.
- Don’t sand the walls: sanding inside the dado makes it wider, and the fit you set with the shelf is gone. If the shelf is tight, sand the shelf end instead, a few strokes at a time.
- Sand the faces before assembly: it is much easier to sand a cabinet side flat on the bench than inside a finished bookcase. Go through the grits on a random orbital sander (my grit guide for wood has the sequence), and keep the sander away from the dado edges so you don’t round them.
What Are the Downsides of a Dado Joint?
A dado removes material from the panel, so a deep dado weakens a thin side; that is why the depth stays around one third of the thickness. The joint is end grain or plywood edge against long grain, which glues less strongly than long grain to long grain, so dadoes are usually combined with glue and screws or nails, or with a back panel that stops racking. And a through dado shows on the front edge unless you stop it or cover it with a face frame.
Printable Router Dado Jig Plan (PDF)
The router dado jig plan PDF has the top view, the bit cross-section, the cut list, the hardware list and the four steps on two pages, ready to print and take to the shop.
Tools for Building and Using the Jig
These are the tools the plan above calls for: a router that takes the bit, the bit itself, clamps to hold the jig and, if you’d rather cut dadoes on a table saw, a stacked dado set. None of them are things I’ve put through a side-by-side test for this page, so each pick is based on the manufacturer’s specifications and on how it fits this jig.
DEWALT DW618PK Fixed and Plunge Base Router Kit

Full-Size Router for 1/4 and 1/2 in Shank Bits
A 2-1/4 HP, 12 A motor with electronic variable speed from 8,000 to 24,000 RPM and soft start, in a kit with both a fixed and a plunge base. The plunge base makes stopped dadoes easy, the depth ring adjusts in 1/64 in steps, and the clear sub-base accepts standard template guide bushings, so it also works with bushing-guided dado jigs.
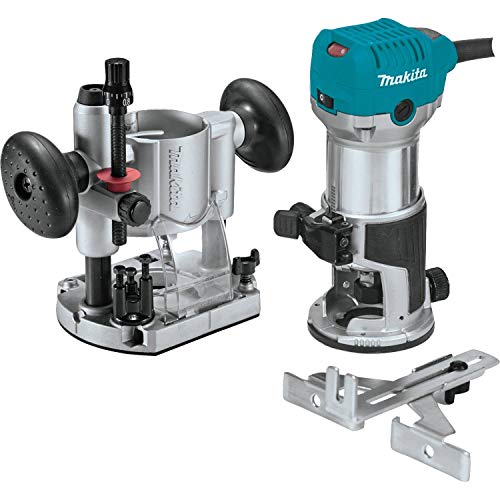
Makita RT0701CX7 Compact Router Kit
Lighter Option for 1/4 in Shank Bits
A 1-1/4 HP compact router with variable speed from 10,000 to 30,000 RPM, rack-and-pinion fine depth adjustment and a quick-release cam lock. It takes 1/4 in shank bits like the Whiteside 3001 below, and a compact router is easier to steer on narrow rails than a full-size one. It has less power for deep cuts, so take dadoes in two depth passes.
Whiteside 3001 Template Bit With Top Bearing
The Bit This Jig Is Designed Around
Two carbide flutes, 1/2 in cutting diameter, 1/2 in cutting length, a 1/4 in shank and 2 in overall length, with the ball bearing on the shank right above the cutter. The short cutting length is what lets the bearing ride on 3/4 in rails while the carbide cuts a 1/4 in deep dado. Whiteside lists 16,000 to 18,000 RPM as the recommended speed.
Freud 50-102 Top Bearing Flush Trim Bit

For a Jig With 1-1/2 in Rails
Also 1/2 in in diameter with a 1/2 in bearing and a 1/4 in shank, but with 1 in of carbide and 2-5/8 in overall length. With 3/4 in rails the bearing would sit above the rail, so use it if you glue up your rails from two layers of 3/4 in plywood; the taller rails also make the jig stiffer on long panels. It doubles as a flush trim bit for template work.
Bessey GSCC2.512 Clutch Style Bar Clamp, 12 in

To Hold the Jig Down
A 12 in clutch-style bar clamp rated at 600 lb, with cast-iron jaws, a serrated rail and non-marring pads. The low-profile jaws sit flat on the rail ends outside the router’s path. You need two; four if you also clamp the panel to the bench.
IRWIN QUICK-GRIP Mini Bar Clamps, 12 in, 2-Pack

One-Handed Clamps for Quick Repositioning
Two one-handed 12 in mini bar clamps with a quick-release trigger and non-marring pads. IRWIN rates them at around 140 lb of clamping force, which is light, but enough to hold a jig in place on a panel that is already lying flat, and you can move the jig to the next dado with one hand while the other holds it in position.
Freud SD208 8 in Stacked Dado Set

If You Cut Dadoes on a Table Saw
Two outer blades, three 1/8 in two-wing chippers and three 1/16 in spacers, plus a shim set, for dado widths from 1/4 in to 13/16 in in 1/16 in steps. Negative hook angles are meant for flat-bottomed, low-splinter cuts. Check that your saw’s arbor and manual allow a dado set before buying one.
Oshlun SDS-0842 8 in 42-Tooth Stack Dado Set

Dado Set Sized for Nominal Plywood
Two 42-tooth outer blades with six-tooth chippers (four 1/8 in, one 3/32 in, one 1/16 in) for widths from 1/4 in to 29/32 in, and eight shims from 0.005 in to 0.020 in. Oshlun says the set is designed to cut slightly undersized so you can shim it up to the real thickness of “3/4 in” plywood.
🏆 The Bottom Line
Build the two-rail jig: four pieces of 3/4 in plywood, two bolts and two knobs. Pair it with a 1/2 in top-bearing pattern bit that has a 1/2 in cutting length, set the width with the shelf itself, cut 1/4 in deep in two clockwise passes, and every shelf in the bookcase will fit the same way. Leave the dado walls alone when you sand, and do the face sanding before glue-up.
Frequently Asked Questions
Can I make a dado with a router?+
What router bit is best for dado cuts?+
Is it better to cut a dado with a router or a table saw?+
How deep should a dado be?+
Can I cut dados without a dado blade?+
What is the difference between a dado and a groove?+
A good dado jig is one of those shop projects that pays for itself on the first bookcase. Build it once, keep it hanging on the wall, and every shelf you cut afterwards will fit the same way. If you have built one of these jigs or a different design, share how it worked for you in the comments below.
