
As an Amazon Associate I earn from qualifying purchases. All claims are strictly my personal opinion.
Top pick for sharpening chisels
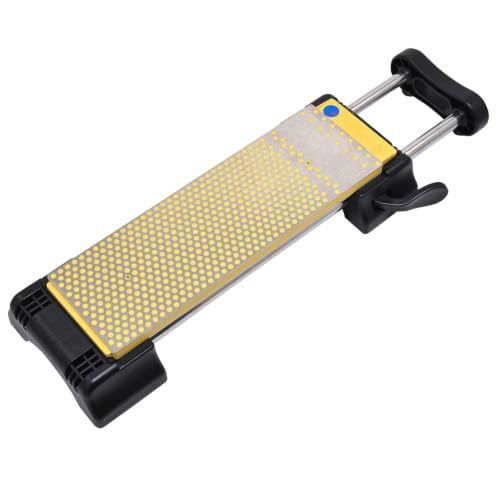
DMT 8" DuoSharp Plus Diamond Bench Stone
A double-sided coarse and fine diamond plate that stays flat, for flattening chisel backs and sharpening.

To sharpen a chisel, flatten and polish the back first, then hone the bevel at about 25 degrees on progressively finer stones until a small burr forms along the whole edge, add a quick micro-bevel at about 30 degrees, and remove the burr on the finest stone or a leather strop. A honing guide keeps the angle constant, which is the single biggest help for beginners. A bench grinder is only needed to reshape a chipped or badly worn bevel.
This guide covers what “sharp” actually means, the tools you need, the five steps, the main methods (water stones, diamond plates, sandpaper and the grinder) and the angles for different chisels. If you sand a lot, you’ll find the same ideas as sanding: go through the grits in order and don’t skip steps.
⚡ Quick Answer
Angle: about 25 degrees for the main bevel, plus a 30 degree micro-bevel. Paring chisels can go lower; mortise chisels higher.
Grits: coarse (about 300 to 400) only to fix damage, then about 1000 to sharpen and 4000 to 8000 to polish.
Order: flatten the back, hone the bevel to a burr, add the micro-bevel, remove the burr.
Easiest setup: a diamond plate, a 1000/6000 water stone, a honing guide and a strop.
What a Sharp Chisel Is
A chisel’s edge is where two surfaces meet: the flat back and the angled bevel. The edge is only as sharp as the worse of the two. That’s why sharpening the bevel alone, the most common beginner approach, never quite works: if the back is scratched or rounded near the edge, the edge stays ragged no matter how well you polish the bevel. A sharp chisel pares end grain cleanly and leaves a shiny surface; a dull one crushes the fibers and leaves them torn and white.
Sharpening is abrasion, the same thing a sander does, only on steel. Each grit removes the scratches of the one before, and the finest grit leaves scratches so small the edge cuts like glass. When you work a bevel on a stone, the steel at the very edge rolls over into a thin wire called the burr. Feeling a burr along the whole width of the back tells you that grit has done its job and you can move on.
What You’ll Use
You don’t need all of these to start, but this kit covers every step and lasts for years. Each pick was available on Amazon when I checked, and the details come from the makers’ listings.
DMT 8″ DuoSharp Plus Bench Stone (Coarse/Fine)
Diamond Plate: Flatten Backs and Sharpen
A diamond plate is the most useful single sharpening tool for chisels, because it stays flat for years and cuts any steel, including the hard back of a new chisel that a soft stone would dish. This 8″ DMT bench stone is double-sided, with a coarse (blue) side for flattening backs and restoring dull or chipped edges and a fine (red) side for sharpening. The recessed dot pattern catches the steel filings, and a small continuous zone handles narrow chisels and pointed tools. It needs no oil: use it dry or with water. The lightweight base raises it off the bench. DMT makes these in the USA. Upper price tier.
- ✅ Stays flat, never needs flattening
- ✅ Coarse and fine in one plate
- ✅ Use dry or with water, no oil
- ❌ Fine side isn’t a final polish
- ❌ Costs more than a water stone
Best For: Flattening chisel backs and the coarse and medium sharpening steps, before a fine stone or strop.
King KW65 1000/6000 Combination Whetstone

Water Stone: Sharpen and Polish
The King 1000/6000 is the classic first water stone: a 1000-grit side to sharpen and a 6000-grit side to polish the edge until it shaves. It measures about 8″ by 2-1/2″ by 1″ thick and comes on a plastic base. Water stones cut fast and leave a fine edge, but they wear and slowly go hollow in the middle, so flatten the stone every few sessions; the coarse side of a diamond plate does that well. Prepare it with water as King instructs before you sharpen. Budget price tier.
- ✅ Two useful grits in one stone
- ✅ Fine 6000 polish
- ✅ Low cost
- ❌ Needs regular flattening
- ❌ Messier than a diamond plate
Best For: The sharpening and polishing steps on a budget, paired with a diamond plate to keep it flat.
Sharp Pebble Honing Guide for Chisels and Planes

Honing Guide: The Same Angle Every Time
A honing guide clamps the chisel and rolls on the stone, so the bevel meets the stone at the same angle on every stroke. That’s the difference between a crisp, flat bevel and a rounded one, and it’s why a guide is the fastest way for a beginner to get sharp. This side-clamp guide is machined stainless steel with a bronze bearing. You set the angle by how far the blade sticks out of the guide, and the included instructions and eBook list the projection for the common angles. It holds chisels and plane irons. Budget to mid price tier.
- ✅ Repeatable bevel angle
- ✅ Stainless steel, bronze bearing
- ✅ Projection chart included
- ❌ Very short chisels are hard to clamp
- ❌ Wheel can wear a groove in soft stones
Best For: Anyone learning to sharpen, and anyone who wants identical bevels on every chisel.
SHARPAL 205H Double-Sided Leather Strop Kit

Strop: Remove the Burr and Polish
Stropping is the last step: a few pulls on leather loaded with fine compound remove the last of the burr and polish the edge. The SHARPAL 205H has two sides, smooth and suede, of vegetable-tanned cowhide on a wooden handle, and comes with 2 oz of green polishing compound and an angle guide. Pull the chisel backward, bevel down, never pushing into the leather. A quick strop also brings a slightly dull chisel back during work without going to the stones. SHARPAL backs it for three years. Budget price tier.
- ✅ Compound included
- ✅ Two leather sides
- ✅ Fast touch-ups between sharpenings
- ❌ Won’t fix a dull or chipped edge
- ❌ Easy to round the edge if you rock it
Best For: The final polish after the stones, and quick touch-ups during work.
How to Sharpen a Chisel, Step by Step
Step 1: Flatten and Polish the Back
You do this once per chisel, and new chisels need it most. Hold the chisel flat on the coarse side of the diamond plate, back down, and rub in circles or long strokes, pressing near the edge with your fingers. Check the scratch pattern: when the coarse scratches reach right to the edge across the whole width, move to the fine side, then to the 1000 and 6000 water stone. You only need the first inch or so behind the edge flat and polished, not the whole back. Never lift the handle while doing this, or you’ll grind a small bevel on the back and start over.
Step 2: Fix the Primary Bevel (Only If Needed)
If the edge is chipped, out of square or rounded from years of freehand sharpening, reshape the main bevel first. On a stone, use the coarse diamond side with the chisel in the honing guide set to 25 degrees, and grind until the chip is gone and the bevel is one flat surface. That can take a while by hand, which is where a bench grinder earns its place: a slow-speed grinder with a tool rest set to 25 degrees reshapes a bevel in a minute. Keep it cool by dipping the steel in water every few seconds; if the edge turns blue, it has lost its hardness there. My guide to the best bench grinder explains why woodworkers prefer slow-speed grinders with white wheels for this.
Step 3: Hone the Bevel
- Set the angle. Clamp the chisel in the honing guide square to the guide, with the projection your guide’s chart gives for 25 degrees. Mark the setting on a block of scrap so you can repeat it.
- Work the 1000 grit. With the stone wet, push the guide up and down the stone using the full length, pressing on the edge with two fingers. Keep going until you feel a burr along the full width of the back.
- Move to 4000 to 8000 grit with the same setting. Fewer strokes here: you’re replacing the 1000-grit scratches with finer ones, not removing steel.
Step 4: Add a Micro-Bevel
A micro-bevel is a tiny second bevel at the very edge, a few degrees steeper than the main one. It’s quick to make because there’s very little steel to remove, it makes the edge stronger, and future sharpening only touches that narrow strip. Pull the chisel back in the guide to raise the angle to about 30 degrees (some guides have a micro-bevel setting), then take 5 to 10 strokes on the finest stone until a fine burr forms.
Step 5: Remove the Burr and Strop
Lay the chisel flat on its back on the finest stone and take a few light strokes to fold the burr over, then a couple of light strokes on the bevel, alternating until it breaks off. Finish with 10 to 20 pulls on a leather strop loaded with compound, bevel down and pulling away from the edge. Test it: a sharp chisel shaves end grain of pine cleanly and catches on a fingernail instead of sliding. Next time the chisel dulls, you can usually skip straight to the micro-bevel and strop.
💡 Pro Tip: Use a Marker
Color the bevel with a permanent marker before you start, then take two strokes. Where the ink is gone, the stone is cutting. If it only removes ink at the heel or the tip, your angle is off from the existing bevel; adjust the projection in the guide until the ink comes off evenly across the whole bevel.
Sharpening Methods Compared
Water Stones
Water stones like the King 1000/6000 cut quickly and polish to a very fine edge, and they’re the traditional choice for chisels and plane irons. Their weakness is wear: the middle of the stone dishes, and a dished stone rounds edges. Flatten it every few sessions on a diamond plate or on coarse sandpaper on a flat surface.
Diamond Plates
Diamond plates stay flat for their whole life, cut hard steels, need no soaking or oil and double as a flattener for water stones. They’re the best tool for the back-flattening step. Their finest grits are less fine than the best water stones, so many woodworkers pair a coarse/fine diamond plate with one fine water stone or a strop.
Sandpaper on Glass (“Scary Sharp”)
The cheapest way to start is wet-or-dry silicon carbide sandpaper stuck to a flat sheet of thick glass, a granite tile or a machine table, used with a little water. Work through the grits, for example 220, 400, 600, 1000, 1500 and 2000, exactly as you would with stones. The paper wears quickly, so it costs more over time, but it’s perfectly flat and you can try sharpening before buying stones. My sandpaper grit chart shows how the grit numbers compare, and the guide to types of sandpaper explains why silicon carbide is the abrasive to use on steel.
Bench Grinder
A grinder is for shaping, not finishing. It’s the fastest way to restore a damaged bevel or regrind a chisel to a new angle, and the hollow it leaves in the bevel makes later honing quicker, because the stone only touches the toe and heel of the bevel. Always hone after grinding: the grinder’s coarse wheel leaves an edge that’s rough under magnification.
Chisel Sharpening Angles
About 25 degrees with a 30 degree micro-bevel suits most bench chisels in most woods. Lower angles cut more easily but chip sooner; higher angles last longer but need more force.
- Paring chisels (pushed by hand, never struck): about 20 to 25 degrees, for clean shavings in softwood and end grain.
- Bench chisels (hand pressure and light mallet work): about 25 degrees, with a 30 degree micro-bevel.
- Mortise chisels (heavy mallet work and levering): about 30 to 35 degrees, so the edge doesn’t fold.
- Hard woods and hard steels: add a few degrees to the micro-bevel if edges chip.
Chisels Worth Sharpening
A good edge needs decent steel behind it. If you’re buying a first set, two well-regarded options on Amazon cover different budgets. The Narex 6-piece bevel edge chisel set uses chrome-manganese steel hardened to about Rc 59, comes ground at a 25 degree bevel with beech handles, and includes the six widths most furniture work needs, from 6 to 26 mm. The IRWIN 4-piece chisel set has forged steel cores, split-proof handles and large strike caps, and suits carpentry and general shop work where chisels get hit hard. Either one needs its back flattened before first use, as in step 1. For setting up a whole shop, my guide to woodworking tools for beginners lists what else to buy first.
How Often to Sharpen
Sharpen as soon as the chisel stops cutting cleanly: when it tears end grain, needs more force, or leaves a dull surface. In practice that means a strop every so often during a work session and a quick micro-bevel touch-up on the fine stone when stropping no longer helps. Full sharpening from the 1000 grit is only needed after the micro-bevel grows wide, and grinding only after damage. Keeping chisels in a roll or rack, not loose in a drawer, saves most of that work.
❓ Frequently Asked Questions
Can you use WD-40 to sharpen a chisel?+
Is using a bench grinder the best way to sharpen a chisel?+
What is the best chisel sharpening guide?+
How can I sharpen a chisel without using a stone?+
What angle should a chisel be sharpened at?+
Do new chisels need to be sharpened?+
Conclusion
Sharpening a chisel comes down to two flat, polished surfaces meeting at a consistent angle. Flatten the back once, hone the bevel at about 25 degrees until you raise a burr, add a 30 degree micro-bevel and strop the burr away. A honing guide, a diamond plate and a combination water stone make it repeatable, and a bench grinder handles the occasional chipped edge. Questions about your chisels or stones? Ask in the comments.

