
As an Amazon Associate I earn from qualifying purchases. All claims are strictly my personal opinion.

To choose a belt grinder for knife making, pick the belt size first (a 2×72 if you can afford it, a 2×48 or 2×42 if space or budget is tight, a 1×30 to start), then make sure the motor and drive wheel give you real grinding speed, ideally with a VFD for speed control. After that, the things that separate a good grinder from a frustrating one are the platen, the contact wheels, the tool rest and how well the belt tracks.
A belt grinder looks like a simple machine, but it’s one of the most powerful, and potentially dangerous, tools in a shop. I’ll walk you through everything you need to know to buy the right one: sizes, motors and belt speed, the parts that matter, belts by grit and material, and safety. At the end there are the grinders, belts and accessories you can actually buy on Amazon, sorted by budget. If you only need to sand wood, a belt and disc sander is the cheaper tool.
⚡ Quick Answer
Best size for knife making: 2×72, the standard with the widest choice of belts and attachments.
Motor: about 1 HP per inch of belt width, so 2 HP for a 2×72, ideally on a VFD.
Belt speed: roughly 4,000 SFPM or more for steel. Wood sanders run slower.
Belts: ceramic for grinding steel, finer aluminum oxide or silicon carbide for finishing and handles.
What a Belt Grinder Is (and How It Differs From a Belt Sander)
A belt grinder runs a narrow abrasive belt around three or more wheels at high speed, and you bring the work to the belt: against a flat platen, around a contact wheel, or on the unsupported “slack” section between wheels. Knife makers use it to profile blanks, grind bevels, clean up after heat treatment and shape handles. Metalworkers use it to deburr, blend welds and sharpen tools.
A belt sander is built for wood. The benchtop versions run wider, shorter belts (4×36, 6×48) at lower speed, with the belt under a fixed table, and they can’t use the edge of the belt or swap in contact wheels. That’s why a 4×36 bogs down and feels clumsy on steel, while a grinder does the same job in a fraction of the time. A handheld belt sander is a different tool again: you move it over the work, not the other way round.
Common Belt Grinder Sizes
Grinders are named by belt width and length in inches. A 2×72 takes a belt 2″ wide and 72″ around. Wider belts remove more and stay flatter on the platen; longer belts run cooler and last longer between changes, but both need more motor.
| Size | Typical motor | Good for | Limits | Budget |
|---|---|---|---|---|
| 1×30 | 1/3 to 3/4 HP | First knives, profiling, sharpening | Too narrow to flatten, short belts wear fast | $ |
| 2×42 | 1/3 to 3/4 HP | Handles, light grinding, mixed wood and metal | Mostly woodworking machines, slow under load | $ to $$ |
| 2×48 | 1 to 1.5 HP | Serious hobby knife making in a small shop | Fewer attachments than a 2×72 | $$ |
| 2×72 | 1.5 to 2 HP or more | Everything: bevels, hollow grinds, flattening, finishing | Price, space, often needs 220V for full power | $$$ |
2×72 vs 1×30 vs 2×42: Which Belt Grinder Size Should You Buy?
2×72: The Knife Making Standard
The 2×72 belt grinder is what most professional knife makers use, and for good reason. Every abrasive maker sells 2×72 belts in every grain and grit, and the attachments (small wheels, large contact wheels, rotary platens, surface grinding attachments) are built for the 1.5″ square tooling arm that most 2x72s share. The best ones use a “square wheel” layout: drive wheel at the back, tracking wheel on top, and a tooling arm facing you that swaps a flat platen for a contact wheel in seconds. Buy one of these and you won’t outgrow it.
2×48 and 2×42: The Middle Ground
A 2×48 takes nearly the same belts as a 2×72 and fits a smaller bench. Alec Steele’s shop, which sells both sizes, describes the 2×48 as an excellent option for a serious hobbyist or a professional short on space. A 2×42 is usually a belt and disc combo built for woodworking with a small motor: fine for handles and light grinding, but it slows down when you lean on it with steel.
1×30: The Cheapest Way to Start
A 1×30 belt sander is how many knife makers started. It will profile a blank and grind a bevel, and it’s a good sharpening machine. The catch is the narrow belt (it can’t flatten a blade face well) and the short belt, which heats up and wears out quickly. If you go this route, spend the money you saved on ceramic belts: on a small motor they make far more difference than they do on a big grinder.
Buy Complete, Buy a Kit, or Convert a Bench Grinder?
- Complete grinder: chassis, motor and usually a VFD, ready to bolt down. The fastest way to start grinding.
- 2×72 kit or chassis: you add your own motor and VFD. Cheaper if you already have a motor, and the route many makers take to a 2×72. The motor and VFD are a big part of the total cost.
- Bench grinder attachment: a belt arm that mounts on the shaft of an 8″ bench grinder you already own. A cheap way into a 2×36 or 2×48, limited by the grinder’s motor.
Several of the best-known American 2×72 makers, such as Beaumont Metal Works (the KMG), Brodbeck Ironworks and Burr King, sell direct rather than on Amazon. The picks below are the ones you can order on Amazon with a buy button today.
Motor, VFD and Belt Speed
How Much Horsepower Do You Need?
A good rule of thumb, used by Alec Steele’s shop among others, is about 1 HP per inch of belt width on a 72″ belt: 2 HP for a 2×72, 1 HP for a 1×72. Shorter belts need less, which is why 2×48 machines often ship with 1 to 1.5 HP. An underpowered grinder slows down the moment you press a blade into it, and that’s exactly when you want it to keep cutting.
Belt Speed (SFPM) and the Drive Wheel
Steel grinds best at high belt speed, measured in surface feet per minute (SFPM). Alec Steele’s 2x48s run at 4,100 SFPM and notes that wood sanding often uses only 2,500 to 3,200, which is why a woodworking sander feels slow on steel. You can work out any grinder’s speed yourself: SFPM = π × drive wheel diameter (in inches) ÷ 12 × motor RPM. With a common 3,450 RPM motor:
| Drive wheel | Belt speed at 3,450 RPM | What it means |
|---|---|---|
| 4″ | 3,613 SFPM | More torque at low speed, slower stock removal |
| 5″ | 4,516 SFPM | A balanced all-round speed |
| 6″ | 5,419 SFPM | Fast hogging; a VFD helps for finishing |
| 7″ | 6,322 SFPM | Very fast; really wants a VFD |
| 8″ | 7,226 SFPM | Production speed, hard to control at full speed |
Why a VFD Matters
A variable frequency drive runs a three-phase motor from household single-phase power and lets you turn the speed down or up with a dial. Full speed hogs out bevels; a slow belt lets you sharpen, finish and shape handles without burning anything. Alec Steele’s shop admits a VFD adds a good bit of expense but calls it incredibly useful. Two things to check before you buy: whether the package is wired for 110V or 220V (many 2 HP setups only reach full power on 220V), and whether the motor is TEFC (totally enclosed, fan cooled), which keeps metal dust out of the windings.
The Parts That Make a Grinder Good
Platen
The platen is the flat plate behind the belt, and it’s where you grind flat bevels and flatten blade faces. It must be dead flat and square to the work rest. Many makers add a glass liner to the platen so the belt doesn’t wear a groove into the steel and runs cooler.
Contact Wheels and Small Wheels
A contact wheel is a rubber-faced wheel you grind against. The wheel’s diameter sets the radius of a hollow grind, so 8″ and 10″ wheels are the usual knife making sizes. Small wheels (1/2″ to 1″) get into finger grooves, choils and tight curves. The ability to swap these in seconds is the main reason to choose a tooling-arm grinder.
Slack Belt
Take the platen away and the unsupported belt flexes around the work. That “slack belt” is how you put a convex edge on a blade and shape rounded handles.
Tracking and Tension
A crowned tracking wheel and a fine tracking knob keep the belt centered; a spring or gas strut keeps it tight while letting you change belts in seconds. On a knife grinder, tracking is also a technique: Red Label Abrasives explains that lining the belt edge up with the platen edge gives a crisp plunge line, while letting it hang over slightly gives a soft, rounded one.
Tool Rest and Tilting Chassis
A solid, adjustable work rest that sits close to the belt holds blades steady for profiling and bevels. A tilting chassis that lays the whole grinder flat turns the platen into a horizontal sander for flattening blade faces and handle scales.
Belts by Grit and Material
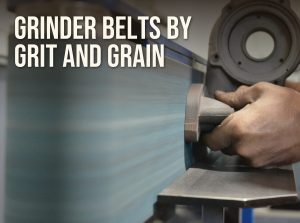
The belt matters as much as the machine. On a belt grinder, the grain decides how fast you cut and how hot the steel gets; the grit decides the finish. For belts in every size, including the 1×30, 2×42 and 2×48 sizes, see my picks for the best sanding belts.
Abrasive Materials
- Ceramic (Norton Blaze, 3M Cubitron II, Red Label ceramic): the first choice for grinding steel. Ceramic grain keeps fracturing into new sharp points, so it cuts fast and runs cool. Red Label Abrasives recommends ceramic for knife making precisely because it limits heat, and heat after heat treatment can ruin the temper of a blade.
- Zirconia: tough and long-lasting, cheaper than ceramic. It needs firm pressure to break down and keep cutting, so it suits heavy grinding and weld blending more than light finishing passes.
- Aluminum oxide: the cheapest belts, fine for wood, handle materials and light metal work. They dull quickly on hardened steel.
- Silicon carbide: very sharp and brittle. Used in fine grits (240 and up) for finishing, and for glass, stone and composites.
- Non-woven and leather: Scotch-Brite style belts leave an even satin finish, and a leather belt with compound strops an edge.
Grit Progression for Knives
| Stage | Grit | Belt type |
|---|---|---|
| Profiling and hogging bevels | 36 to 60 | Ceramic |
| Refining bevels, cleanup after heat treat | 80 to 120 | Ceramic |
| Secondary bevel and edge | 180 to 220 | Ceramic or aluminum oxide |
| Finishing the blade face | 400 and up | Silicon carbide, structured or non-woven |
| Handles and scales | 80 to 220 | Aluminum oxide |
Red Label Abrasives suggests moving to a P180 to P220 belt to set the secondary bevel and sharpen. Whatever the steel, step through the grits one at a time: each belt only has to remove the scratches of the one before. Personally, I keep a full set from 40 up to 600 grit on hand, which covers woodworking, metalworking, and even ceramic applications. The sandpaper grit chart explains how belt grits compare across grading systems.
Wood and Handle Materials
For basic woodwork on a belt grinder, I recommend staying in the 80 to 120 grit range. A 50-grit belt removes wood very fast but leaves deep scratches that take several more steps to remove, and a fast belt can burn hardwood. Turn the speed down if you have a VFD, and keep the piece moving.
💡 Pro Tip
Keep a container of water next to the grinder and dip the blade whenever it gets too warm to hold. Once a blade is heat treated, overheating the edge can draw the temper, so light passes and a cool-cutting ceramic belt beat pressing harder.
Belt Grinder Safety
Don’t Mix Wood Dust and Metal Sparks
This is non-negotiable. Metal grinding throws sparks, and wood dust is highly flammable. If you’ve been sanding wood, clean out the machine and the area before you touch steel, and never send steel sparks into a dust collector or shop vacuum full of sawdust. Better yet, dedicate one grinder to wood and another to metal if possible.
⚠️ Important
Never switch from sanding wood to grinding metal on the same machine without emptying the dust collection first. The combination of metal sparks and accumulated wood dust is a serious fire risk.
Protect Your Eyes, Lungs and Hands
- Eyes and face: safety glasses at minimum, a face shield for heavy grinding.
- Lungs: metal dust and many handle materials (micarta, G10, exotic hardwoods) produce fine dust you don’t want to breathe. Wear a properly fitted respirator.
- Hands and clothing: no loose sleeves, ties or long hair near the belt. Many makers avoid gloves at the contact wheel because a glove caught by the belt pulls the hand in.
- Work rest gap: keep the rest close to the belt so a blade can’t be dragged into the gap and thrown.
Techniques That Keep You in Control
Here are the techniques I’ve learned work best:
- Let the belt do the work. Light, consistent pressure cuts better than pressing hard, which overheats both the work and the belt.
- Keep the work moving. Pausing in one spot creates a dip, on wood and on a blade bevel alike.
- Use the full width of the belt. Working one strip wears a groove in the abrasive and shortens the belt’s life.
- Track the belt before every session. Run it briefly and adjust until it stays centered.
For a step-by-step on handheld machines, see how to use a belt sander; for steel prep beyond knives, how to sand metal.
Belt Grinders You Can Buy on Amazon
These are the grinders I’d look at on Amazon, from a complete American-made 2×72 down to a variable-speed 1×30. I haven’t run them in my own shop; the details below come from the makers and their listings.
Best 2×72 Belt Grinder: OBM Dominator 2×72 with 2 HP Motor and VFD

Origin Blade Maker (OBM) builds its grinders in Oregon, and the Dominator is a complete package: welded steel chassis, 2 HP motor with a KBAC-27D VFD, VFD stand and a 7″ drive wheel on a tilting chassis that lays the grinder flat for horizontal work. With a 7″ drive wheel the belt runs fast at full speed, and the VFD turns it down for finishing. OBM’s Dominator listings describe gas-strut belt tension, a crowned tracking wheel and the standard 1.5″ tooling arm, so OBM’s small wheel kit and other 2×72 attachments fit. OBM also sells a fixed-chassis Dominator with a 4″ drive wheel. OBM’s listings say the VFD ships wired for 110V and can be rewired for 220V.
Budget 2×72: VEVOR 2×72 Belt Grinder with VFD

The VEVOR is a complete budget 2×72 with a VFD, sold and shipped by Amazon. It has a 1500W (about 2 HP) motor, a VFD for stepless speed control, and three grinding positions: flat platen, contact wheel and an arc for curves, on an all-welded steel frame. It comes with 100, 180 and 240 grit belts, which are finishing grits, so budget for a few coarse ceramic belts before you grind your first bevel. Think of it as a capable all-in-one, and check the fit before you buy third-party 2×72 attachments for it.
Brand-Name 2×72 With a Buffer: RIKON 50-272

The RIKON 50-272 is a different layout: a 2×72 belt on one side and a buffing spindle on the other, driven by a 1 HP dual-voltage motor (110/220V). RIKON lists the belt speed at 3,600 SFPM, fixed. The belt arm rotates through 180 degrees from horizontal to vertical, and the 1″ x 8″ spindle takes buffing and sanding accessories, which is handy for polishing blades and hardware. It also accepts 2×76 belts. It suits a maker who wants one brand-name machine for grinding and buffing, though it has less power for heavy hogging than a 2 HP grinder.
Best 2×48 for a Small Shop: BUCKTOOL 2×48 Belt Sander

The BUCKTOOL 2×48 is sold specifically for knife making and metal. It has a 1 HP induction motor running the belt at 4,500 FPM, right in the range steel likes, plus a cast-iron platen with a graphite liner to cut friction and heat. A serrated rubber contact wheel handles curves and hollows, a quick-release tension handle speeds up belt changes, and a cast-iron work table gives you a steady rest. There’s no VFD, so for slow finishing work you’ll rely on light pressure and fine belts.
If You Own a Bench Grinder: Multitool 2×48 Attachment

The Multitool attachment turns a bench grinder into a 2×48 belt grinder. It fits most grinders with a 1/2″ or 5/8″ shaft, uses a quick-change belt system with automatic tensioning, and this version comes with an 8″ contact wheel for hollow grinds, plus a 7″ disc. Speed and power come from your bench grinder, so the stronger the grinder, the better it grinds. It’s the cheapest route to a real 2″ belt with a contact wheel if the grinder is already on your bench.
Best 1×30 to Start: RIKON 50-161VS Variable Speed
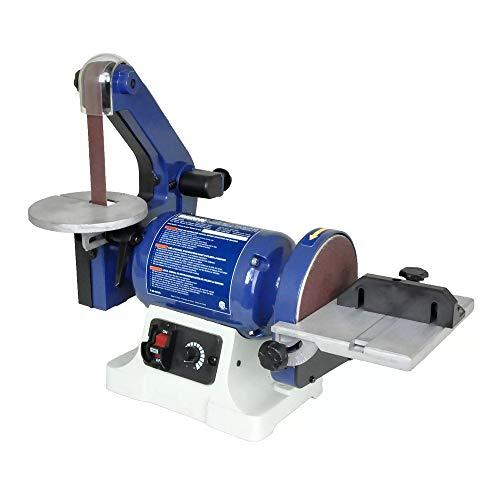
Most 1x30s run at one speed. The RIKON 50-161VS has a 3/4 HP motor with variable belt speed from 1,909 to 3,248 SFPM, so you can slow it down for sharpening and handles. It adds a 6″ disc for flattening small parts (the job a 1″ belt is worst at), belt and disc tables that tilt to 45 degrees, a miter gauge and separate dust ports. Top speed is modest for steel, so pair it with ceramic belts. It’s a sensible first machine and a good sharpening station after you upgrade.
2×72 Belts and Accessories Worth Buying
Most grinders ship with a few general-purpose belts. These are the belts and add-ons that make the biggest difference once you start grinding steel.
| Product | What it is | Use it for |
|---|---|---|
| Ceramic belts, 36, 60, 80 and 120 grit, Y-weight polyester backing | Profiling and bevels; the listing rates them to last 50% to 200% longer than aluminum oxide on steel | |
| 6-pack of US-made ceramic belts, bi-directional joint, wet or dry | Refining bevels and cleanup after heat treat | |
| 6 zirconia belts, 40 to 180 grit | A budget set for heavy grinding and weld cleanup | |
| 12 belts, 80 to 1000 grit, wet or dry | Finishing blade faces, handle materials | |
| Non-woven belt, very fine (blue) | Even satin finish on blades and hardware | |
| Leather honing belt with buffing compound | Stropping and polishing the edge | |
| Holder, five wheels from 1/2″ to 1″, platen and rack | Finger grooves, choils and tight curves on any 1.5″ tooling arm | |
| Tool rest with five adjustment points and fine tilt | Truing the rest square to the platen, angled bevels | |
| TEFC motor, KBAC-27D VFD, 1.5 HP on 110V or 2 HP on 220V | Powering a 2×72 kit or chassis you build yourself |


Gummed-up belts cut slowly and run hot; a sanding belt cleaner brings them back on wood and softer handle materials. For discs, sheets and flap discs for other metal jobs, see the best sandpaper for metal.
❓ Frequently Asked Questions
What type of grinder is best for knife making?+
What size motor does a belt grinder need?+
What is a belt grinder used for?+
What’s the difference between a belt sander and a belt grinder?+
What belt grinder is best for sharpening knives?+
Do I need a 2×72 to start making knives?+
Can I use the same belt grinder for both wood and metal?+
✨ The Bottom Line
If you’re serious about knives, buy a 2×72 with about 2 HP and a VFD, like the OBM Dominator, and spend the rest on ceramic belts and a small wheel kit. If the budget is tighter, the VEVOR 2×72 or a 2×48 such as the BUCKTOOL gets you grinding steel properly. To try knife making before committing, a variable speed 1×30 like the RIKON 50-161VS with good belts is enough to make your first blades. Whatever you buy, set up the tracking and the work rest carefully, and keep wood dust away from the sparks.
Finally, respect the machine. A belt grinder demands focus and proper technique, but when it’s set up right it’s the fastest way to turn a bar of steel into a knife. If your projects are mostly wood, a benchtop belt sander will serve you better and cost less.
