
As an Amazon Associate I earn from qualifying purchases. All claims are strictly my personal opinion.
My top pick

3M 6291 Half Facepiece Respirator with P100 Filters
A NIOSH-approved half-mask assembly with 2091 P100 filters included, so fiberglass dust is covered before you pick up the sander.

To sand fiberglass, start with 80 grit when you are repairing or giving epoxy something to grip, step up through 120 to 180 for fairing, finish at 220 to 320 before paint, and go wet with 600 to 2000 only when you are polishing gelcoat. When sanding fiberglass, wear a respirator, goggles, gloves and loose long sleeves every time, because the dust is an irritant to skin, eyes and lungs, and use a sander that stays flat on the panel.
Below are the grits for each job, how gelcoat differs from bare laminate, when wet sanding is worth it, the steps in order, the protection you need, what to do about cure times, and the tools I’d put in the kit. It covers boats, tubs and shower stalls, and fiberglass car parts.
⚡ Quick Answer
Grits: 80 to repair or key a surface, 120 to 180 to fair, 220 to 320 before paint, 600 to 2000 wet to polish gelcoat. Check the grit chart on the sandpaper grit chart if you are unsure how the numbers compare.
Protection: a half-mask with P100 filters such as the 3M 6291, goggles, gloves and long sleeves.
Sander: a Mirka DEROS hooked to a vacuum keeps most of the dust out of the air.
Grits by Job
The right grit depends on what you are doing to the surface, not on the material alone. The ranges below are the ones boat and body-repair guides commonly use, and they are starting points: if the label on your gelcoat, filler or paint gives a grit, follow the label.
| Job | Grit | Wet or dry | What it does |
|---|---|---|---|
| Repair and bonding prep | 80 | Dry | Removes damaged material and leaves a rough key for resin, filler or new laminate |
| Fairing and filler | 120 to 180 | Dry | Levels filler into the surrounding panel and removes the 80 grit scratches |
| Pre-paint or pre-primer | 220 to 320 | Dry or wet | Leaves a fine, even scratch pattern the coating can grip |
| Gelcoat polish | 600 to 2000 | Wet | Removes oxidation and prepares the gelcoat for compound and polish |
Where 80 Grit Comes From
The one number I can pin to a maker is 80. West System, the epoxy company, writes in its Epoxyworks magazine: “We always recommend sanding the entire surface with 80-grit sandpaper before applying epoxy.” That is for bonding, so it is the floor for repairs, not a finish. A longer-read piece in Good Old Boat adds that on smooth deck areas the author wouldn’t go further than 120 grit, and that going finer than 80 on non-skid is superfluous.
Do Not Jump Too Many Grits
Move up one step at a time, such as 80, then 120, then 180. Each grit’s job is to remove the scratches of the one before it. If you skip, deep scratches survive under the paint and show up as lines once the sun hits them. For the full ladder see the sandpaper grit chart.
Gelcoat vs Bare Laminate
Gelcoat is the thin, glossy resin layer on the outside of a molded fiberglass part. Under it is the laminate: glass fibers in resin. Sanding gelcoat is mostly about the surface finish, and sanding laminate is about getting through damage without cutting the glass.
Sanding Gelcoat
Gelcoat is thin, so work lightly and keep the sander moving. Oxidized gelcoat on an old hull looks chalky; a gentle wet sand followed by compound and polish brings it back. If the gelcoat is crazed or flaking, it needs repair, not polishing. My guide to the difference between rubbing compound and polishing compound covers the step after sanding.
Sanding Bare Laminate
Once you have cut through the gelcoat, you are on the glass-and-resin laminate. Sanding exposed glass fibers raises splinters and fuzz, so scuff the repair area to a dull, even surface, avoid grinding down into the glass, and fill low spots with resin or filler. Epoxy and polyester resins sand differently once cured, and my page on how to sand epoxy resin covers the resin side.
Painting Fiberglass Car Parts
Panels such as bumpers, fenders and kit-car bodies follow the same rule: sand to a uniform dull finish at 220 to 320 before primer, and use a flat block or an even-pressure orbital. Our guide to the best sander for auto body work compares the tools.
Wet or Dry?
Dry sanding cuts faster and is the choice for the coarse work: repairs at 80, filler at 120 to 180. It also makes the most airborne dust, so use extraction and a respirator. Wet sanding uses water to carry the glass and resin dust away and keeps the paper from clogging, so it is the usual choice for the fine steps and for polishing gelcoat at 600 and above.
- Dry: repairs, fairing, leveling filler, any step that removes real material.
- Wet: final scratch refinement, oxidized gelcoat, and the 600 to 2000 polishing sequence.
- Either: pre-paint scuffing at 220 to 320, depending on the coating maker.
Use waterproof (wet or dry) paper for wet work. My guide to wet sanding has the full technique, including a block and a sander, and how to keep water out of the tool.
How to Sand Fiberglass, Step by Step
- Protect yourself first. Respirator, goggles, gloves, long sleeves and trousers, and ventilation. Details are in the safety section below.
- Clean the surface. Wash off wax, grease and dirt, because sanding drives contamination into the scratches. West System says amine blush on cured epoxy will clog sandpaper, and that because it is water soluble you scrub it off with a Scotch-Brite pad in warm, soapy water and wipe dry, no solvent needed, so wash and dry before sanding any epoxy-coated area.
- Find the high and low spots. Run your hand over the surface or use a guide coat. West System describes a chalk stick, a batten coated with carpenter’s chalk, for revealing high spots before fairing.
- Cut the damage at 80 grit. Work the repair area until the damaged material is gone and the surface is dull and uniform.
- Fill and fair. After filler cures, use a long flat block rather than a small pad. West System says a dual-action sander with a small 5 inch pad follows the highs and lows of the surface, so use a longboard where the panel has to stay flat.
- Step up one grit at a time. 120, then 180, then 220 to 320 before paint.
- Clean again. Use a HEPA vacuum and a damp cloth, not a dry brush that throws dust back into the air.
- Polish gelcoat only if you are keeping the gelcoat. Wet sand through 600 to 2000, then compound and polish.
⚠️ Important
Old boats and older vehicles can have paints and bottom coatings with hazardous contents. If you do not know what is in the coating, treat the dust as hazardous and read the product information before you sand.
Safety: Glass Fibers and Resin Dust
Is it bad to sand fiberglass? It is something to take seriously. The New York City Department of Health says that contact with fiberglass may irritate the skin, eyes, nose and throat, and that high levels of airborne fiberglass may aggravate asthma or bronchitis. Sanding adds cured resin dust to the glass fibers, so the cloud is worse than the fibers alone.
Respirator
The NYC Department of Health recommends an N95 particulate respirator approved by NIOSH for fiberglass work. For regular sanding I’d go a step higher and wear a reusable half-mask with P100 filters, which you can also use for other dust. Good Old Boat is blunt about it: “A respirator is essential; dust masks won’t cut it.” If you also use resin, solvent or gelcoat products, check the product’s safety data sheet for the right cartridge. My guide to the best respirator for woodworking explains fit and filter ratings, which apply to this dust too. Do not sand without a mask, and do not rely on a loose paper mask.
Skin, Eyes and Ears
The NYC Department of Health says to wear loose-fitting, long-sleeved clothing and gloves to reduce skin contact and irritation. Add goggles, which Good Old Boat prefers to safety glasses, and hearing protection if you are using a grinder. Wash exposed skin with soap and water after you finish, and wash work clothes separately from the family laundry.
Control the Dust
Connect your sander to a vacuum whenever the tool allows it. Good Old Boat says a sander hooked to a shop vacuum is “very nearly dustless.” For cleanup the NYC Department of Health says to use wet mops and cloths or a vacuum with a HEPA filter, and not to dry sweep or do anything else that stirs up dust. Work outside or in a well-ventilated space, and keep children and pets away.
How Long to Wait After Resin Cures
I won’t give you a number here, because it depends on the resin, the hardener, the temperature and the product. Polyester, vinylester and epoxy cure differently, and gelcoat and filler have their own sheets. The only reliable answer is the technical data sheet for the exact product you used, which gives the time and conditions for sanding or recoating. If you cannot find it, the surface is not ready if it is still tacky, soft or gums the paper. West System also warns that cured epoxy should be washed to remove amine blush before it is sanded or coated, which is part of the wait.
The Tools I’d Use
These are the tools I’d put in a fiberglass kit. I haven’t listed prices or customer ratings, because they change. Where I haven’t read a spec on the maker’s page, I haven’t stated one.
Mirka DEROS 650CV Electric Random Orbital Sander

Best Sander for Dust Control
For long sessions on a hull or a panel, a sander designed to connect to a vacuum is the biggest improvement you can make to the dust problem. The DEROS is the Mirka model I’d choose for it. The listing describes the 650CV as a brushless 6-inch hook and loop sander with a 5 mm orbit, variable speed, dust extraction and a weight of 2.4 lbs, which matters when you are holding it overhead on a hull.
Best For: Fairing and prep on larger flat or gently curved fiberglass panels.
Mirka Abranet 6 Inch Sanding Discs

Best Discs for Dust Extraction
Abranet is a net-backed abrasive, so dust can pass through the whole disc to a vacuum instead of loading the paper. It suits fiberglass because the dust is the problem. Check that the disc size matches your sander’s pad before you order, and read the listing for the grit you want.
Best For: Dry sanding with a vacuum attached to a 6 inch sander.
3M Wetordry Sandpaper
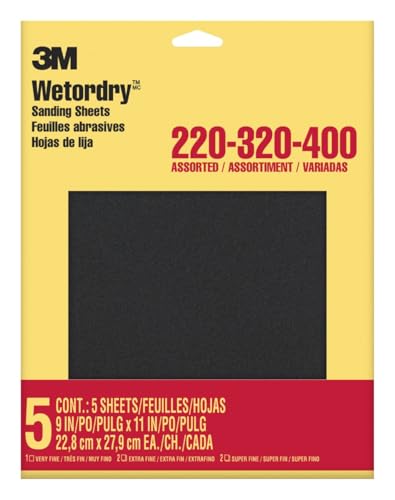
Best for Wet Sanding Gelcoat
Waterproof sheets are what you want for the 600 to 2000 steps. Wrap one around a flat block, keep the surface wet, and let the grit do the work rather than pressing. This pack is five 9 x 11 inch sheets of silicon carbide on waterproof paper in assorted grits; the listing doesn’t say which, so you may need single-grit sheets for the 1500 and 2000 steps. My wet sanding guide covers the technique.
Best For: Hand wet sanding and polishing prep on gelcoat.
3M 6291 Half Facepiece Respirator with P100 Filters
Best Ready-to-Use Respirator
The listing describes the 6291 as a NIOSH-approved medium half-facepiece assembly with 2091 P100 particulate filters included, on bayonet connections. That makes it a complete kit for sanding dust. Sizes differ, so match the size and do a fit check before relying on it.
Best For: Anyone who needs a complete respirator for fiberglass dust today.
3M 7502 Half Facepiece Respirator

Best for Longer Sessions
The 7502 is 3M’s silicone facepiece, medium size, with the Cool Flow valve and a drop-down harness. The listing is for the facepiece, which 3M approves for use with its cartridges, filters or supplied air, so plan to buy filters with it. It is for people who sand often and want a softer seal. Choose particulate filters for sanding dust, or combination cartridges if you are also working with resin or solvent products.
Best For: Frequent fiberglass and resin work.
Meguiar’s M105 Ultra-Cut Compound

Best for Polishing After Wet Sanding
After 2000 grit, the surface is smooth but hazy, and a compound brings the gloss back. The M105 is the Meguiar’s compound I’d pair with a wet-sanded gelcoat panel. Read the label for the pad and the directions, and see my page on rubbing compound vs polishing compound for when to compound and when to polish.
Best For: Restoring gloss to wet-sanded gelcoat.
How I Put This Guide Together
The health and cleanup advice comes from the New York City Department of Health’s fiberglass page. The 80 grit rule and the notes on blush, chalk sticks and dual-action sanders come from West System’s Epoxyworks articles, and the respirator, goggle and dust notes come from Good Old Boat’s piece on sanding fiberglass. The respirator, sander and sandpaper details come from their Amazon listings. The grit ranges in the table are common practice and not a maker spec, so the label on your product wins. Where I could not find a spec, I say it is not stated. More on how I choose the products I recommend.
🏆 The Verdict
Sand fiberglass with 80 grit for repairs, 120 to 180 for fairing, 220 to 320 before paint, and wet 600 to 2000 only to polish gelcoat. Protect your lungs first: a half-mask like the 3M 6291, plus goggles, gloves and long sleeves. Connect a Mirka DEROS to a vacuum if you will be sanding more than a patch.
❓ Frequently Asked Questions
What is the best way to sand fibreglass?+
What’s the best sandpaper for fiberglass?+
What is the best sander for sanding fiberglass?+
Is it bad to sand fiberglass?+
How long should you wait to sand fiberglass?+
Conclusion
Fiberglass is easy to sand well if you match the grit to the job, step up one grit at a time and keep the dust out of your lungs and off your skin. Start with the protection, choose the sander second, and polish only the gelcoat you are keeping. For the resin side of a repair, read how to sand epoxy resin, and for the finishing step see rubbing compound vs polishing compound.

