
As an Amazon Associate I earn from qualifying purchases. All claims are strictly my personal opinion.
HVLP sprayer used in this guide

HomeRight Super Finish Max HVLP Sprayer
Ships with 1.5, 2.0 and 4.0 mm tips and a fine air cap for furniture and cabinets; the pattern adjusts from 1 to 12 inches.

How to use a paint sprayer, in order: sand and clean the surface, mask everything you don’t want painted, strain the paint and thin it if your sprayer needs it, fit the right tip or nozzle, set the lowest pressure that gives a full pattern, practice on cardboard, then spray in straight, overlapping passes with the gun square to the surface and moving before you pull the trigger. Clean the sprayer as soon as you stop. The steps are the same for a dresser, a set of cabinet doors or a bedroom wall; what changes is the tip, the thinning and how far you hold the gun.
This guide is written from the finishing side: most bad spray jobs on furniture and cabinets fail in the prep, not at the trigger. The numbers below (distances, tip sizes, thinning, pressure) come from the sprayer makers’ own instructions, and where Wagner, Graco and HomeRight disagree, I say so.
⚡ Quick Answer
Prep: sand with 150 to 220 grit, remove the dust, mask with pre-taped plastic.
Paint: strain it; for an HVLP, thin about 5 to 15% and check it with a viscosity cup.
Spray: 10 to 12 in away with an HVLP, about 12 in with an airless; overlap each pass; trigger on and off past the edges.
After: flush the sprayer right away and wear a paint respirator the whole time.
What You’ll Use
A sprayer is only part of the kit. The cheap extras below solve the problems that make beginners give up: clogs, runs, dry spray and overspray on everything in the room.
| Product | Use it for | Price | Buy |
|---|---|---|---|
| ⭐ HomeRight Super Finish Max | HVLP for furniture, doors and cabinets | $$ | Shop Now at Amazon |
| Graco Magnum Project Painter Plus | Airless for rooms, whole kitchens, fences | $$$ | Shop Now at Amazon |
| TCP Global 190 Micron Strainers | Straining every fill | $ | Shop Now at Amazon |
| HomeRight Viscosity Cup | Checking the thinning | $ | Shop Now at Amazon |
| Flood Floetrol | Latex that levels and clogs less | $ | Shop Now at Amazon |
| U.S. Art Supply Cone Risers | Holding doors and panels off the bench | $ | Shop Now at Amazon |
| ScotchBlue Pre-Taped Plastic | Masking walls, trim and openings | $ | Shop Now at Amazon |
| 3M 6211 Paint Project Respirator | Breathing safely while you spray | $ | Shop Now at Amazon |
Know Your Sprayer First: HVLP, Airless or Compressor Gun
Every step in this guide applies to all three, but the tip, the thinning and the distance depend on which one you have. In short:
| HVLP (turbine) | Airless | Compressor gun | |
|---|---|---|---|
| How it atomizes | Lots of low-pressure air from a turbine | Paint pumped at high pressure through a tiny tip | Air from a separate compressor |
| You change | Nozzle size in mm, air cap, flow knob | Tip number (311, 413, 515), pressure knob | Needle and nozzle, fluid and air at the gun and regulator |
| Thinning | Usually, for fine finishing | Usually none | Usually, per the gun and paint |
| Best at | Furniture, doors, cabinets, clear coats | Rooms, ceilings, whole kitchens, exteriors | Shop finishing if you already own a big compressor |
| Overspray | Low | Highest | Depends on the gun |
HVLP
“High volume, low pressure” has a legal meaning in the US: the EPA’s definition is a gun designed and operated at 0.1 to 10 psi of atomizing air at the air cap. That gentle air is why an HVLP wastes less paint and is easier to control on a chair or a door, and also why it needs thinner paint than an airless.
Airless
An airless sprayer pushes unthinned paint through a tiny hole at very high pressure: Graco rates its Project Painter Plus at up to 2,800 psi. It covers a wall fast, but it puts out far more paint per second, so runs come quickly on small pieces until you learn the speed.
Compressed-Air and LVLP Guns
Cup guns that run off a shop compressor work like an HVLP once set up, but the compressor has to keep up with the gun’s air demand. Which type suits your projects is a question of its own: see my HVLP vs airless vs LVLP comparison.
How to Use a Paint Sprayer, Step by Step
1. Sand and Clean the Surface
A sprayer lays paint down perfectly flat, which means it shows every scratch, dent and dust nib under it. Wagner’s advice for a smooth finish is to sand raw or painted wood with 150 to 220 grit before spraying, so the paint has something to grip. On an old glossy finish, a scuff with 220 is enough; on bare wood, finish at 180 or 220 (my grit guide for wood has the full sequence). Fill holes, sand the filler flush, then vacuum and wipe off every bit of dust. On kitchen cabinets, degrease before you sand, as in my kitchen cabinet refinishing guide.
2. Set Up a Spray Area and Mask
Overspray travels further than you expect. Indoors, cover floors with a drop cloth and use pre-taped plastic on walls, windows and anything you aren’t painting. For furniture and doors, a garage or basement with plastic hung around the work area works well; Graco suggests setting cabinet doors on sawhorses so they’re at a comfortable height. Keep the area clean: dust in the air lands in wet paint. Ventilate, and turn off any appliances nearby, as Graco’s instructions say.
Outdoors, pick a calm day. Wagner suggests 70 to 80°F for a smooth finish, and Benjamin Moore says not to spray exteriors below 40°F or in direct sun, which dries paint too fast.
3. Strain and Thin the Paint
Strain every fill. Even a new can has skins and lumps, and one bit is enough to clog a nozzle or spit a blob onto a door. Pour through a cone strainer into the cup, or through a 5-gallon strainer bag for an airless.
Thin only as much as your sprayer needs:
- Airless: most paints go in unthinned. Graco says its Project Painter Plus sprays paints and stains unthinned, straight from a 1- or 5-gallon container.
- HVLP: HomeRight’s manual for the Super Finish Max says you may need to thin 5 to 15% for the best pattern. Wagner’s guide starts at 10% water and 90% paint for latex with its Detail Finish nozzle, adding a little at a time until the paint is like “pancake batter”. For oil-based paint, use the thinner on the can (usually mineral spirits), not water.
- Always: follow the paint maker’s limit. Many data sheets cap thinning at a set amount; more than that can hurt coverage and durability.
A viscosity cup takes the guesswork out: dip it, lift it and time how long it takes to empty. When the spray looks right, write that time down and thin every later batch to the same number. If you’d rather not thin latex with water, a conditioner such as Floetrol makes it level and flow better through a sprayer; dose it as the label says.
4. Pick the Right Tip or Nozzle
The tip decides how wide the fan is and how much paint comes out. Choose by the material and the size of the piece.
Airless tips use a three-digit code. Graco explains it this way: double the first digit for the fan width in inches, and the last two digits are the hole size in thousandths of an inch. A 515 sprays a 10-inch fan through a .015 hole. Smaller holes are for thin materials like stains and enamels, bigger ones for thick wall paints, and your sprayer has a maximum tip size (the Project Painter Plus tops out at .015).
| Airless tip | Fan | Use it for |
|---|---|---|
| 311 | 6 to 8 in | Sealers, transparent and semi-transparent stains (Wagner); water-based enamel on cabinets and small doors (Graco) |
| 413 ⭐ | 8 to 10 in | Solid stains, lacquer, enamel and polyurethane (Wagner); Graco calls an 8-inch fan with a .013 hole “the best control” for furniture |
| 515 / 517 | 10 to 12 in | Interior and exterior paints and primers, walls and ceilings |
| 619 | 12 to 14 in | Large exterior walls (only on sprayers rated for a .019 tip) |
HVLP nozzles are sized in millimeters. On the HomeRight Super Finish Max, the manual pairs the 1.5 mm tip with stains and polyurethane, the 2.0 mm with latex, chalk-type and milk paint on furniture and cabinets, and the 4.0 mm with primer and latex on walls, decks and fences. Its black air cap gives the fine pattern for furniture; the yellow one is the wide pattern for big areas. Tips wear: Graco says a worn tip sprays a narrower, heavier fan, and suggests replacing it after 15 to 40 gallons of latex.
5. Set the Pattern and Pressure
On an airless, Graco’s rule is to start at the lowest pressure, test, and turn it up a little at a time until the pattern is full, with soft edges and no heavy lines (“tails”) at the top and bottom. More pressure than that only adds overspray and wears the tip. Graco also suggests the lowest setting that still gives a good pattern for lighter materials, for better control and a finer finish.
On an HVLP, set the flow knob and the air cap instead. Wagner’s tip for its sprayers: a vertical pattern for side-to-side passes, a horizontal one for up-and-down passes. The droplets should be even and evenly spaced; big spatters mean the paint is too thick or the flow too high.
6. Practice on Cardboard
Every maker says the same thing: practice before the real piece. Graco suggests practicing with plain water first, then with paint on cardboard. A flattened box is perfect: you’ll see right away whether the pattern is full, whether the edges are heavy, and how fast you need to move to get a wet coat without runs. On cabinet doors, the back of a door is your second practice board.
7. Spray: Distance, Overlap and Trigger
- Distance. Graco says about 12 inches for its airless sprayers; Benjamin Moore says about a foot. For HVLP, HomeRight gives 10 to 12 inches and Wagner 6 to 12. Too far and the paint lands dry and rough; too close and it runs.
- Keep the gun square. Move your arm, not your wrist, and keep the gun at 90 degrees to the surface. Swinging it in an arc (Graco calls it fanning) makes the coat thick in the middle and thin at the ends.
- Trigger off the piece. Start moving, then pull the trigger; release it before you stop. That way the heavy start and stop of each pass land on the cardboard or in the air, not on the door.
- Overlap. Graco and Wagner both say to overlap each pass by about 50%, aiming the tip at the edge of the last pass. HomeRight’s manual suggests about a third of the pattern width for its HVLP. Either way, the goal is a coat with no stripes.
- Steady speed. One wet, even coat. Wagner warns that too light a coat leaves a sandpaper-like orange peel, and too heavy a coat sags.
💡 Pro Tip
Shine a work light across the surface at a low angle, as Wagner suggests. A wet coat shows thin spots and dry patches in raking light that you can’t see from the front.
8. Let It Dry, Sand Lightly and Recoat
Wait for the recoat time on the can. Wagner says paints are generally 3 to 6 hours, but the label rules, and cool or humid air makes it longer. Then scuff lightly with fine paper, remove the dust and spray the next coat. Wagner puts it simply: “nothing gets smoother by adding more paint, it only gets smoother by sanding between coats.” For grits and technique, see sanding between coats. Wagner also says most paints need 15 to 30 days to cure fully, so handle doors and tops gently for the first weeks.
Spraying Furniture and Cabinet Doors
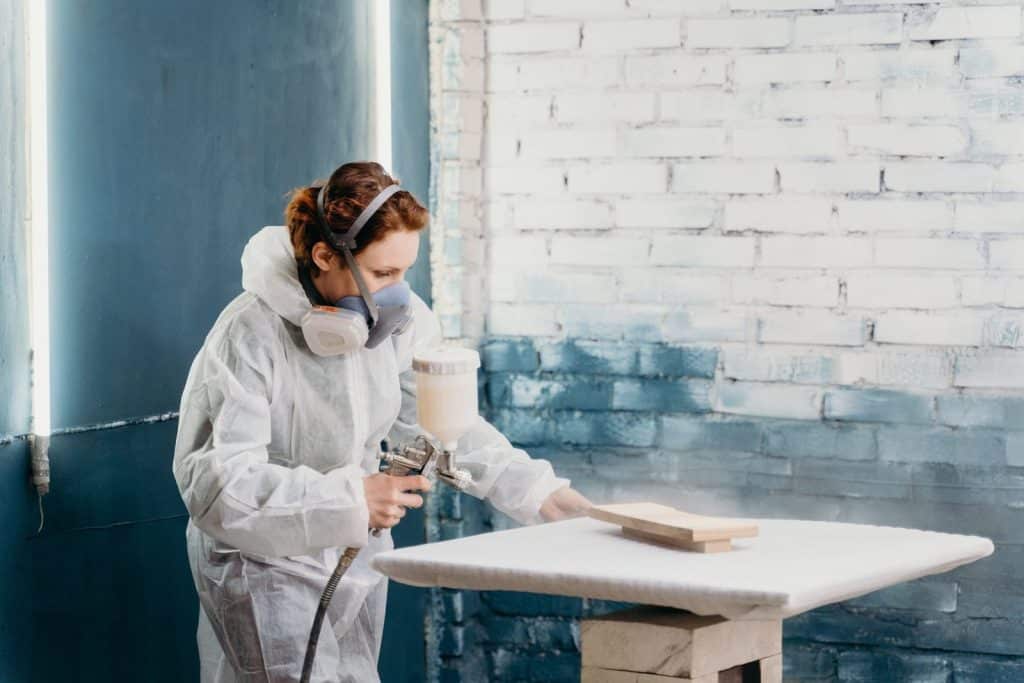
Furniture and cabinets are where a sprayer earns its keep: no brush marks, no roller stipple, and paint gets into raised panels and spindles in one pass. They’re also where runs show most, so the order and the setup matter.
Lay Pieces Flat When You Can
Wagner recommends spraying pieces lying flat rather than standing up: gravity pulls paint down a vertical door and makes runs, while a flat door lets the paint level. Set doors and panels on painter’s pyramids so the edges are clear of the bench and you can spray the edges without the paint sticking to the support.
The Order for a Dresser or Table
- Take off hardware and drawers. Graco says to use a screwdriver, not a drill, so you don’t strip the old screws.
- Spray from the top down and with the grain, in long, even passes, 12 inches away (Graco’s furniture instructions).
- Hit carvings, inside corners and legs first, then the flat surfaces, so the overspray from the details is covered by the final passes.
- Spray the drawer fronts separately, face up, with the drawer boxes masked.
The Order for Cabinet Doors
- Backs first. Spray the edges and the inside of the frame, then the flat panel.
- Let them dry completely before you turn them over. Graco is clear on this one; a door turned too soon is marked by the stands.
- Fronts last, the same way: profiles and edges, then the panel.
- For the cabinet boxes, Graco suggests the corners first, then fill in the middle.
Graco’s cabinet guide uses a 311 tip for water-based enamel because its narrow, 6-inch fan suits small doors. If your sprayer can switch between an oil primer and a water-based topcoat, Graco says to flush with mineral spirits after the oil primer, then again with water before the topcoat. Which paint to use is in my best paint for cabinets guide, and which sprayer suits a whole kitchen in best paint sprayer for cabinets.
Spraying Stain, Polyurethane and Lacquer
Clear finishes spray beautifully but run easily because they’re thin. Use a smaller tip (a 1.5 mm HVLP tip, or a 311 to 413 airless tip by Wagner’s chart), thin only as far as the finish’s label allows, and spray lighter coats. With stain, wipe off the excess as the can says, as you would if you brushed it. The coats, drying times and between-coat sanding are the same as with a brush, which I cover in how to apply polyurethane.
Walls, Ceilings and Exteriors
Interior Walls and Ceilings
Mask the trim, outlets and floor, and use a 515 or 517 tip on an airless. Graco says to spray the outside edges of a wall or ceiling first, then fill in the middle, and to aim straight into an inside corner so both walls get an even coat in one pass. Wagner suggests a coat of primer first when you go from a dark color to a light one. Then work in sections you can reach without leaning; on a ladder, Wagner says not to go higher than the second or third rung from the top.
Exterior Siding, Fences and Decks
Wind is the main enemy. Cover plants, cars and anything nearby, and stop when it gusts. Benjamin Moore suggests starting on a side of the house in indirect sun, where mistakes are easier to fix, spraying eaves and overhangs first, then corners and windows, then the walls from the top down. Keep the gun pointed at the wall, not down at the ground, on the bottom third so you don’t spray the foundation.
How to Clean a Paint Sprayer
Cleaning is the part nobody likes and the part that kills most cheap sprayers. HomeRight’s manual is blunt: dried paint acts like glue on the moving parts, and the sprayer should never sit longer than 30 minutes without being cleaned.
HVLP and Cup Sprayers
- Pour the leftover paint back into its can.
- Half-fill the cup with warm soapy water for latex, or the cleaner the paint maker names for oil-based paint (usually mineral spirits), and spray it through until it runs clear.
- Take apart the nozzle, air cap and pickup tube, and brush them clean.
- Let every part dry before you put it back together.
Airless Sprayers
- Release the pressure as your manual describes, then remove the tip and clean it separately.
- Flush water-based paint with water (the Project Painter Plus has a Power Flush adapter for a garden hose), and oil-based paint with mineral spirits.
- Clean the filters in the gun and at the intake.
- For storage, fill the pump with a storage fluid such as Graco’s Pump Armor, which comes in the box.
Spraying Safely
- Protect your lungs. Spraying turns paint into a fine mist you can breathe. Benjamin Moore says to never spray without a mask or respirator, goggles, a covered head and a painter’s suit. A dust mask isn’t enough for solvent-based finishes: use a half mask with organic vapor cartridges and particulate filters, like the 3M 6211. More options in my respirator guide.
- Never point an airless gun at anyone. Graco warns that airless pressure is high enough to pierce skin. Lock the trigger safety whenever you stop, and relieve the pressure before you change or clean the tip.
- Ventilate and keep flames, pilot lights and sparks away from solvent-based paints.
Troubleshooting a Bad Spray Pattern
| Problem | Likely cause | Fix |
|---|---|---|
| Runs and sags | Too much paint, gun too slow or too close | Turn the flow down, move faster, back off to the right distance |
| Dry, rough coat | Paint too thin or gun too far away | Add unthinned paint, move closer |
| Orange peel | Coat too light, or paint too thick to level | Slow down for a full wet coat; thin a little more (HVLP) |
| Stripes | Passes not overlapped, gun tilted | Aim at the edge of the last pass, keep the gun square |
| Heavy lines at the edges (“tails”) | Pressure too low for the tip (airless) | Raise the pressure a little at a time; if it’s at maximum, the tip is wrong or worn |
| Spitting and blobs | Lumps in the paint, dried paint on the tip | Strain the paint, clean the tip and air cap |
The causes and fixes follow HomeRight’s troubleshooting chart and Graco’s pressure instructions. To fix a run once it has dried, Benjamin Moore’s advice works on furniture too: sand it flat, then touch up and blend the spot.
The Tools and Products I’d Use
These are the products for the steps above, all on sale on Amazon. Specs come from the makers’ manuals, spec sheets and listings.
HomeRight Super Finish Max HVLP Sprayer
Best HVLP for Furniture and Cabinet Doors
A handheld HVLP built for the kind of work this site is about. It comes with 1.5, 2.0 and 4.0 mm tips (2.0 installed) and two air caps: the black one for a fine pattern on furniture and cabinets, the yellow one for decks and fences. The pattern adjusts from 1 to 12 inches with a knob, the motor is 450 watts, the cup holds 40 oz, and HomeRight says it needs less thinning than its smaller Finish Max. It sprays water- and oil-based paints, primers, stain, polyurethane and varnish.
- ✅ Three tips and two air caps in the box
- ✅ Fine pattern for furniture and doors
- ✅ Sprays clear coats as well as paint
- ❌ Thicker latex still needs some thinning
- ❌ A 40 oz cup means many refills on a whole kitchen
Best For: Dressers, tables, chairs, cabinet doors and clear finishes. More HVLP options in my best HVLP sprayer guide.
Graco Magnum Project Painter Plus
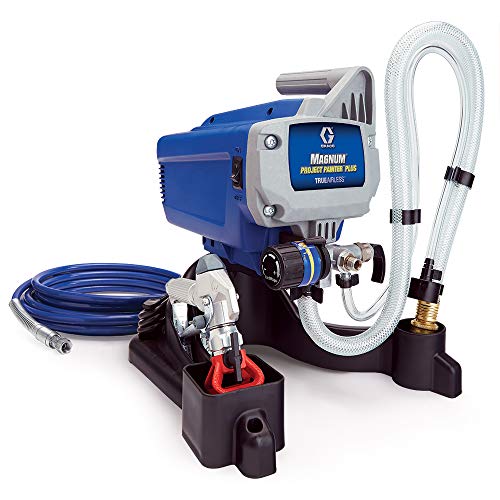
Best Airless for Rooms and Whole Kitchens
When the job is a room, a ceiling, a fence or every cabinet box in a kitchen, an airless is faster than any cup sprayer. Graco’s spec sheet gives the Project Painter Plus a maximum of 2,800 psi, tips up to .015 (.009 to .015), and a flexible suction tube that draws straight from a 1- or 5-gallon bucket. It ships with a 515 tip and a 25 ft hose (it supports up to 50 ft), and a Power Flush adapter lets you clean it with a garden hose. Add a 311 or 413 tip for doors and trim.
- ✅ Sprays most paint unthinned
- ✅ Pressure fully adjustable
- ✅ Garden-hose flushing
- ❌ More overspray than an HVLP, so more masking
- ❌ Needs a smaller tip bought separately for fine work
Best For: Walls, ceilings, exteriors and whole-kitchen cabinet jobs.
TCP Global 190 Micron Paint Strainers

Best for Straining Each Fill
Paper cones with a fine nylon mesh tip that catches particles down to 190 microns. Set one in the cup, pour, and the lumps that would clog a nozzle stay behind. A pack of 50 covers a lot of refills, and they work with water- and solvent-based paints, stains and varnishes.
- ✅ Fine 190 micron mesh
- ✅ Water- or solvent-based finishes
- ❌ Cone size suits cups and quarts, not 5-gallon buckets
HomeRight Viscosity Cup

Best for Repeatable Thinning
A simple gravity cup: dip it in the paint, lift it out and time how long it takes to drain. That time is your paint’s thickness as a number, so once you find the mix that sprays well, you can hit it again on the next batch instead of guessing by eye.
- ✅ Turns “pancake batter” into a number
- ✅ Works for paint, stain and varnish
- ❌ You need a timer and a note of your target time
Flood Floetrol Latex Paint Conditioner

Best Additive for Spraying Latex
Floetrol conditions latex and acrylic paint so it flows and levels and stays workable longer. Flood’s listing says it reduces tip clogging in sprayers and cup guns and helps latex spray more like an oil-based paint. It cleans up with soap and water. Add it at the dose on the bottle, and stay within your paint maker’s limits.
- ✅ Better leveling on doors and tops
- ✅ Fewer clogs
- ❌ Latex and acrylic only, not oil-based paint
U.S. Art Supply Cone Risers (20 Pack)

Best for Holding Doors and Panels
Small cones that lift a door or panel off the bench so you can spray the edges in the same pass and the paint doesn’t glue the piece to the table. The tips are rounded so they don’t dent the work, they’re rated to 200 pounds, and they nest for storage. Twenty is enough for several doors at once.
- ✅ Edges sprayed with the face
- ✅ Rounded tips, minimal marks
- ❌ Wait until the first side is fully dry before flipping
ScotchBlue Pre-Taped Painter’s Plastic

Best for Masking Fast
Plastic sheeting already attached to ScotchBlue painter’s tape, in a dispenser: run the tape along the trim or the top of a wall and the plastic unfolds to 48 inches below it. The tape has medium adhesion and 3M rates it for 21 days of clean removal, so it won’t lift the paint on the walls you’re protecting, and the plastic has a static cling that keeps it in place.
- ✅ Tape and plastic in one step
- ✅ Gentle on painted walls
- ❌ Floors still need a drop cloth
3M 6211 Paint Project Respirator

Best Respirator for Spraying
A complete kit for paint spraying: a reusable half mask with 3M 6001 organic vapor cartridges and 5P71 P95 particulate filters, both NIOSH approved. The cartridges handle solvent vapors from oil-based paints and finishes; the filters catch the paint mist itself. The bayonet mount takes other 3M cartridges later. This is the medium size; check the fit before you spray.
- ✅ Vapor cartridges and mist filters included
- ✅ NIOSH approved
- ✅ Replaceable cartridges and filters
- ❌ Medium only in this listing
Best For: Anyone spraying paint, primer, stain or clear finish indoors or in a garage.
How I Put This Guide Together
The distances, tip sizes, thinning amounts, pressure advice and cleaning steps come from the sprayer makers’ own instructions: Wagner’s how-to, smooth-finish and spray tip guides, Graco’s spray technique, tip selector, furniture and cabinet guides and the Project Painter Plus spec sheet, and HomeRight’s Super Finish Max manual. The weather and exterior advice is from Benjamin Moore’s spraying guide, and the HVLP definition from the EPA’s rule (40 CFR 63.11180). The sanding steps follow the same grits as my furniture and cabinet guides. I don’t show customer ratings or prices, which change daily. More on how I choose the products I recommend.
🏆 The Verdict
A good spray finish is decided before you pull the trigger. Sand to 220, mask with pre-taped plastic, strain every fill through a cone strainer, and thin to a time you’ve measured with a viscosity cup. For furniture and doors, an HVLP like the HomeRight Super Finish Max is the easiest to control; for rooms and whole kitchens, an airless like the Graco Project Painter Plus is faster. Whichever you use, practice on cardboard, keep the gun square and moving, and wear a paint respirator.
❓ Frequently Asked Questions
How do you use a paint sprayer for beginners?+
Do you dilute paint when using a sprayer?+
How difficult is it to use a paint sprayer?+
Do you put normal paint in a paint sprayer?+
Can you use a paint sprayer on interior walls and ceilings?+
How often should you clean a paint sprayer?+
Conclusion
Learning how to use a paint sprayer is mostly learning the order: sand and clean, mask, strain and thin, choose the tip, set the lowest pressure that gives a full pattern, then spray square and steady with the trigger off the piece. On furniture and cabinet doors, lay the work flat and do the backs first; on walls, edges before the middle. Clean the sprayer before you do anything else. If you’re refinishing a piece from start to finish, the sanding and stripping steps come first in how to refinish wood furniture.

