
As an Amazon Associate I earn from qualifying purchases. All claims are strictly my personal opinion.
Scroll saw used in this guide
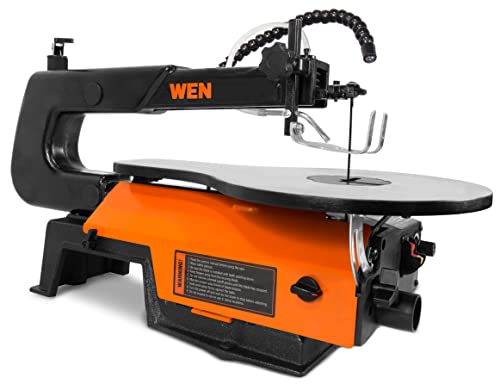
WEN 3923 16-Inch Variable Speed Scroll Saw
Its side panel flips open for blade changes, it takes pinned and pinless blades, and it runs 550 to 1,600 strokes per minute.

To use a scroll saw, bolt it to a solid bench, unplug it, and fit a blade that suits your wood with the teeth pointing down toward the table. Tension the blade until it pings when plucked, set the hold-down foot so it just rests on the workpiece, start at a middle speed, and feed the wood slowly into the blade with both hands flat on the table, turning the work, not pushing it, around curves.
This guide takes you from a saw in its box to your first finished pattern: safety, setup, blades, tension and speed, practice cuts, inside cuts and the problems every beginner runs into. The settings come from the WEN and DEWALT manuals and Olson’s blade chart. If you haven’t bought a saw yet, start with my guide to the best scroll saws.
⚡ Quick Answer
Blade: teeth down and facing you. Start with a #5 for 1/2 to 3/4 inch softwood; finer for thin stock, coarser for thick.
Tension: tight enough to ping at a high note when plucked. Slack blades wander; over-tight blades snap.
Speed: start in the middle. Go slower for hardwood, thin stock, plastic and tight turns.
Feed: slow and steady, hands flat on the table, hold-down foot just touching the wood. Let the blade cut.
What You’ll Use
A scroll saw, a pack of decent blades and a way to put a pattern on the wood are all you need for a first project. These are the products the steps below refer to; the facts come from the makers’ manuals and listings.
WEN 3923 16-Inch Variable Speed Scroll Saw
The Saw Used in This Guide
Any variable-speed scroll saw works with the steps below, but a first saw should make blade changes painless, because you’ll change and rethread blades constantly. The WEN 3923 does that well: its side panel flips open to reach the lower blade holder, and it takes both pinned and pinless 5-inch blades. WEN lists a 16-inch throat, 550 to 1,600 strokes per minute, a 2-inch cutting capacity at 90 degrees and a table that tilts up to 45 degrees left, plus a cast-iron base, an air pump, a dust port and a hold-down foot. Its manual is unusually clear, which is why several settings below quote it.
- ✅ Side panel opens for the lower blade holder
- ✅ Takes pinned and pinless blades
- ✅ Variable speed from 550 to 1,600 SPM
- ❌ C-arm vibrates more than a parallel-link saw
- ❌ Table tilts to the left only
Best For: Beginners who want easy blade changes and room to grow into pinless blades.
Olson FR49202 Reverse Tooth Blade Assortment

Blades to Learn With
The blades that come with a saw are only enough to start. This Olson assortment gives you 36 plain-end (pinless) 5-inch blades, 12 each of three sizes, all with reverse teeth at the bottom for a cleaner underside. Olson rates the #5R (12.5 TPI) for hardwood up to 1/2 inch and softwood up to 3/4 inch, the #7R (11.5 TPI) for hardwood up to 3/4 inch and softwood up to 1-1/2 inches, and the #12R (9.5 TPI) for heavy cutting in hardwood up to 1-1/2 inches and softwood up to 2 inches. Plain-end blades need clamp-style holders, which the WEN 3923 has.
- ✅ Three useful sizes in one pack
- ✅ Reverse teeth reduce underside tear-out
- ✅ Maker rates each size by wood thickness
- ❌ Plain-end only, not for pin-only saws
- ❌ No very fine sizes for thin fretwork
Best For: Learning which blade size suits which thickness without buying single packs.
Krylon Easy Tack Repositionable Adhesive Spray

To Stick the Pattern
Most scroll saw projects start with a paper pattern stuck to the wood. A repositionable spray adhesive holds the paper flat while you cut and lets it peel off afterwards. Krylon describes Easy Tack as a non-wrinkling, low-odor adhesive that works on wood and paper and lets you adjust, remove and reapply the material. It’s extremely flammable, so spray it away from the saw. A glue stick also works on small pieces.
- ✅ Repositionable, peels off cleanly
- ✅ Non-wrinkling on paper
- ✅ Low odor
- ❌ Flammable aerosol
- ❌ Overspray is tacky, so spray over scrap paper
Best For: Holding printed patterns flat on wood and removing them without residue.
Scotch Heavy Duty Packing Tape

Over the Pattern
Clear packing tape over the pattern is an old scroller’s trick: it lubricates the blade, so it runs cooler and leaves fewer burn marks in hardwoods, and it stops the paper from tearing at tight turns. Any clear tape works; this 1.88-inch roll comes on a dispenser, which makes it quick to lay overlapping strips across a pattern.
- ✅ Reduces burning in hardwood
- ✅ Keeps the pattern from tearing
- ✅ Comes with a dispenser
- ❌ Can lift on rough, unsanded stock
Best For: Covering patterns on hardwood and on any project with tight turns.
You’ll also need a drill with small bits for inside cuts, safety glasses, a dust mask, a bright light aimed at the blade, and 120 and 180 grit sandpaper. Practice stock can be any flat 1/2 to 3/4 inch pine or poplar; for thin ornaments, 1/4 inch Baltic birch plywood cuts cleanly.
Scroll Saw Safety: What the Manuals Insist On
A scroll saw is one of the gentler power saws, because the blade is thin and moves up and down rather than spinning, but it still cuts fingers. These rules come from the WEN and DEWALT manuals:
- Unplug before you touch the blade, whether you’re changing blades, adjusting anything or doing maintenance.
- Never start the saw with the wood touching the blade. Both manuals warn that it can lift the workpiece and break the blade.
- Keep the hold-down foot in place. DEWALT says never to remove it, because it also acts as a barrier between your fingers and the blade.
- Keep your fingers out of the blade’s path, avoid awkward hand positions, and don’t cut pieces too small to hold safely.
- No gloves, loose sleeves or jewelry, and tie back long hair.
- Wear safety glasses, plus a dust mask when the cut is dusty.
- Never reach under the table while the motor is running.
- If the blade jams, turn the saw off and unplug it, wedge the kerf open and back the blade out. WEN notes that a jam is usually sawdust packed into the cut line.
Scroll sawing makes fine dust, MDF in particular. A shop vacuum on the dust port and a proper mask help; my guide to the best respirators for woodworking covers which filters to use.
Set Up the Saw
1. Bolt It Down
Both WEN and DEWALT tell you to fix the saw to a workbench or stand through the holes in the base. A loose saw walks and vibrates, and vibration makes the line hard to follow. Set it at a height where you can see the blade without hunching.
2. Square the Table to the Blade
The bevel scale is set at the factory, but check it. With a blade tensioned and the hold-down foot raised, loosen the bevel lock, hold a small combination square against the blade, adjust the table until the square sits flat, and lock it, as WEN’s manual describes. A table a degree or two off bevels every edge slightly, which shows on puzzles and stacked cuts.
3. Set the Hold-Down Foot and Blower
Adjust the hold-down foot so it is parallel to the table and just rests on the workpiece. It stops the wood lifting and chattering on the upstroke. Point the dust blower at the cut line; DEWALT adds that it should blow dust away from you.
Choose the Right Blade
Scroll saw blades are numbered: the higher the number, the wider and thicker the blade and the fewer teeth per inch (TPI). Olson’s rule is simple: lower numbers for thinner stock, higher numbers for thicker stock. Smaller blades turn tighter curves but break more easily; larger blades last longer and cut thick wood faster.
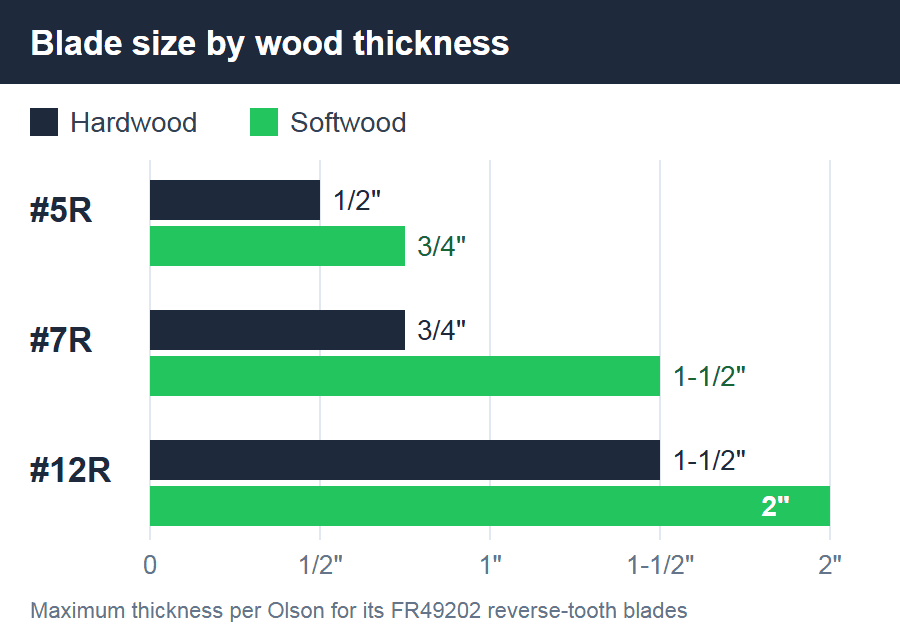
For a first project in 3/4 inch pine, a #5 reverse-tooth blade is the usual starting point. Drop to a #2 or #3 for 1/4 inch plywood and fine fretwork, and step up to #7 or larger for thick hardwood. Two other things to know:
- Reverse-tooth blades have a few teeth near the bottom pointing up. They cut the underside cleanly on the upstroke, so you sand less. Most scrollers use them for almost everything.
- Pinned vs pinless: pinned blades hook into the holders and are the easiest to fit, but need a larger starting hole for inside cuts (WEN’s manual calls for 1/4 inch). Pinless blades clamp in, thread through a hole as small as 1/16 inch and come in many more sizes. My scroll saw roundup explains the difference in more detail.
Keep at least three teeth in the wood at all times, a rule from WEN’s troubleshooting chart: in very thin material, a coarse blade snags and breaks, so use a finer one.
How to Install and Tension a Scroll Saw Blade
- Unplug the saw and release the tension with the tension lever or knob.
- Check the teeth. Hold the blade so the teeth point down, toward the table, and face the front of the saw. Scroll saws cut only on the downstroke; DEWALT calls this essential. Run a fingernail down the blade if you can’t see the teeth: it catches going down.
- Clamp the bottom end first. Slip the blade through the table slot into the lower holder and tighten the thumbscrew (pinless) or hook the pins into the recess (pinned).
- Clamp the top end. Press the upper arm down if needed, seat the blade in the upper holder and tighten it.
- Apply tension. Close the tension lever or turn the knob until the blade is taut.
How tight is right? WEN’s manual says a properly tensioned blade makes a high C note (C6, about 1,047 Hz) when plucked. Olson puts it another way: pushed with reasonable force, the middle of the blade should move no more than 1/8 inch front to back. Too little tension and the blade wanders and cuts poorly; too much and it snaps. A brand-new blade stretches when first tensioned, so check it again after a minute of cutting. When you’re done for the day, DEWALT recommends releasing the tension or removing the blade.
Set the Speed
Variable-speed saws run from a few hundred strokes per minute up to about 1,600 or 1,750 (WEN and DEWALT, respectively). WEN suggests starting with the speed knob in the middle. From there:
- Slower for hardwoods, very thin material, plastics and metals (DEWALT’s list), and whenever you’re learning a tight curve.
- Faster for thick softwood and long, gentle cuts where the blade needs to clear sawdust.
- If the saw shakes at one setting, nudge the speed up or down. WEN’s troubleshooting chart lists running at a harmonic frequency of the saw as a cause of vibration.
Speed and feed rate go together. If the wood starts to burn or the blade bows backward, you’re pushing faster than the blade cuts: slow your feed before you change the speed.
Your First Cuts: Practice Before the Project
Spend fifteen minutes on scrap first. Draw straight lines, wavy lines, circles and a zigzag on a piece of 3/4 inch pine and cut them.
Feed With Both Hands Flat
Rest both hands flat on the wood, fingertips well to the sides of the blade, and press down lightly so the piece stays on the table. Push gently toward the blade and let it cut; DEWALT’s instruction is to feed fast enough to let the blade cut but never force it. Guide with your fingertips, not your arms.
Steer by Turning the Wood
The blade stays put; the workpiece pivots around it. On a curve, rotate the wood slowly, a little ahead of the turn. Push sideways on the blade and it bends, drifts and breaks. Blades also tend to follow the grain, so be ready to steer slightly against the drift, as WEN’s manual warns.
Sharp Corners and Long Curves
For an outside point, cut to the corner, then cut a small loop in the waste to swing around and come back along the next line. For an inside corner with a fine blade, pivot on the spot while the blade cuts in place. On long curves, DEWALT recommends relief cuts, short cuts from the edge to the line, so waste falls away and the blade doesn’t bind.
Your First Pattern, Step by Step
Pick something simple with gentle curves and one or two inside openings: an ornament, a name sign with block letters, a small animal silhouette. Print it at the size you want.
1. Prepare the Wood
Sand the face of the board smooth with 120 to 180 grit before applying the pattern; it’s much easier now than after the piece is cut into small shapes. See my sandpaper grit chart if you’re unsure which grit to use.
2. Stick the Pattern Down
Spray a light coat of repositionable adhesive on the back of the paper, wait for it to turn tacky, and smooth it onto the wood, with any long, thin parts running with the grain so they’re stronger. Cover it with overlapping strips of clear packing tape.
3. Drill the Starting Holes
Every enclosed opening needs a hole to thread the blade through. Drill it in the waste, close to a line or corner, never on the line. Use a 1/16 inch bit for a #5 pinless blade (the pilot-hole size on Olson’s chart) or 1/4 inch for pinned blades, as WEN’s manual specifies. Put scrap under the piece so the drill doesn’t splinter the back.
4. Cut the Inside Openings First
Inside cuts come before the outline, because the full board is easier to hold and support. For each opening:
- Turn the saw off and unplug it, release the tension and free the top end of the blade, leaving it in the lower holder.
- Lower the workpiece over the blade so it passes through the drilled hole.
- Clamp the top of the blade, re-tension it and lower the hold-down foot onto the wood.
- Plug in, start the saw and cut the opening. When the waste drops free, turn the saw off, unplug, release the tension and lift the piece off.
5. Cut the Outline
Start the outer cut from the edge of the board in the waste, come onto the line at a shallow angle, and work around the shape. Cut just on the waste side of the line so the edge needs little sanding. Use relief cuts on long curves and loops on sharp points as you practiced.
6. Remove the Pattern and Finish
Peel the tape and paper off; a little mineral spirits on a rag removes leftover adhesive. Break the sharp edges with 180 grit; on curved edges, a spindle sander or a detail sander speeds things up. Then finish as you would any small project.
💡 Pro Tip: Wax the Table
WEN recommends a coat of paste wax on the saw table now and then so the wood glides instead of catching. Smooth movement makes it far easier to follow a line, because you’re steering instead of fighting friction. Wipe the excess off well so it doesn’t transfer to your project.
Common Scroll Saw Problems and Fixes
- Blades keep breaking: tension set too high, a blade too fine for the stock, too much forward or sideways pressure, or a blade fitted with the teeth up. WEN lists all four.
- The cut wanders off the line: a dull blade, too little tension or the grain pulling the blade. Scroll saw blades wear out fast: WEN puts their sharp life at half an hour to two hours of cutting, depending on wood and cut. Change blades more often than feels necessary.
- Burn marks: a dull blade, feeding too slowly in one spot, or hardwood without tape over the pattern. Fit a fresh blade and keep the work moving.
- The wood jumps or chatters: the hold-down foot is too high, the blade is upside down, or you started the saw with the wood against the blade.
- Too much vibration: the saw isn’t bolted down, the tension is wrong, or the speed sits at a harmonic.
- Fuzzy underside: switch to reverse-tooth blades, or put thin plywood under the work as a backer.
🏆 The Short Version
A beginner-friendly saw like the WEN 3923, a pack of Olson reverse-tooth blades and a pattern held on with repositionable adhesive and packing tape are all you need. Fit the blade teeth-down, tension it until it pings, keep the hold-down foot on the work and feed slowly.
❓ Frequently Asked Questions
How do I learn to use a scroll saw as a beginner?+
Are scroll saws hard to use?+
What are some common scroll saw mistakes?+
How do you use a scroll saw to cut plywood?+
Should you wear gloves when using a scroll saw?+
How often should you change a scroll saw blade?+
Conclusion
Using a scroll saw well comes down to a few habits: a saw that’s bolted down and square, the right blade at the right tension, and a slow, steady feed. Practice on scrap, then cut a simple pattern with an inside opening or two, and you’ll have the basics for ornaments, signs, puzzles and fretwork. Questions about your saw or a project? Ask in the comments.

