

As an Amazon Associate I earn from qualifying purchases. All claims are strictly my personal opinion.

Your bowling ball’s surface is one of the most important — and most overlooked — variables in your game. The coverstock texture directly controls how much friction the ball generates against the lane, which determines hook potential, entry angle, and pin carry. Over time, oil from the lanes soaks into the coverstock and fills the microscopic pores that create that friction. The ball gets shiny, hooking stops, corner pins start appearing, and no amount of adjustment to your delivery fixes it. Sanding is the solution.
Done correctly, sanding restores a bowling ball’s surface to its original performance specification — or adjusts it to a new one that suits different lane conditions. This comprehensive guide covers everything: when to sand, what grit to use, wet vs dry technique, hand sanding vs machine, how to add or reduce surface, and how often you can do it before the ball needs replacing.
⚡ Key Takeaways
- Surface texture controls up to 70% of a bowling ball’s hook potential — sanding is the primary tool to adjust friction and lane reaction.
- Grit selection is critical: 500–800 for heavy oil patterns (maximum friction), 1000–1500 for medium conditions (balanced), and 2000+ for dry lanes (maximum length).
- Maintenance sanding every 60–100 games keeps your ball hooking consistently; a ball spinner produces far more even results than hand sanding alone.
- You can sand a bowling ball 20–30 times before the coverstock thins too much, as long as each session uses proper technique and appropriate grit.
- Always clean the ball thoroughly before sanding and inspect the surface under good light after each grit stage to catch uneven areas.
ℹ️ What Sanding Actually Does to a Bowling Ball
Sanding creates microscopic scratches and texture in the coverstock surface. A rougher surface (lower grit number) means more friction against the lane — stronger, earlier hook with more overall hook potential. A smoother surface (higher grit number) means less friction — the ball skids further down the lane before transitioning into the hook phase. This is why surface adjustment is a genuine competitive tool, not just routine maintenance.
If you’re looking to learn more about the fundamentals of ball care and lane prep, check out the SanderScore blog for additional resources on equipment maintenance and DIY techniques.
🎯 When Should You Sand Your Bowling Ball?
There are two distinct reasons to sand a bowling ball — maintenance and performance adjustment — and understanding the difference helps you choose the right grit and timing:
- Maintenance sanding — When the ball has lost its hook due to oil absorption and surface wear. Signs it’s time: the ball is hooking less than it used to, it skids through the mid-lane instead of transitioning cleanly, the surface looks shiny where it used to have a matte or textured finish, or you’re leaving corner pins consistently. Recommended interval: every 60–100 games, or once per season for regular league bowlers.
- Performance adjustment — Deliberately changing the surface grit to suit lane conditions. Heavier oil patterns call for rougher surfaces (lower grit) to create enough friction on oily lanes. Lighter or drier conditions call for smoother surfaces (higher grit) to prevent the ball from hooking too early and burning up before the pins.
⚠️ Check Your Ball’s Warranty First
Some bowling ball manufacturers include specific guidelines for surface alterations in their warranty terms. Sanding with non-approved abrasives or exceeding certain surface changes can void a warranty. Check the manufacturer’s documentation before altering a new ball, particularly an expensive reactive resin coverstock.
🧹 What Grit Sandpaper for a Bowling Ball?
Grit selection is the most important decision in bowling ball sanding because it directly determines your ball’s performance characteristics:
- 500–800 grit — Aggressive surface. Maximum friction, earliest hook transition, highest overall hook potential. Used for heavy oil patterns where the ball needs to grip the lane early. Also the starting point for restoring a heavily worn or oil-saturated ball.
- 1000–1500 grit — Medium surface. Balanced between friction and length. A versatile all-around surface that suits medium oil patterns. This is where most recreational and league bowlers want their ball.
- 2000–4000 grit — Smooth surface. The ball skids further before transitioning — more length, less hook, better control on dry or lightly oiled lanes. Also useful for reactive resin balls that hook too aggressively on your local conditions.
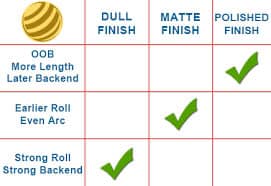
- Polish — Smoother still. Polished balls have the most length and the least friction. Typically used on dry house shots or when a ball is over-hooking for the conditions.
💡 Pro Tip
Solid reactive coverstocks are naturally more aggressive — they benefit from higher grit (smoother) surfaces to balance their inherent oil absorption. Pearl reactive coverstocks are smoother and benefit from lower grit (rougher) surfaces to add the friction they naturally lack. Hybrid coverstocks sit in the middle. Understanding your ball’s coverstock type helps you choose the right grit for your specific conditions.
🔧 How to Sand a Bowling Ball: Step-by-Step
Follow this detailed process to sand your bowling ball evenly and achieve the surface characteristics you need:
Step 1: Clean the Ball Thoroughly
Before any sandpaper touches the ball, clean it completely. Use a bowling ball cleaner or isopropyl alcohol with a microfibre towel to remove all lane oil, dirt, and debris from the surface. Any contamination trapped under the sandpaper will create uneven abrasion and score the surface unevenly. Let it dry completely before proceeding.
Step 2: Choose Your Grit
Based on the guidance in the grit section above, select the appropriate starting grit for your goal. For maintenance restoration, start at 500–800 and work up to your desired finish grit. For a minor adjustment or light refresh, start one grit coarser than your target finish.
Step 3: Sand in Consistent Circular Motions
Apply the sandpaper to the ball’s surface and work in consistent circular motions, rotating the ball regularly to ensure even coverage across the entire surface. Apply moderate, even pressure — the sandpaper does the work, not force. Check frequently that you’re covering all areas of the ball, not focusing on one section at the expense of others. Uneven sanding creates an inconsistent surface that produces unpredictable ball motion.
💡 Pro Tip
A ball spinner holds the ball on a rotating spindle while you apply the sandpaper — this produces far more consistent, even coverage than hand-rotating the ball. If you’re sanding regularly, a spinner is worth the investment. It eliminates the flat spots and uneven texture that hand rotation almost inevitably produces.
Step 4: Work Through the Grit Sequence
If you’re restoring a heavily worn ball or making a significant surface change, work up through multiple grits to your target finish. Each grit removes the scratch pattern left by the coarser one before it. For a simple maintenance refresh at a single grit, one thorough pass at the target grit is sufficient.
Step 5: Clean and Inspect
After each grit stage, wipe the ball clean with a microfibre cloth and inspect the surface under good light. The surface should be consistently textured with no shiny spots (which indicate unevenly sanded areas) or scratches deeper than the current grit pattern. Any inconsistencies should be addressed before moving to the next grit.
Step 6: Apply Polish (If Desired)
If your target finish calls for a polished surface, apply bowling ball polish with a clean microfibre cloth in circular motions after reaching 2000+ grit. Buff to an even sheen. Polish adds length and reduces friction — only apply it if that’s the ball reaction you’re looking for.
Step 7: Final Clean and Test
Wipe the ball thoroughly with a clean cloth to remove all sanding residue and polish. The ball is ready to bowl. Pay attention to its reaction during the first few frames — this is your feedback on whether the surface adjustment achieved what you were looking for.
💧 Wet Sanding vs Dry Sanding a Bowling Ball
Both techniques work effectively, and each has distinct advantages worth understanding before you choose:
- Wet sanding — Apply a small amount of water (or a water/ball cleaner mix) to the sanding pad or surface. The water lubricates the surface, prevents heat build-up that can damage the coverstock at high friction, keeps the sandpaper from loading up too quickly, and suppresses dust. Wet sanding generally produces a more consistent, smoother result and is the preferred method for fine grits (1000+). The main downside is slightly less tactile feedback about how aggressively you’re cutting.
- Dry sanding — Faster material removal, more tactile feedback, no setup required. Better suited to the coarser grits (500–800) where speed matters more than refinement. The risk is heat build-up on the coverstock with sustained pressure — keep the sander moving and take breaks to feel the ball’s surface temperature.
For a complete restoration starting at 500 grit, I recommend a practical hybrid approach: dry sanding the initial coarse passes and switching to wet sanding from 1000 grit onwards for the refinement stages.
✋ How to Sand a Bowling Ball By Hand
You don’t need a machine to sand a bowling ball effectively — it’s one of those tasks that hand sanding handles well with the right technique and tools. Here’s what you need to gather:
- Sandpaper sheets at your chosen grits (500–2000 wet/dry paper is ideal)
- A bucket of warm water for wet sanding stages
- Microfibre towels for cleaning between stages
- A clean, stable surface to work on
Place the ball in a bowl or on a non-slip surface so it doesn’t roll while you work. Wrap a piece of sandpaper around a flat foam block for flat-section work, or hold it folded for curved areas. Work in consistent circular motions across the entire ball, rotating it frequently. Change the sandpaper as soon as it stops cutting efficiently — loaded paper smears rather than cuts and produces an inconsistent surface.
💡 Pro Tip
Fresh sandpaper on a bowling ball loads up quickly with coverstock material and lane oil residue. Change sheets every 10–15 minutes for coarser grits, or as soon as you notice the paper sliding rather than abrading. Continuing with loaded paper wastes effort and time — fresh paper always cuts more efficiently.
🔄 Bowling Ball Sanding Machines and Spinners
A dedicated bowling ball spinner is the tool that makes consistent sanding significantly easier. It holds the ball on a rotating spindle at a consistent speed, leaving both hands free to apply the sandpaper evenly. The consistent rotation eliminates the flat spots and uneven texture that hand-rotating the ball almost inevitably creates, particularly over multiple sanding sessions.
For those who sand frequently — league bowlers who resurface every season, or anyone who wants to adjust surface for different shot patterns — a spinner is a worthwhile investment. There are affordable tabletop options designed exactly for this purpose, and they pair beautifully with the sanding pads designed specifically for bowling ball use.
⏱️ How Many Times Can You Sand a Bowling Ball?
There’s no fixed limit — it depends on how aggressively each sanding session removes material. A light surface refresh at fine grit removes almost no material. A full restoration starting at 500 grit removes more. Most bowlers resurface their ball 20–30 times before retiring it, as long as each session uses appropriate technique. The practical indicators that a ball has been over-sanded: the surface feels noticeably softer or more flexible than new, it no longer responds to surface changes as expected, or it’s developed visible flat spots from uneven sanding history.
🎯 How to Dull a Bowling Ball
If your ball is hooking too aggressively for your lane conditions — producing an early, over-sharp break that misses the pocket — dulling the surface reduces friction and adds length. The process is identical to standard sanding: start at a grit appropriate for the amount of friction reduction needed (typically 500–800 for a significant dull, 1000–1500 for a modest adjustment), sand evenly across the entire surface, and test on the lanes. Less is more when dulling — over-aggressive sanding is harder to reverse than not going far enough.
ℹ️ The Importance of Even Coverage
Research from the National Bowling Academy emphasizes that uneven surface texture creates unpredictable ball motion. The entire ball surface must meet USBC specifications — one flat spot or thin area creates inconsistent friction that will derail your shot shape and accuracy on the lanes.
✨ The Bottom Line
Sanding your bowling ball is one of the most impactful performance tools available — surface texture directly controls friction, hook potential, and lane reaction. Start with the right grit for your conditions, use consistent circular motions with even coverage, and test your results on the lanes. A ball spinner makes the process easier and produces superior results, but hand sanding works perfectly well with patience and proper technique. Experiment with different grit levels and pay attention to how the ball reacts — you’ll quickly develop a feel for what your game needs.
❓ Frequently Asked Questions
How to sand a bowling ball properly?+
What grit should I use to sand my bowling ball?+
Can I sand my own bowling ball at home?+
How do I know if my ball needs sanding or just cleaning?+
Can I use an orbital sander on a bowling ball?+
🏁 Final Thoughts
Surface maintenance is one of the most impactful — and most underused — performance tools available to any serious bowler. A correctly sanded ball matched to your lane conditions performs better than the same ball with the wrong surface regardless of price or technology. The investment is minimal (sandpaper and a cloth), and the reward is significant: more consistent hook, better pin carry, and a tangible improvement in your scoring consistency.
Start by tracking your current ball’s performance over a few games, then experiment with different grit levels. Pay close attention to how the ball reacts at each stage — you’ll quickly develop a feel for what your game needs. Test one grit adjustment at a time so you can clearly see what changed. In just a few bowling sessions, you’ll understand surface better than most bowlers ever will. Good luck on the lanes!
